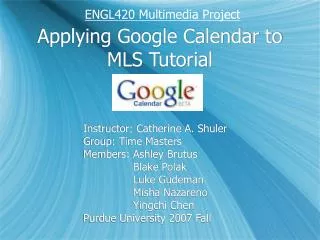
Applying Google Calendar to MLS Tutorial
Applying Google Calendar to MLS Tutorial. Purdue University Time Masters: Ashley Brutus Yingchi Chen Luke Gudeman Misha Nazareno Blake Polak. What is Google Calendar?. Free online shareable calendar service Maintained by a 3 rd party server: Google Corporation

Applying Google Calendar to MLS Tutorial
E N D
Presentation Transcript
Applying Google Calendar to MLS Tutorial Purdue University Time Masters: Ashley Brutus Yingchi Chen Luke Gudeman Misha Nazareno Blake Polak
What is Google Calendar? • Free online shareable calendar service • Maintained by a 3rd party server: Google Corporation • Features: adding and sharing calendar events
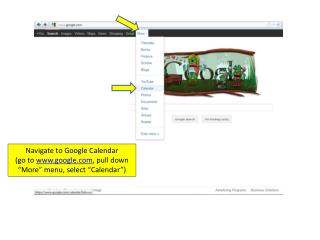
Creating a Google Account: Step 1 • Go to: www.google.com/calendar
Creating a Google Account: Step 2 • Click on the link: “Create a new Google Account”
Creating a Google Account: Step 3 • Enter the required information: -Email address, name, password, country, time zone, word verification • Agree to Terms of Service
Creating a Google Account: Step 4 • Go to your previously provided email account • Open verification email sent by Google • Click on the verification link
Getting Started with Google Calendar Now that an account has been created, Let’s get started with using the Google Calendar
Different Views of Google Calendar • Views can be switched on Calendar by clicking on the view tabs. • This is the day view.
Different views of Google Calendar Week View Month View
Different views of Google Calendar Next 4 days View Agenda View
Scrolling Through the Calendar • Scroll through calendar by clicking on the “forward” and “backward” tabs • The Keyboard shortcuts for this are “k” forward and “j” backward
Displays of Google Calendar • Groups of days can be compared side by side if the user highlights the dates together on the mini calendar. • They will then be shown on the calendar so one can compare what is going on each day.
Popup Windows On Google Calendar • When events re clicked, a popup appears with additional information of the event.
Adding an Event with a Forum: Step 1 • Click ‘Create Event’ located in the upper left hand corner of the Google Calendar screen
Adding an Event with a Forum: Step 2 • Fill out the required information for your event
Adding an Event with a Forum: Step 3 Click ‘Save’ and the event will appear on the calendar
Adding an Event with a Forum: Step 4 • To edit the event double click on the event and make the necessary changes • This Box will reopen and edits can be made at any time
Importing Events from Other Programs: Step 1 • Click on ‘Add’ above the ‘My Calendar’ box on the left hand side of the Google Calendar page
Importing Events from Other Programs: Step 2 • After clicking on ‘Add’ select ‘Import Calendar’ from the pop-up box
Importing Events from Other Programs: Step 3 • Select the File of the Calendar from another program • Complete Steps 2 and 3 by pressing the ‘Import’ button
A Special Note on Gmail • When an invitation is received look to the left of your Gmail toolbar • There will be a ‘Calendar’ choice on the task bar • Follow the instructions and the invitation will be added to the Google Calendar
Sending Invitations: Step 1 • Click on the ‘Create Event’ on the left side of the calendar
Sending Invitations: Step 2 • Fill out the Forum • The Guest’s emails should be entered in the Guest section • Email Addresses should be separated by commas
Guest RSVP’s • When you receive a conformation email the person’s information will be updated to the event’s information • (note: The recipient does not need to have Google Calendar) • This is what a guest will receive • They are able to accept or deny the invitation • The Calendar will receive information of the guests status when the RSVP
Guest Comments • Those invited to events have the opportunity to comment on the invitation page at the time they RSVP for the event • The host can disable this feature if necessary
Event Reminders • Event Reminders can be set up after clicking on ‘Create Event’ • Notification by email, text messages and Pop-ups are all available
Searching for Events: Step 1 Searching by Time and Location • Enter the times and locations of interest HERE (found at the top of the Google Calendar Screen) • Google will display all relevant events • Similar to a informational Google search • In this application PUBLIC events and details are available to browse and can be moved directly to the Google Calendar
Managing Multiple Calendars: Create Multiple Calendars
Step 1: Click the “Add” on the top of the “My calendar” to get started. Create multiple calendars: Step 1 • You can set up multiple calendars for different areas of your organization. • You can manage all different calendars easily and also make different privacy for each calendar.
Create multiple calendars: Step 2 Step 2: Choose “Create a new calendar”.
Create multiple calendars: Step 3 Step 3: Create a new calendar name, description and location.
Create multiple calendars: Step 4 Step 4: New Calendar is created and shown here!
Subscribe to additional calendars Managing Multiple Calendars:
Subscribe to additional calendars: Step 1 • You can add a public calendar, a friend’s calendar or a URL into your calendar. Step 1: Click the “Add” on the top of the “My calendar” to choose “Add a public calendar”, “Add a friend’s calendar” or “Add by URL”.
Subscribe to additional calendars: Step 2 • Add a public calendar. Step 2: Choose any public calendar you like to add.
Subscribe to additional calendars: Step 3 • Add a friend’s calendar. Step 3: Enter your friend’s Email address to add.
Managing Multiple Calendars: Modifications
Showing and hiding calendars • You can show and hide events from different calendars to customize what you see. Click the check boxes to show and hide events from different calendars.
Changing the color of the calendar • You can change the color of events from different calendars. Click the triangle next to a calendar name to pick a new color.
Calendar Sharing settings: Setting your privacy for different calendars
Setting your privacy for different calendars: Step 1 • You can share an entire calendar to public (share with the world!) or share with individuals that you specified. Step 1: Click the triangle next to a calendar name to choose “Share this calendar”.
Setting your privacy for different calendars: Step 2 Step 2: Share an entire calendar with everyone or share with specific people.
Step 1 • After logging into your Google calendar account, click on the “Settings” link in the upper right of the screen
Step 2 • From there, click on the “Calendars” link under the heading, “Calendar Settings”
Step 3 • From there, click on the “Share this calendar” link under the heading, “Sharing”