ABCD Adding a new database
ABCD Adding a new database. Example: The list of Open Access Journals from DOAJ. Why DOAJ?. Open Access is the most important evolution for scientific libraries in the last decades, especially for developing countries. Two main tracks: Open Access Journals >> DOAJ

ABCD Adding a new database
E N D
Presentation Transcript
ABCDAdding a new database Example: The list of Open Access Journals from DOAJ
Why DOAJ? Open Access is the most important evolution for scientific libraries in the last decades, especially for developing countries. Two main tracks: • Open Access Journals >> DOAJ • Institutional Repositories >> BASE Therefore, these two websites should appear in all ABCD OPAC pages:
Importingdirectly the DOAJ database into ABCD has the followingadvantages: • Itgivesfasteraccess to the journals • Itallowssearchingbymeans of the keywords • Anyway, it is anexerciseonhow to create a new database!
Steps • * Downloading the DOAJ table • Creating the new database in ABCD • * Uploading the table in the database • Defining the additional tables • * Generating the inverted file • Updating (*: steps to be periodically repeated )
1. Downloading the DOAJ table http://www.doaj.org FAQ
E.g. in the root directory, but anywhere is OK! Change extension to “.txt”
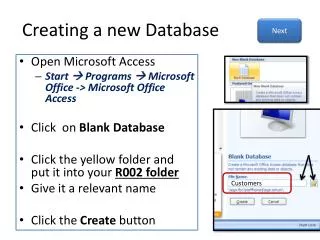
From a Help-file in ABCD: • We choose “with tabs”. We have to adapt our table: • strip the text strings from their quote-delimiters (“...”) • separate the fields with tabs • This can be done, e.g. with Microsoft Access:
- Open Microsoft Access, and select to make a new empty database.- Goto: External Data >> Import >> Text file - Select source for data: type in, or browse to previously saved file!
In the preview window you get a view of the structure of the database: • first line contains the names of the various fields • text strings are enclosed by quotes and fields are separated by commas. • >> leave the first option button that describes this situation (not the “fixed length” button!) • >> go to “Advanced options”.
As Code Table you should select “UTF-8” in view of the many diacritics appearing in the non-English languages. If the comma is used as decimal separator, you should change this - eventually temporarily - by a dot. Then press OK, and “Next” on the previous form.
In the next window verify that • separation symbol is the comma • text separation sign is the quote • Click the box that indicates that the first row contains the field names! (But take a note of the correct sequence of field names: this will be needed for the conversion to ABCD!) • Click “Next”.
In the next window, select “Use primary key of Access”: this adds an autoincrementing field to the records, which will be useful in counting your records. Continue with “Next”.
REMARK: If the database has generated a table with “import errors”, you can look at these faulty records in the file doaj.txt and see if you can correct the cause of the error. • E.g. : • >> A journal with title field : "Chemical Bulletin of “Politehnica” University of Timisoara“ causes a problem, because the quotes in the title let Microsoft Access believe that the title is only “Chemical Bulletin of”. Changes these internal double quotes into single quotes: "Chemical Bulletin of 'Politehnica' University of Timisoara", • and start all over again… • If the table “doaj” does not have created an autocrementing field (with name e.g. “Id”), • you should create it from the “Design” window: • Add a new field in front of the others • Give the field the name “Id” • Choose as type “Autoincrement”.
The file should now look as follows, and it is ready to be transported to a new text file, adapted to the needs of ABCD:
We go now to >> External data >> Export >> Text file And we select a new name for the export file, e.g.: C:/doaj2.txt, and click “OK”.
In the “Advanced Options”, you should now select “Unicode”. We accept again that fields should be separated by a given sign, click “Next”.
In the next window we select • “Tab” as separation sign between the fields • “None” as text separation sign • and click “Next”.
and in the next window we click “Finish” after checking again the name of the export file.
Result (visible, e.g., using Wordpad): Remark that the bad diacritics have disappeared!
2. Creating the new database in ABCD and from there:
This leads you to the “Field Definition Table” (FDT): • Type: there is a list of choices, but we have here all simple fields • Title: For simplicity we just repeat the name of the fields in the original DOAJ • I: as main index we choose the title • R: (Repeatable field): both the “Language” and “Keyword” field have the possibility of several entries! • At the end: • test with “Validate” – and if no errors are mentioned: • click on “Update”
This leads you to the “Field Selection Table” (FST), which is needed for the construction of the “Inverted File” (the index table used for all search operations).
Fields: • Here we have chosen to build the following indices: • TI : All words from the title and the alternative title • LA : The languages of the journals as separate words • KW : The keywords as separate words • MT : The title as one string • FT : All words in the title and in the keywords • (See the documentation on the “Formating language” for explanation about the format code) • The various indexing techniques are explained in the “Help” of the form:
Updating the FST leads you automatically to the form for defining the “Display Format Table” (PFT). First you should select the fields you want to show when displaying a record:
We select “Paragraph” and type in the desired formatting (see Manual!!). Here we have used the following formatting, explained further on in more detail:
FORMAT: (using HTML) if p(v2) then '<a href = 'v2'><font face=arial size=3><b>'v3,'</b></a>' else if p(v3) then '<font face=arial size=2><b>'v3,'</b>' fi, fi/ >> if identifier (= URL) is present: use it as a hyperlink (href) for title, else give title without hyperlink; title is presented in bold, size=3. if p(v4) then '<br><font face=arial size=2>'"(",v4")", fi/ >> new line (<br>) and show alternative title, if present if p(v5) then '<br><font face=arial size=2><b>Publisher: </b><font face=arial size=2>'v5, fi/ >> show the publisher preceded with text “Publisher: “ in bold if p(v6) then '<br><font face=arial size=2><b>Language: </b><font face=arial size=2>'v6+| -- |, fi/ >> show languages (repeated field!) separated with string “ -- “. if p(v7) then '<br><font face=arial size=2><i>ISSN: </i><font face=arial size=2>'v7, fi, if size(v8)>1 then x1,' --- <font face=arial size=2><i>EISSN: </i><font face=arial size=2>'v8, fi, >> show ISSN and (if present) EISSN, separated with “ --- “; “ISSN” and “EISSN” in italic. if p(v11) then '<font face=arial size=2><i> --- Available: </i><font face=arial size=2>'v11,'-', fi, >> on same line (no <br>!) show Start year, followed by “-”. if p(v9) then '<font face=arial size=2>'v9,fi, >> if End year is given, show this after the hyphen. if p(v10) then '<br><font face=arial size=2><b>Keywords</b>: <font face=arial size=2>'v10+| -- |, fi/ >> Repeated keywords are presented (in bold) again separateed by “ -- “.
A typical output from this format is the following: But…, for the moment our database is still empty: we have now to upload the DOAJ data!
3. Uploading the table in the database We start from the main form, select the Database, and click on “Data entry” On the “Data entry” form, we click on the “Utilities” button.
In the next screen, we click on “TXT file” under “Import”. We are now presented with a conversion table for the uploading of the data from the text file into the database table:
What we must do is: • Select “Delimited with Tabulators” • Give all the labels in the text file (CAREFUL: they may differ from the tags of the ABCD table) • Indicate the separators for the repeatable fields (Language and Keyword). The separator in our case is the comma. • Therefore:
Type in a name for this conversion table below this list (e.g. the name of the data table, but you may define more than one conversion table!), and click on the “Save” symbol: Click on “Continue” in the next window, and in the next screen you will see the following form: Click on the green “Select” button to proceed with the conversion, and you will receive a blank window in which you can copy some of the records from the text file:
Open the textfile to be imported (e.g. with Notepad), and test the conversion out by copying the first record: Click on “Execute” at the bottom of the window, and you see how the various fields will be imported in the table. Result: Clicking on “Update” results in the final importation in the ABCD table “DOAJ”.
Upon successful importation, the result is shown in the PFT-format: Clicking on “Close” leads again to the window in which you can upload more records from the text file. Clicking on “Open the database” leads to the more general screen for data entry or editing: • ATTENTION: If you upload many records at the same time, the “Update” may take some time. Even if the updated records start showing up, the list may still not be complete: • Wait till all uploaded records have shown up. • Do not upload too many records simultaneously: there is a 30” time-out in PHP. • (My experience: work with a maximum of 500 records at a time!)
4. Defining the additional tables 4A. The Advanced Search Form For each of the items in the FST, a name has to be given. From >> Update database definitions >> Advanced Search form you get a table in which you can fill in the Field names, nex to the ID from the FST and the Prefix:
4B. Configure Database in IAH Here you can specify how the “Advanced Search” will be presented, making use of the various indices that have been specified in the FST and built in the inverted file. From >> Update database definitions >> Configure Database in IAH and you receive the following form with many options. It begins as follows : This first group of lines can be left unchanged. Next group:
Here you should specify a line for each index that you want to add to the advanced metasearch, with the following format: ^3: The name that (in the English interface) will be used for the search with this index ^d*: Marks the default index (Mandatory element for the default index. Only one index should be default.) Here the standard language should be indicated in the following form, e.g. for English: End by clicking “Save”.
4C. Add the Database to the IAH site This should be done from the “Site Administration” web page: >>Components >>Information Sources, and from there >>New. The form has to be filled in as follows: This should be the name as used in defining the database. The “Description” is optional, but the “Metasearch” data have to be filled in as follows (see also the Site Management Documentation!) :
Next, click on “Add” In order to classify this new database under e.g. “Databases”, it may be necessary to click “increase level”. After this, you can put the database at an arbitrary place in the list, by moving it up or down. Finish with clicking on “Save”!
5. Generating the inverted file Before you can search in the database, you still have to construct the inverted file that contains the indices according to the defined FST. This can be done from the previously described link >>Databases (Select database!) >>Data entry >>Utilities, where now you select “Inverted file generation”: • After this, one final task has to be performed: copying two files from an existing database (e.g. “dblil” or “marc”)to the directory “C:/ABCD/www/bases/doaj/pfts/en”, namely: • bookmark.pft • shortcut.pft
6. Updating The DOAJ has been growing with around 15 new journals per week. Some journals disappear, others get a new URL. Therefore regular updating is necessary. The following steps have to be taken: Growth of DOAJ over the past years • Cleaning of the database • Downloading and converting the list from the DOAJ website • Uploading the list into ABCD • Reconstructing the inverted list • More details:
Cleaning of the database • >> Select the database • >> Go to “Utilities” • >> Initialize the database • (NOT “delete” !) • and confirm B. Downloading and converting the list from the DOAJ website This means repeating Step 1 from the initial series of operations. C. Uploading the list into ABCD This means repeating Step 3 from the initial series of operations, but you do not have to redefine the conversion table (unless the order in the DOAJ has changed…). You are immediately presented with the possibility to select the old table: D. Reconstructing the inverted list: Repeating step 5 from above.