Download
1 / 23
250 likes | 832 Vues
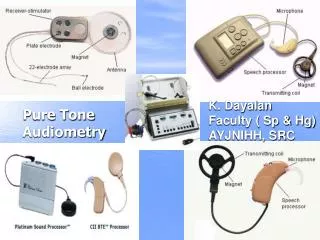
Pure Tone Audiometry Training Course. —— Marketing Dept. AD-3A Audiometer(Frontage). AD-3A Audiometer(Side View). Bone-Conduction Earphone. Responsor. Air-Conduction Earphone. Air-Condu ction Test. 1 .Look before you touch

E N D
Pure Tone Audiometry Training Course ——Marketing Dept
Bone-Conduction Earphone Responsor Air-Conduction Earphone
Air-Conduction Test 1.Look before you touch The clinician should assess whether there are any apparent structural abnormalities and asymmetries of the head in general and the ears in particular, and perform an otoscopic inspection prior to testing. For example, is there evidence of active ear disease, eardrum perforations, atresia, exostoses, external ear abnormalities, or impacted cerumen?
2. Talk before You Test A case history should be taken at this point. If a case history form was completed in advance, then this is the time to review it with the patient for clarification of pertinent details. Always ask if there have been any changes since the last time he was seen. This is also the time when the clinician observes the patient to develop a clinical picture of his auditory status, communicative strategies, and related behaviors.
3. Test Instructions The patient must know exactly what to do during the test. The idea of this test is to find out the softest sounds you can hear. You're going to hear tones from these earphones. There will be many tones, one at a time. Some of the tones will be loud, but most of them will be very faint, and many of them will be too soft to hear. Your job is to press the responser every time you hear a tone, no matter how faint it is, and not to press the responser whenever you don't hear any tones. We will test one ear and then the other one. Remember, press the responser every time you hear a tone, no matter how faint it is. Do you have any questions?
4. Orientation of the Patient The patient should be seated in a reasonably comfortable chair. Audiologists prefer to have the patient seated with her back to the clinician so that she will not receive inadvertentclues about when test signals are being presented. Patients and doctors is 90 °angle.
5. Earphone Placement • Red on the right, blue on the left. • The audiologist should check to see whether putting pressure on the external ear seems to cause the ear canal to close. This is important because the pressure exerted by the earphones might similarly cause collapse of the ear canals and give the false impression of a conductive hearing loss. • Earrings and most eyeglasses (but not contact lenses) must be removed for both comfort and proper fitting of the earphones. It is also necessary to remove any other objects (e.g., headbands or other hair adornments) that could interfere with the placement of the headset (or the bone vibrator that will be used later). Hearing aids should be removed, turned off, and put away during the test. Chewing gum and candy must be disposed of.
6. Test Frequencies and Testing Order • Air-conduction has traditionally been tested for the octave frequencies from 250 to 8000 Hz. In this case, pure-tone thresholds are obtained in the following order for each ear : 1000,2000,4000,8000, retest at 1000,500,250 Hz. • The 1000-Hz retest is done as a reliability check and is expected to be within ±5 dB of the first 1000 Hz-threshold in that ear, and the lower (better) of the two is considered the threshold. The semioctaves (750, 1500, 3000, and 6000 Hz) are tested whenever there is a difference of ≥20 dB between two adjacent octave frequencies (e.g., 3000 Hz is tested if the thresholds at 2000 and 4000 Hz differ by 20 dB or more).
7.Test Method After a ballpark estimate is obtained, the threshold search procedure is then begun, which uses the following strategy: 1. Test the better ear first, then the other ear. 2. Air-conduction test first, then the other ear. 3 . Each test tone is presented for 1 to 2 seconds. 4. Used “up-5 down-10” technique typically in pure-tone audiometry.
Conceptual illustration of the “up-5 down-10” technique typically used in pure-tone audiometry
NOTE: • False Response • Avoiding Equipment Problems and Tester Errors • Masking
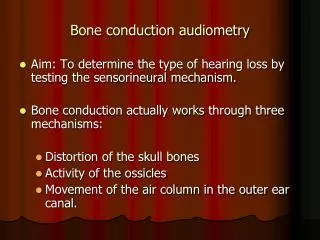
Bone-Conduction Test Placement variations on the mastoid can result in threshold differences. For this reason, many audiologists have the patient listen to a readily audible 500 Hz bone-conduction tone while they shift the vibrator around on the mastoid. The vibrator is then kept in the location where the tone sounds loudest. To minimize the chances that the vibrator will shift once it has been placed, it is wise to instruct the patient to keep her head still and not to talk during bone-conduction testing.The patient should also be instructed to tell you if the vibrator moves in any way. It is also a good idea to provide a strain relief so that an unintentional tug on the wire will not dislodge the vibrator. This can be done with a small clip or by looping the wire under the patient's collar.
In this case, pure-tone thresholds are obtained in the following order for each ear : 1000Hz,2000Hz,4000Hz, retest at 1000Hz,500Hz,250Hz. Bone-Conduction Test
Clinical Masking Why to masking? It is common to find that the sound being presented to one ear is actually being heard by the opposite ear. This phenomenon is called cross-hearing or shadow hearing. To avoid confusion it is customary to call the ear currently being tested the test ear (TE), and to call the opposite ear, which is the one not being tested, the nontest ear (NTE). Even the possibility that the sounds being presented to the TE are really being heard by the NTE causes the outcome of a test to be suspect.
Hearing level in dB Frequency The left ear has profound hearing loss. Without masking right ear, the sound can be heard by the right ear through the bone-conduction.
When to masking? • BC(T)-BC(N)≥ 10 dB • AC(T)-BC (N)≥40 dB
Masking Steps: 1.Test the two ear's threshold of air-conduction and bone-conduction. 2.Compare the worse ear’s threshold of air-conduction and the better ear's threshold of bone-conduction, then decide whether and which frequency to masking. 3. Talk with the patient.
Degrees of hearing loss Mild hearing loss (25-40dB) Soft noises are not heard. Understanding speech is difficult in a loud environment Moderate hearing loss (41-60dB) Difficulty understanding speech, especially in the presence of background noise. Higher volume levels are needed for hearing TV or radio. Severe hearing loss (61-80dB) Conversations have to be conducted loudly. Group conversations are possible only with a lot of effort Profound hearing loss (>81dB) Some very loud noises are heard. Without a hearing aid, communication is no longer possible even with intense effort