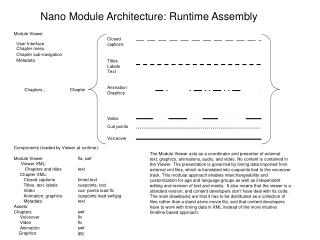

Using the Envirodata Viewer
E N D
Presentation Transcript
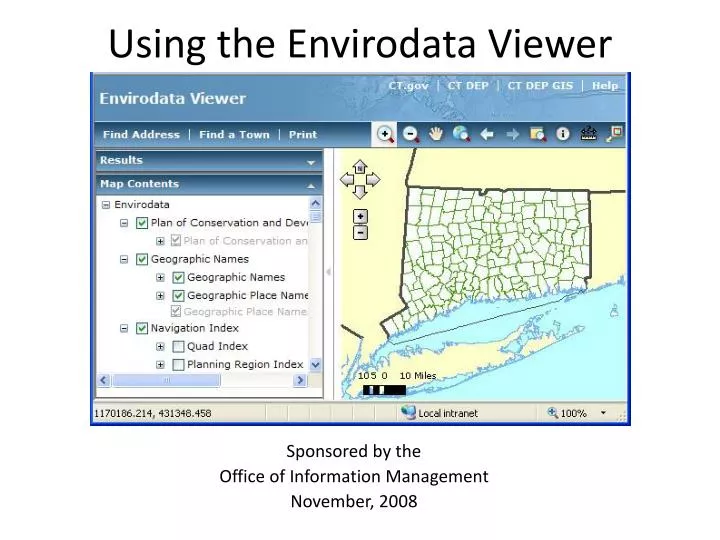
Using the Envirodata Viewer Sponsored by the Office of Information Management November, 2008
Why a New Viewer? • To display DEP’s most up-to-date spatial data • To replace ECO, which will be discontinued on March 12, 2010 • To display data that may not be included in the new SIMS viewer
What Layers Are New In Envirodata • Plan of Conservation and Dev. • Administrative Boundary Index • Planning Region Boundaries • US Congressional Districts • State Senate Districts • State House Districts • County Lines • Outdoor Recreation • Trails • Resource Management • Fisheries Management Areas • Critical Habitats • Utilities • Long Island Sound Cables/Pipelines • Water Resource Management • Stream Channel Encroachment • Coastal Resource Management • Channels, Basins and Anchorages • Administrative • New England State Lines • Watersheds • HUC Watersheds • Elevation • 20 Meter Contours • Lake Bathymetry • Property • Town Parcel Lines • Protected Open Space • Geology and Soils • Erosion Susceptibility • Septic Potential Soils • Glacial Sediment Thickness • Imagery and Topo • 2004 Orthophotos • 2006 NAIP Color Orthos • 2004 Coastal Color Orthos • 2004 and 2005 Coastal Infrared Orthos
ECO Layers NOT In Envirodata • Not Included for one of the following reasons: • are regulatory-related and are in the SIMS Viewer • are not included for other reasons, e.g. file size issues, lack of metadata, outdated data, etc. • ---------------------------------- • Coastal, waste, water, and air PERMIT sites are in SIMS. • Leachate and Wastewater • Sewage Treatment Plants • Registered Underground Storage Tanks • Air Monitoring Sites • Air Stacks • OLISP Permits • Coastal Hydrography • Submerged Aquatic Vegetation • Land Use / Land Cover • Percent Impervious Surface • USGS Gauging Stations
To Open the Envirodata Viewer • On InSide DEP, click on Tools (left menu), then GIS Info/ECO. This will bring you to the GIS home page. • Click on the Envirodata link, and then the Envirodata Viewer link on the next page.
Three Major Differences BetweenECO and Envirodata • No Map Redraw Button • The map redraws EVERY TIME you turn a layer on or off. • Grayed Out Layers • The layers are grayed out and cannot be turned on until you zoom in to the proper scale. • No Environmental Conditions Report • in Envirodata. If you need this type of report, use the SIMS Viewer.
No Map Redraw Button To minimize redrawing time, turn the category off before turning new layers on or off. This will stop the redraw until you check the category name back on.
Grayed Out Layers Layers are grayed out until the proper display scale is reached. The check mark will disappear at that point and allow you to turn the layer on.
No Environmental Conditions Report There is no Environmental Conditions Report in Envirodata as there was in ECO.
Navigation Tools Zoom In, Zoom Out, and Pan Use the mouse button to “click, drag and release” to zoom to a specific area. Or Just click on the map after activating the zoom tools. Or Use the on-screen pan and zoom tools
Navigation Tools Full Extent, Back Extent, Forward Extent These tools are self explanatory and require only a click directly on the tool to cause a change in your map view. Be aware that the extent buttons do not show previous layers that were turned on, merely your current layers in the old extent. Full Extent Example
Window Magnifier Tool Magnifier Window Allows you to magnify a chosen area without changing your map scale. Magnify your area from 2 times to 10 times larger.
Identify Tool The Identify Tool will give you information about the features that are visible on your map. • First, click the point on the map that you would like to identify. • Click the arrow beside the first layer name to see a complete list of layers that were identified.
Identify Tool • To view the identify results for that layer, click on the layer name. • You now have the option of adding this information to the Results area on the Console where you may print the results with your map, or right click in the Results area and choose Print to print only the results.
Measure Tool The measure tool allows you to measure distances and areas and to find the coordinates of a specific point. To measure a distance, click on the line icon. To measure an area, click on the polygon icon. To find the coordinates of a point, click on the point icon.
Overview Map Tool The overview map shows you where in the state of Connecticut your current map view is located. Click to turn it on and Click again to turn it off. NOTE: The overview map is not interactive and cannot be used to navigate to a new location.
Find Address This tool allows you to navigate to a specific address or a street. Click on the tool. Then type in a street address or just the street name, followed by the type of roadway, i.e. “Rd.”, “Ave.”, “Blvd”, etc. In this dialog box, although it offers “Intersection” as an option, this is not available. Also, beside the word “Zone”, type in the town or city name. Zip codes cannot be entered.
Find Address Typing in “79 Elm St.” and “Hartford” displays a list of address beginning with number 79. To zoom to the list of addresses, right click on one address, and choose “Zoom to”. To show only a selection of these addresses on the map, uncheck the appropriate boxes.
Find Address After zooming to the cluster of addresses in the list, each represented by a red push pin, you can hover over a pin and it will display the address.
Find Town This tool finds and zooms or pans to a specific town. You must choose a town from the list provided. You cannot find village names, borough names, etc. For example, Kensington would not be a choice, but Berlin would be a choice.
Find Town After clicking on “Find”, the town will be highlighted in your map view and the town result will be placed in the “Results” section of the Console. Right click on the town name and choose zoom to or pan to. This will place the entire town in your map view.
Find Town Now, when you hover over your town, it turns red and is labeled with the town name.
Find Town At any time, you can remove your town from the Results section by right clicking on the result and choosing “Remove”.
Printing Your Map Select Print. The following dialog box appears. • Your choices are: • Title your map • Choose a size for your map • Choose to print Identify results with your map • Choose to print only the Identify results with no map
About the Layers Drawing Order The layers draw from the bottom up. Make sure that you do not have one polygon layer drawn on top of another. Only the top layer will be displayed. Example: Although both the orthos and the topos are turned on, only the orthos will be visible since they are on top of the topos.
About the Layers Categories The layers are organized into categories so that related data are logically placed together. In addition, for some categories, the layers are mutually exclusive. That is, only one layer within a category should be turned on at once. These categories include: Administrative Boundary Index, Watershed, Geology and Soils, and Imagery and Topos.
About the Layers Overlapping Features For some categories, there may be layers that have overlapping features. For example, DEP property features are also contained in Protected Open Space. This means that those two layers may have some overlapping features.
About the Layers • Overlapping Features • Examples of other categories that have overlapping layer features are: • Waterbody (All Waterbody and Hydrography) • Water Resource Management (Assessed Waterbody 2006 and 2008) • Geology and Soils (Soils, Wetland, Farmland, Septic Potential, etc.)
Thematic Maps • In Envirodata, Thematic Maps must be created by the user, unlike in ECO where Thematic Maps are already made for you. • A list of suggested layers you might use to create thematic maps is shown on the next slide. • You can also visit GIS Home on Inside DEP and choose List of Datalayers Available in DEP. • Turn the appropriate layers on and off to create your customized map. • Thematic Maps and Favorite Locations cannot be saved in Envirodata.
For Help Click on Help in the upper right corner of the viewer. There are a variety of built-in help topics. To see a Help page that is customized to DEP, click on “Tips for Using the Envirodata Viewer”.