DC Circuits
DC Circuits. Unit 4. Review From Last Unit. Let ’ s review some of the major points we covered at the end of last unit. Batteries generate a potential difference (voltage) within a circuit.

DC Circuits
E N D
Presentation Transcript
DC Circuits Unit 4
Review From Last Unit • Let’s review some of the major points we covered at the end of last unit. • Batteries generate a potential difference (voltage) within a circuit. • As a result, current flows if there is a complete conductive path between the + and - terminals of the battery.
Review • Resistors dissipate energy within the circuit and resist the flow of electrons. • Voltage drops across a resistor and rises across a battery. • Current is constant throughout the circuit, and flows from high potential to low potential.
Review • The amount of current that flows through a circuit is determined by the total resistance of the circuit. • Current is found using Ohm’s Law.
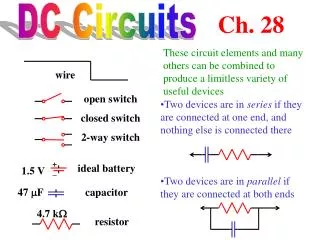
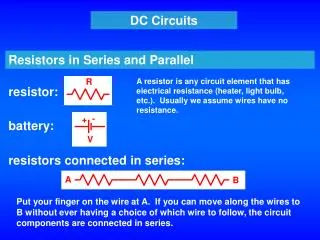
Review • We have also learned a good number of circuit symbols: Battery Capacitor Resistor Wire Switch Ground
EMFs • We already know that a battery is needed to cause a current to flow in a circuit. • Batteries transform other types of energy (such as chemical) to electrical energy.
EMFs • A device that generates electrical energy is commonly known as a source of electromotive force (EMF). • EMF is not a force measured in Newton’s. • It is a synonym potential difference, or voltage, and is measured in volts. • EMF is denoted by the symbol
EMFs • It is important to remember that a battery generates a constant voltage. • However, the current that results from that voltage depends on the total resistance of the circuit.
Terminal Voltage • Ideally, the potential difference between the two terminals of a battery would exactly equal its emf. • However, because the battery is made of real materials and involves chemical reactions that occur at a fixed rate, this is never actually the case.
Terminal Voltage • The materials of the battery always present at least some hindrance to the current. • Thus, the battery has an internal resistance. This is denoted with a lower case r.
Terminal Voltage • A real battery is modeled as a perfect emf followed by a resistor, r. • Points a and b represent the physical terminals of the battery. • When we measure the voltage between a and b, we are measuring the terminal voltage.
Kirchhoff’s Rules • So far, we have been analyzing circuits by finding equivalent resistances and using Ohm’s law. • While this works for many circuits, some are too complicated for this method to be effective.
Kirchhoff’s Rules • An alternative way to analyze circuits is by using Kirchoff’s rules. • These rules were developed by G. R. Kirchhoff in the mid-19th century. • They are merely a restatement of two well known physical principles: conservation of charge, and conservation of energy.
Kirchhoff’s Rules • Kirchhoff’s first rule is known as the junction rule: • This is a restatement of the principle of conservation of charge. At any junction point in a circuit, the sum of all the currents entering the junction must equal the sum of all the currents leaving the junction.
Kirchhoff’s Rules • Kirchhoff’s second rule is known as the loop rule: • This is a restatement of the principle of conservation of energy. The sum of the changes in potential (voltage) around any closed loop in a circuit must be zero.
Problem Solving • When using Kirchhoff’s rules, you will write down several equations to describe the circuit. • To analyze the circuit, you will be solving these equations as a system. • This means, you will need as many equations as you have unknowns.
Problem Solving • Start by labeling the current through each branch of the circuit. • Make sure you differentiate each current with a subscript. • If you do not immediately know the direction of a current, guess. If you guess wrong, the current will have a minus sign in the solution. • Identify the unkowns. You need as many equations as you have unknowns.
Problem Solving • Apply the junction rule at one or more junctions to generate equations. • Apply the loop rule around one or more loops generate equations. • When applying the loop rule, go in one direction only around the loop even if you are going against the current.
Warnings About the Loop Rule • When applying the loop rule, pay careful attention to minus signs. • For a resistor, • The voltage is negative (drops) if the direction of your loop is the same as the current. • The voltage is positive (rises)if the direction of the loop is opposite the current.
Warnings About the Loop Rule • For a battery, • The voltage is positive (rises) if the direction of the loop goes from the negative terminal to the positive terminal. • The voltage is negative (drops) if the direction of the loop goes from the positive terminal to the negative terminal.
Problem Solving • Once you have written your equations, solve them using any of the common techniques for solving a linear system. • Substitution is probably your best bet. • Check your answers afterward to ensure they make sense physically.
Problems • Do problems 26 and 27 on page 548. • If you finish early, work on problem 28.
Problem Day • Do problems 29, 31, and 32 (part a only) on page 549. • We will whiteboard at the end of class.
Homework • Read section 19-8. • Also, read the handout on breadboards.
Plan for Today • Today, we will practice working with the new lab equipment, which includes • Breadboards • Multimeters • Resistors • You should be taking notes on the use of these devices, as we will be using them to analyze more complex circuits tomorrow.
Breadboards • A breadboard is a device that allows you to design and test a circuit without having to solder any wires together. • It consists of a grid of holes designed to fit the leads of electronic components.
Breadboards • On the inside of the breadboard, the holes are wired together in a specific way. • Each column on the outside of the board is connected. • Each row of five holes on the interior of the board is connected. • No rows are connected across the central column.
Breadboards • When you place the lead of any circuit element into a row, it is automatically wired to anything else placed in that row. • This allows you to make circuits without using lots of excess wires.
Breadboards • The breadboards we will be using consist of three of the pictured breadboards placed together. • The three breadboards are not connected internally.
Breadboards • Our breadboards are also powered by a wall outlet and are capable of acting as three separate voltage sources. • One source is fixed at 5 V. • The other two are adjustable and have a range of 0 V to 15 V.
Breadboards • The black terminal is used for ground. You can think of it as the negative terminal of the battery. • In order to form a circuit, you need to have complete conducting path from one of the red terminals to the black terminal.
Breadboard Rules • Do not turn on the power to your breadboard until you have finished building your circuit. • At no point should both leads of a circuit element be placed in the same row. That is the same as shorting the element. • Generally, we use the + column for the input power from the battery, and the - column for ground.
The Multimeter • In order to analyze the circuit, we will be using a digital multimeter. • The multimeter can contains both an ammeter and a voltmeter. • It can also measure resistance, capacitance, and temperature.
Measuring Voltage • When measuring voltage, the black probe should be placed in the lower right socket. This is considered to be ground (0 V) by the meter. • The red probe should be placed in the upper right socket (red arrow). • Turn the dial to the DC V position (green arrow).
Measuring Voltage • When measuring voltage, the voltmeter should be set up in parallel with the circuit element you are measuring. • In practice, this just means you touch the two probes to either side of the element you are interested in. • The red probe should be placed where the current is coming in to the element, black should be where the current is going out.
Measuring Current • When measuring current, the black probe should be placed in the lower right socket. • The red probe should be placed in the lower left socket (red arrow). • Turn the dial to either the mA or the A position (green arrow) depending on how much current you have.
Measuring Current • When measuring current, the ammeter should be set up in series with the circuit element you are measuring. • In practice, this means you will have to break the circuit at a point and add in the ammeter. • The red probe should be placed where the current is coming in to the break, black should be where the current is going out.
WARNING • Ammeters are designed with very low internal resistance. • If you set it up in parallel with the circuit, all the current will flow through the ammeter and it will get fried. This happens in a fraction of a second. • If you find yourself hooking up the ammeter without unplugging some part of your circuit, you are not doing it correctly. • For today, you MUST set up the ammeter with the power to the board off. I will check it, and then you may turn the current on.
Resistor Color Code • Resistors are marked with a number of colored bands to indicate the resistance. (see page 499 of the book)
Practice Circuit • We will use the following series circuit to practice using the equipment. • Use the resistor color code to determine the values of R1 and R2.
Practice Circuit • We will let R1 be the 1.5 k resistor, and R2 will be the 470 resistor. We will also set V at 9 volts. • In your group, use what we have learned about circuits to predict: • The current in the circuit. • The voltage drop between points a and b. • The voltage drop between points b and c.
Practice Circuit • Now it’s time to set up this circuit on the board. • Turn the power on, and then use one of the knobs to set the voltage of one of the power terminals to 9 V. Then, turn the power back off before continuing.