Tapiflex Stairs Self-Adhesive Vinyl Installation Instructions 2018
Detailed instructions for installing Tapiflex self-adhesive vinyl on stairs. Includes subfloor preparation, temperature requirements, and adhesive application steps.

Tapiflex Stairs Self-Adhesive Vinyl Installation Instructions 2018
E N D
Presentation Transcript
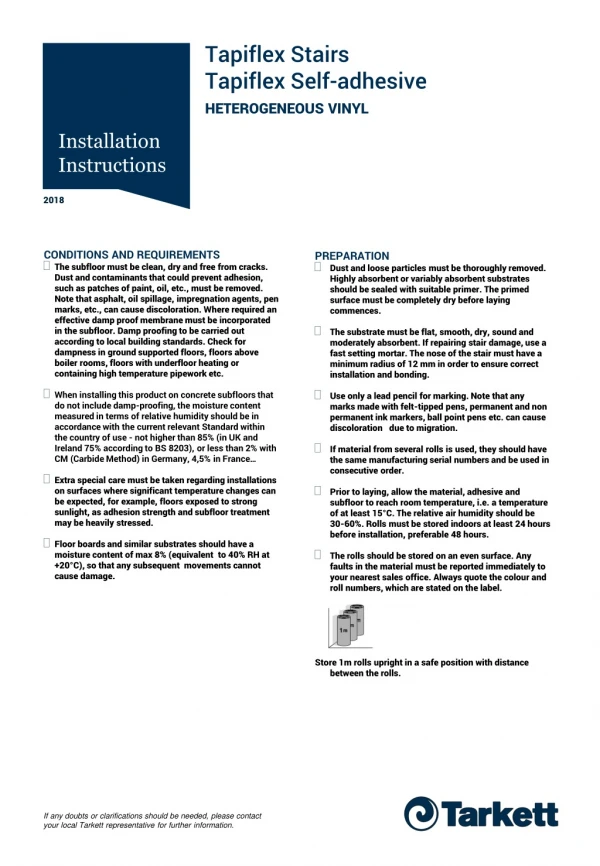
Tapiflex Stairs Tapiflex Self-adhesive HETEROGENEOUS VINYL Installation Instructions 2018 • CONDITIONS AND REQUIREMENTS • The subfloor must be clean, dry and free from cracks. Dust and contaminants that could prevent adhesion, such as patches of paint, oil, etc., must be removed. Note that asphalt, oil spillage, impregnation agents, pen marks, etc., can cause discoloration. Where required an effective damp proof membrane must be incorporated in the subfloor. Damp proofing to be carried out according to local building standards. Check for dampness in ground supported floors, floors above boiler rooms, floors with underfloor heating or containing high temperature pipework etc. • When installing this product on concrete subfloors that do not include damp-proofing, the moisture content measured in terms of relative humidity should be in accordance with the current relevant Standard within the country of use - not higher than 85% (in UK and Ireland 75% according to BS 8203), or less than 2% with CM (Carbide Method) in Germany, 4,5% in France… • Extra special care must be taken regarding installations on surfaces where significant temperature changes can be expected, for example, floors exposed to strong sunlight, as adhesion strength and subfloor treatment may be heavily stressed. • Floor boards and similar substrates should have a moisture content of max 8% (equivalent to 40% RH at +20°C), so that any subsequent movements cannot cause damage. • PREPARATION • Dust and loose particles must be thoroughly removed. Highly absorbent or variably absorbent substrates should be sealed with suitable primer. The primed surface must be completely dry before laying commences. • The substrate must be flat, smooth, dry, sound and moderately absorbent. If repairing stair damage, use a fast setting mortar. The nose of the stair must have a minimum radius of 12 mm in order to ensure correct installation and bonding. • Use only a lead pencil for marking. Note that any marks made with felt-tipped pens, permanent and non permanent ink markers, ball point pens etc. can cause discoloration due to migration. • If material from several rolls is used, they should have the same manufacturing serial numbers and be used in consecutive order. • Prior to laying, allow the material, adhesive and subfloor to reach room temperature, i.e. a temperature of at least 15°C. The relative air humidity should be 30-60%. Rolls must be stored indoors at least 24 hours before installation, preferable 48 hours. • The rolls should be stored on an even surface. Any faults in the material must be reported immediately to your nearest sales office. Always quote the colour and roll numbers, which are stated on the label. • Store 1m rolls upright in a safe position with distance between the rolls. If any doubts or clarifications should be needed, please contact your local Tarkett representative for further information.
INSTALLATION – TX Stairs • Installation should be carried out at room temperature between 15°C to 28°C. Subfloor temperature must be at least 10°C. The relative air humidity in the premises should be 35-65%. Maintain same temperature and humidity for at least 72 hours after installation. • Measure and cut to the width of the stair plus an allowance of 5 cm down the length of the roll and store flat. Make a reference mark in pencil on the backing of the vinyl in order to position the ribbing on each of the stairs uniformly. Lay the sheets out to relax 24h prior to installation. • Apply a suitable primer on the subfloor recommended by the primer manufacturer and allow to dry before applying a contact adhesive (solvent-free) to both surfaces (the back of the TX Stairs and the substrate) as directed by the manufacturer. • The sheets are fully adhered with an contact adhesive approved for Tarkett’s vinyl sheet. See the adhesive manufacturer´s instruction regarding coverage, open time etc. Example of suitable adhesives can be found at professionals.tarkett.com • Using a very finely notched spatula or roller, apply the adhesive to each nose, tread and riser of the stair starting from the top. At the same time, coat the reverse of each of the pre-cut pieces of floorcovering and allow to dry. • The assembly time depends on the type of substrate, its absorbency, the temperature and air humidity in the premises. Applying adhesive to the staircase: Using a very finely notched spatula or roller, apply the adhesive to each noze, tread and riser of the stair starting from the top. At the same time, coat the reverse of each of the pre-cut pieces of floorcovering and allow to dry. Start at the bottom of the staircase. The fine ribs are spread evenly over the nose of the stair and the broad ribs cover the tread. Identify the position of the ribs by aligning with a reference mark on the substrate. Distribution of streaks (ribs): 1/3 on the riser, 2/3 on the tread. Ensure that the floorcovering is pressed firmly into the adhesive, especially over the nosing detail. Roll carefully from the nose of the stair over the tread, and finish with the riser. In case of turning stairs, use a stair bevel to ease the installation. Where the tread and risers meet, the joint should be cold welded (observe the instructions and precautions for use). If any doubts or clarifications should be needed, please contact your local Tarkett representative for further information.
INSTALLATION – TX Stairs Self-adhesive • Installation should be carried out at room temperature between 15°C to 28°C. Subfloor temperature must be at least 10°C. The relative air humidity in the premises should be 35-65%. Maintain same temperature and humidity for at least 72 hours after installation. • Measure and cut to the width of the stair plus an allowance of 5 cm down the length of the roll and store flat. Make a reference mark in pencil on the backing of the vinyl in order to position the ribbing on each of the stairs uniformly. Lay the sheets out to relax 24h prior to installation. • Remove the protective foil from the cut sheets1. Place the TX Stairs on the riser, press to ensure the bonding. Continue step by step, placing the TX Stairs on the nose and on the tread. • 1: for more details, look at the description and pictures below Remove the protective foil on the riser area (1), letting protection on the sides (1’) not to stick to the wall or to the skirting. Place the TX Stairs on the riser, press to ensure the bonding. Remove the second part of the foil (2), step by step, placing the TX Stairs on the nose and on the tread, always letting protection on the sides (2’). Let also protection on the end (2’) of the tread not to stick to the next riser. Start at the bottom of the staircase. The fine ribs are spread evenly over the nose of the stair and the broad ribs cover the tread. Identify the position of the ribs by aligning with a reference mark on the substrate. Distribution of streaks (ribs): 1/3 on the riser, 2/3 on the tread. Ensure that the floorcovering is pressed firmly to the substrate, especially over the nosing detail. Roll carefully from the nose of the stair over the tread, and finish with the riser. In case of turning stairs, use a stair bevel to ease the installation. Where the tread and risers meet, the joint should be cold welded (observe the instructions and precautions for use). If any doubts or clarifications should be needed, please contact your local Tarkett representative for further information.
LANDING JUNCTIONS Where the staircase and landing meet, the joints must be made at the last broad ribbed nosing furthest from the top of the stair. Hot weld using appropriate welding rod. • INSPECTION • The work must be completed with an inspection. Ensure that the newly laid flooring is free from adhesive residues and that the bond is consistent with no bubbles. • AFTER INSTALLATION • Always protect the floor with thick paper, hard board or similar during the construction period. If using tape, this must not be applied directly to the floor surface. • IMPORTANT! Restrict foot traffic for 24 hours after installation. No heavy traffic, rolling loads or furniture placement for 72 hours after installation. Most suppliers of floor adhesives specify 72 hours before the final strength is achieved. • FOR THE BEST RESULTS • Use only adhesives recommended by adhesive manufacturer. • Use a matting system at entrences to protect from dirt and dust. Rubber can cause discoloration to the floor. • GENERAL • Contact you Tarkett representative if unsure about any part of the installation. • This information is subject to change continuous improvement If any doubts or clarifications should be needed, please contact your local Tarkett representative for further information.