Download
1 / 16
160 likes | 339 Vues
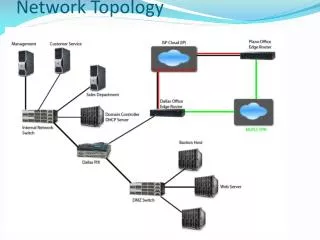
Typical Topology. PC terhubung ke modem speedy Kamera dihubungkan juga ke port modem melalui kabel UTP Nyalakan kamera. Kasus 1: View kamera via web browser. Pastikan menggunakan salah satu browser berikut : IE, Firefox, Chrome atau Safari. Step 1 Mengganti security pada browser

E N D
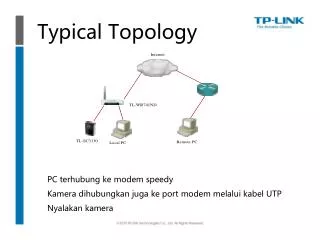
Typical Topology PC terhubung ke modem speedy Kamera dihubungkan juga ke port modem melalui kabel UTP Nyalakan kamera
Kasus 1: View kamera via web browser Pastikan menggunakan salah satu browser berikut : IE, Firefox, Chrome atau Safari.
Step 1 Mengganti security pada browser (Dilakukan pada PC lokal)
Jika menggunakan browser IE, ubah beberapa setting untuk instalasi ActiveX plug-in. Buka Browser IE, klick tools->Internet Options->Security->Custom Leveldan pilih Prompt Download signed ActiveX controls.
Step 2 Gunakan Intelligent IP Installer, untuk mengetahui IP kameranya (Terdapat pada CD bawaan kamera)
Install Intelligent IP Installer dan jalankan. Jika sudah muncul, klik pada list camera dan klik Link to IE
Jika pada saat mengakses IP Camera pertama kali, muncul keterangan: “This website might require the following ActiveX control: ‘AxMediaControl.cab’ from ‘TP-LINK TECHNOLOGIES CO LTD’ ……..” Klik saja Install ActiveX Control.
Step 4 mengubah HTTP port Masuk ke SETTING > BASIC > NETWORK > Information
Pilih Use the following IP address. Masukkan misal IP address : 192.168.1.100 , Subnet MASK : 255.255.255.0, Gateway : 192.168.1.1 Ganti port dari 80 ke 1234 (atau terserah anda bisa 8080, 8084 dll)
Setelah mengganti Port > Lakukan Reboot camera > Klik tombol Reboot (Pada System > Initialize)
Setelah reboot, akses kamera dengan menambahkan port di belakan IP-nya. Misal http://192.168.1.100:1234