Download
1 / 48
540 likes | 816 Vues
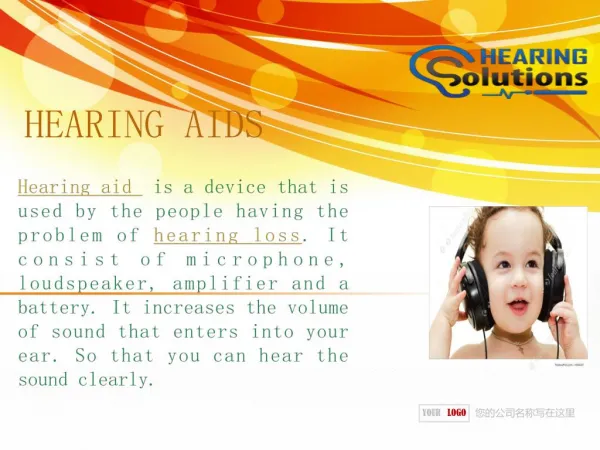
Introduction to the FONIX 7000 Hearing Aid Test System. Software version 1.60. Outline. Coupler Measurements Basic (ANSI, Coupler Multicurve) Testing Digital Aids Open Fit Coupler Measuring directionality Automation Advanced Coupler Real-Ear Measurements Entering an audiogram

E N D
Introduction to the FONIX 7000 Hearing Aid Test System Software version 1.60
Outline • Coupler Measurements • Basic (ANSI, Coupler Multicurve) • Testing Digital Aids • Open Fit Coupler • Measuring directionality • Automation • Advanced Coupler • Real-Ear Measurements • Entering an audiogram • Insertion Gain • Testing directionality • Real-ear SPL • Visible Speech • Testing Open Fit hearing aids • Default Settings
Basic Coupler Measurements Coupler Multicurve — F1 ANSI 03 — F4
ANSI 03 Settings Aid type Telecoil Frequencies Choose ear
ANSI 03 Results Max OSPL90-HFA OSPL90 Distortion FOG EIN Response curve Telecoil Battery current Attack & Release I/O curves Telecoil
Coupler Multicurve Features • Realistic frequency response measurements • Variety of signal types: Composite, Digital Speech, Pure-tone sweeps • Display 10 different curves simultaneously • Switch back and forth between gain and output. All curves translated.
Coupler Screen Operation Amplitude Choose Ear Select Curve Source Type
Example 50 dB 60 dB 70 dB 80 dB
Testing Digital Aids • Digital Speech • Type of Composite signal • Modulated to allow testing of noise reducing digital aids • Used with ANSI or ICRA speech spectra
Example of digital aid test Digital Speech Composite
Testing Open Fit Hearing Aids • The Open Fit Coupler was designed to • Provide a realistic response for open fit hearing aids. • Provide an easy mechanism for attaching an open fit hearing aid to a coupler • The Open Fit Coupler is a non-standard sized coupler not designed to test to manufacturing specifications
Testing Directionality • Use chamber design to perform “forward” and “reverse” measurements to obtain directional advantage • Chamber speaker mounted at 45 degree angle, pointing towards left side of chamber
Forward/Reverse Positioning Forward positioning with hearing aid pointed towards sound chamber speaker Reverse positioning with hearing aid pointed away from sound chamber speaker
Directional Advantage Forward measurement Reverse measurement 6 dB RMS Difference
Coupler Automation • Set up own test sequence • Select signal type for each curve • Select signal amplitude for each curve • Add any desired pauses in test sequence • Save and auto load test sequence
Programming Auto Mode Help window w/instructions F6 — Program Mode F5 — Source Type Amplitude START Advance to next curve without pause Advance to next curve with pause STOP
Example of Auto Test Digital Speech @ 50, 65, 80 dB Pure-tone sweep @ 90 dB F6 — Fully Automatic mode
Saving and Loading Settings Automatically load saved curve group and put analyzer in Auto Mode
Advanced Coupler • Battery Current [F1] • Coupler I/O [F2] • Attack & Release [F3] • Enhanced DSP [F4] Function key operations available in the Advanced Coupler Navigation Screen
Battery Current Screen • Measure Battery Current as a function of frequency • Measure Battery Current as a function of amplitude • Estimate battery life of hearing aid
Battery Current Test Battery current by amp Battery current by freq
Coupler I/O • Composite or Pure-tone source types • Any Freq from 200 to 8000 Hz in 100 Hz intervals • Display results in Output (SPL) or Gain • Graph and data results given
Coupler I/O Test Results Test Results Frequency F5: Source Type
Attack & Release Test Screen • Visual time graph of Attack and Release tests • Scale graphs independently to zoom in on results • Use Composite or Pure-tone • Choose any frequency from 200-8000 Hz in 100 Hz intervals • Customize amplitudes used in tests
Attack & Release Results Frequency F5: Source type F6 & F7: Change graph scales
Enhanced DSP • Designed to measure the "group delay" of a DSP aid. In other words, the actual digital processing time of a hearing aid. • 0 ms for analog aids • 1-12 ms for DSP • Great way to check if aid is analog or DSP • Also tests the "phase" of a hearing aid. This is useful for binaural fittings. Are the aids working together?
Technical Details: Group Delay An impulse signal is delivered to the hearing aid. The time of the maximum peak of the response is considered the group delay. The 7000 system delay is subtracted from this value to obtain the final measurement.
Technical Details: Phase One pulse of a 1000 Hz cosine signal is delivered to the aid. This signal is 1 msec long. The first 20 msec of the aid's response to the signal is displayed in graphical format.
Example Group Delay Phase
Basic Real-Ear measurements Use the function keys to enter a screen F1 — Audiogram Entry F2 — Target Edit F3 — Insertion Gain F4 — Real-ear SPL F5 — Visible Speech
Entering an audiogram Adjust amplitude Adjust frequency Real-Ear SPL only F1 — Select ear F3 — Predict UCLs F2 — Select HTL/UCL/Bone
Insertion Gain features • Unaided measurement • Up to 4 aided measurements • Gives up to 4 insertion gain measurements • Operation similar to coupler screen
Insertion Gain screen Target Insertion Gain Aided Select amplitude Unaided F1 — Select ear F2 — Select curve F5 — Select source type
Step 1: Setup Reference Mic Speaker should be 12 inches from patient at 45 degree angle ProbeMic
Step 2: Level LEVEL
Step 3: Unaided Measurement START STOP Peak at 3 kHz Amplitude Negative response at 6 kHz shows probe tube could probably be inserted more deeply F2 - REUR 1 F5 - DigSpeech
Step 4: Aided/IG measurements IG Target IG curve F2 — REAR 2
Testing Directionality Directional Advantage CRV 2 — Forward response CRV 1 — Reverse response
Real-Ear SPL screen • Check low inputs are above thresholds • Check average inputs meet target • Check loud inputs are below UCLs • Auto-adjusting REUR shows amplification benefit at all levels • Gives overall look at hearing aid fitting • Operation similar to coupler & IG screens
SPL operation U = UCLs H, M, L = Targets T = Thresholds
Auto-Adjusting REUR Option REUR 1 automatically adjusts when the 80 dB REAR 4 curve is selected REAR 4 @ 80 dB REUR 1 adjusted to 80 dB
Visible Speech • Use live speech signal • Real-time response (during test) • Average response • Minimum and maximum response per frequency for the length of the test • HTLs • UCLs • All on one graph in dB SPL
Visible Speech: Before Test UCLs Targets HTLs
Visible Speech: Test Results UCLs (off screen) Max boundary Avg Response HTLs Min boundary
Open Fit Hearing Aids • Some Open Fit hearing aids interfere with the reference microphone measurements outside the ear. • Disable the Reference Microphone in the local menu to perform real-ear on these hearing aids. • Real-ear targets may prescribe low frequency amplification unsuitable for open fit hearing aids.
Default Settings • Press [MENU] from the Opening Screen to enter the Setup Menu • Use [F1] in the Setup Menu to choose between: • General Settings • Coupler Settings • Real-ear Settings