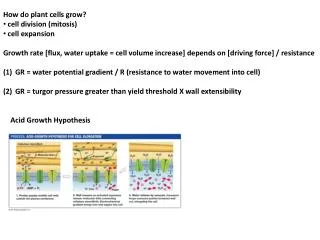
Download
1 / 18
180 likes | 364 Vues
Cells, Cell Transport and Division. Microscopes. Use of Microscope. To magnify objects that cannot be seen with the naked eye Resolving power Ability of microscope to distinguish objects as separate – measured in nm and the lower the number the smaller the object that can be distinguished.

E N D
Cells, Cell Transport and Division Microscopes
Use of Microscope • To magnify objects that cannot be seen with the naked eye • Resolving power • Ability of microscope to distinguish objects as separate – measured in nm and the lower the number the smaller the object that can be distinguished
Types of Microscopes • Stereo/dissecting microscope • 3D images • Relies on light on top of image • Low magnification • Compound light microscope • Magnifies up to 2000 times • Resolving power – 500 nm
Types of Microscopes • Electron Microscopes • Transmission electron microscope (TEM) • Magnify hundreds of thousands of times • Resolution as great as 0.2 nm • Scanning electron microscope • 3D image • Lower magnification than TEM • Sample must be frozen or embedded on plastic – not living
Transmission Electron Microscope (TEM)1: Electronen cannon in the upper part of the column. 2 Electro-magnetic lenses to direct and focus the electron beam inside the column. 3: Vacuum pumps system. 4: Opening to insert a grid with samples into the high-vacuum chamber for observation. 5: Operation panels (left for alignment; right for magnification and focussing; arrows for positioning the object inside the chamber). 6: Screen for menu and image display. 7: Water supply to cool the instrument.
Scanning Electron Microscope (SEM)1: Electron cannon in the upper part of the column (here a so-called field-emission source). 2 Electro-magnetic lenses to direct and focus the electron beam inside the column. 3: Vacuum pumps system. 4: Opening to insert the object into the high-vacuum observation chamber in conventional SEM mode. 5: Operation panel with focus, alignment and magnification tools and a joystick for positioning of the sample. 6: Screen for menu and image display. 7: Cryo-unit to prepare (break, coat and sublimate) frozen material before insertion in the observation chamber in Cryo-SEM mode. 8: Electronics stored in cupboards under the desk. 9: Technicians Mieke Wolters-Arts and Geert-Jan Janssen discussing a view
Compound Light Microscope Ocular Body tube Revolving nosepiece Arm Low power objective Medium power objective Stage High power objective Coarse Adjustment Stage clips Diaphragm Fine Adjustment Light source Base
Function of parts • The tube that supports the eyepiece • The rotating device that holds the objectives • A small lens with low magnifying power • A medium lens with medium magnifying power • A large lens with high magnifying power
Function of parts 6. Metal clips that hold a slide onto the stage 7. An adjustable opening under the stage, allowing different amounts of light onto the stage • Directs light upwards onto the stage • A lens where you place your eye • The attaches the ocular and body tube to the base
Function of parts 11.The platform on which a slide is placed 12. A knob that makes large adjustments to the focus 13. A knob that makes small adjustments to the focus (it is often smaller than the coarse focus knob) 14. This supports the microscope
Measuring with a Microscope • Find diameter of field of view • Estimate the number of objects that will fit across the field of view • Divide this number into the diameter of field Ex. Diameter = 1000 µm # across = 2.5 1000/2.5 = 400 µm
How do you work out the magnification of your microscope? Ocular magnification X Objective magnification
Microscope Techniques • Making a wet slide • Add a drop of water to center of slide • Place object in water (do not let it get folded) • Use forceps to position coverslip (fingerprints will interfere) • Lower coverslip slowly to avoid air bubbles
Microscope Techniques • Staining or Adding Substances to Slide • Place drop of stain beside one edge of coverslip • Touch a small piece of paper towel to opposite edge of coverslip • Towel will absorb H2O and draw stain under coverslip