Home page
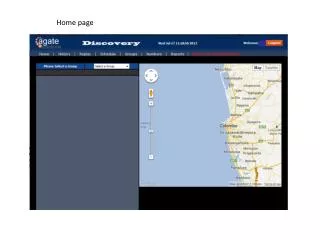
Home page. Home page – new interface. Select the group from the drop down. Click ‘track ‘ to initiate tracking on the particular number. Check multiple numbers and click “Track selected” to track them. Check this box to select all and click ‘track selected‘ to locate every one at once.

Home page
E N D
Presentation Transcript
Home page – new interface Select the group from the drop down Click ‘track ‘ to initiate tracking on the particular number Check multiple numbers and click “Track selected” to track them Check this box to select all and click ‘track selected‘ to locate every one at once
How to schedule the tracking Select a group and set same auto tracking schedule for all the members Select the time interval to schedule the track Select the day /s of the week to enable tracking. i.E – to enable tracking on whole week : From(day) – Sunday To(day) – Saturday do not have Sunday as your To(Day) Select the time range to track in hours and minutes Select ‘yes’ and submit Customize tracking for individual numbers as required.
How to obtain History records Select a group Select a number Select the date range and press ‘go’
History records Click “Download” to save the records to a file Click on arrow head to view details Click “View” to plot individual records on the map
Manage groups You can create your own groups Enter the preferred group name Press “Go” Delete unwanted groups. Note: only empty groups can be deleted. Assign numbers to another group first.
Manage numbers Select the number Assign a name Select the group
Reports Select a group Select date range Click “Group Report” to get a report for the selected group Select numbers from the list Select date range Click “Number Report” to get a report for the selected numbers Click “Download” to save the report to a file