Download
1 / 14
140 likes | 266 Vues
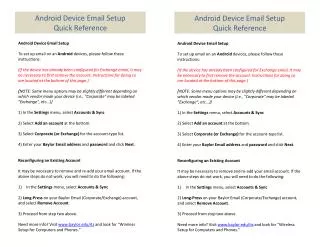
Careersource GC Board and Center Email setup. For use outside the home office outlook 2010. Step 1. This step by step method is for Outlook 2010 and is ideal for situations where you are stationed outside the home office and Outlook has not already been set up on the computer you are using.

E N D
Careersource GC Board and Center Email setup For use outside the home office outlook 2010
Step 1 This step by step method is for Outlook 2010 and is ideal for situations where you are stationed outside the home office and Outlook has not already been set up on the computer you are using. You should get the screen above when you locate and open Outlook 2010.
Step 2 Click “Yes” on this screen and move forward.
Step 3 On this screen you will want to use the option on the bottom before clicking next.
Step 4 Select the Microsoft Exchange option and click next.
Step 5a – BOARD ONLY Here’s where the bulk of the information goes, and the information varies depending on what your email account is. This slide is for Board employees, and the next one is for Center employees. Click the More Settings button when you are done. Server - exch2010.wb.gcwb.org User Name – Enter your email address there.
Step 5b – CENTER ONLY This slide is for Center employees. Click the More Settings button when you are done. Server - mail2010.wfc.workforcecenter.org User Name – Enter your email address there.
Step 6 Click the More Settings button when you are done. Look for the Connection tab on the top right. Once you find it, you’ll want to look at the bottom of that tab for a checkbox near Connect to Microsoft Exchange. Check that box and then click on the Exchange Proxy Settings button.
Step 7A – BOARD ONLY Click the More Settings button when you are done. Similar to Step 5, this slide is for Board employees and the next one will be for Center employees. Click OK after these settings have been changed. Connection settings - webmail.gcwb.org Proxy Authentication settings - Change dropdown to Basic Authentication
Step 7b – CENTER ONLY Click the More Settings button when you are done. This slide is for Center employees. Click OK after these settings have been changed. Connection settings - webmail.workforcecenter.org Proxy Authentication settings - Change dropdown to Basic Authentication
Step 8 Click the More Settings button when you are done. After clicking OK you should return to a section that looks like this, the only exception being that the server information and username that you entered previously are still here. After you have double-checked that your info is present and accurate, click on the Check Name button and a pop-up window should appear.
Step 9 Click the More Settings button when you are done. The pop-up should be similar to this. Put in your office and username here similar to the example below. Ensure that you DO NOT click the “Remember my credentials” checkbox. Click OK when you are done. Center – WFC\hinesc Board – WB\chines
Step 10 Click the More Settings button when you are done. If this was successful, then both the server and the email address should be underlined and the Check Name box will be grayed out. If this was unsuccessful then you will need to double check your entries and try again. If it still doesn’t work then you will need to contact IT support. Click Next. *Note – Server and username listed above are provided as an example only.
Step 11 You should see a screen similar to this now that includes the office and username you used previously. Enter your password and DO NOT click on the “Remember my credentials” checkbox. Click OK and your email should start to load up. *Note - It may take some time for all of your email to load depending on how much you have.