Experimentation with RTL-8139 Network Controller: Setting up Environment
100 likes | 130 Vues
Explore setting up an environment for studying the Network Controller using the RTL-8139 chip. Learn about operating the NIC, memory mapping the registers into the application's virtual address space, and handling resources like memory and interrupts. Enhance the device driver to access kernel memory buffers efficiently and avoid using interrupts initially by performing polling operations. Understand the setup involving kernel space, user space, standard runtime libraries, Linux Kernel, device driver, memory buffer, and network packet transmission steps. Perform in-class exercises to transmit multiple packets and determine successful transmission scenarios.

Experimentation with RTL-8139 Network Controller: Setting up Environment
E N D
Presentation Transcript
RTL-8139 experimentation Setting up an environment for studying the Network Controller
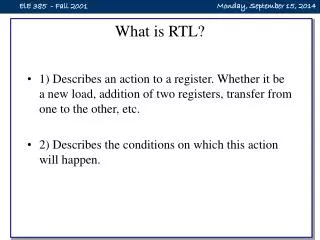
Operating the NIC • We saw that, with a suitable device-driver, we could memory-map the NIC’s registers into an application’s virtual address space (our ‘mmap8139.c’ module did that for us) • But operating the NIC requires two further ‘resources’ that are not directly accessible from user-space: memory and interrupts
Kernel memory-buffer • We can enhance of our device-driver so it provides access to a region of physically contiguous processor memory, by using ‘kmalloc()’ during module-initialization to reserve a big enough buffer (80-KB), and by equipping our driver with functions that perform ‘read()’, ‘write()’, and ‘lseek()’ on the allocated region of kernel memory
Avoid using interrupts • We can temporarily avoid using interrupts by performing ‘polling’ operations during our initial exploratory work with the NIC • Interrupts are disabled by doing a ‘reset’ • Later, after we have developed our basic understanding of the NIC’s operations, we can turn to the issue of how interrupts may be employed for improved efficiency
Overview of our setup kernel-space user-space standard runtime libraries Linux Kernel ‘user8139.ko’ device-driver ‘nicstudy’ application mmap llseek write read 8139 registers memory buffer
The ‘transmit’ steps • To transmit our first network packet, we ‘write’ it into our kernel buffer (at offset 0) • We ‘enable’ transmission (bit #2 of CR) • We ‘configure’ transmission, or use default • To ‘initiate’ packet-transmission, we write the packet’s length to ‘TxStatus0’ register • The NIC sets bit 13 of TxStatus when the transmission has been concluded
Did it work? • Our ‘nicstudy.cpp’ application performs a packet-transmission (using ‘user8139.c’) • To verify that our packet was indeed sent over the Local Area Network, we need to setup another workstation that receives it (and displays the transmitted information) • Our ‘rxtester.cpp’ program can do this – but it requires a ‘privileged’ user to run it
Multiple packets • To send another packet, we need to use the next ‘transmit descriptor’ among four that the network controller supports: • Descriptor 0: <TxStatus0, TxBuffer0> • Descriptor 1: <TxStatus0, TxBuffer1> • Descriptor 2: <TxStatus0, TxBuffer2> • Descriptor 3: <TxStatus0, TxBuffer3> • These descriptors must be used in ‘round robin’ fashion (i.e., as a ‘circular queue’)
In-class exercise #1 • Modify the ‘nicstudy.cpp’ application so it transmits fifteen packets in succession • You can use your ‘rxtester’ workstation’s MAC address in the destination-field for your packet (first six bytes), to avoid your 15 packets being received by everyone’s test-station (that would be very confusing)!
In-class exercise #2 • Find out the lengths for the smallest and the largest packets you can successfully transmit and receive • Find out the maximum number of 80-byte packets that you can successfully transmit and receive during a one-second interval