Download
1 / 22
220 likes | 239 Vues
Learn how to create a backup set for your main drive on a separate backup hard disk using Retrospect. Follow these simple steps to ensure your important data is safe and secure.

E N D
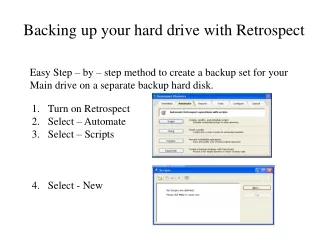
Backing up your hard drive with Retrospect Easy Step – by – step method to create a backup set for your Main drive on a separate backup hard disk. • Turn on Retrospect • Select – Automate • Select – Scripts • Select - New
Selecting the Backup method • 5. Select – No • 6. Select – Backup • 7. Select - OK If you select Yes, you will not have The option of backing up to a file.
Beginning the script • 8. Type in – First • Click – New • 10. Select Sources
Drive and source selection • 11. Select - Drive C • Click – OK • Click – OK
Destinationand backup type • Select – Destinations • In storage type choose • File. • 14. Click - New
Backup set storage location • 15. Select where you are going to • store the backup. In this case • I chose Local Disk (E) • Click – Save • Click OK Choose any different physical drive other Than the one you are backing up.
Starting the scheduling process • Click – OK • Choose - Schedule
First of two schedules • Select – Add • Select – Repeating • Interval then - OK
When do you want your backup to occur • 21. Insert date of first • backup. • 22. Insert time of first • backup. • 23. Repeat – Every 2 weeks • Action: choose – Recycle • Click – OK • Click OK Recycle eliminates the need to cleanse The backups periodically.
Completing the first backup schedule • 27. Exit • Then – Save
Beginning the second script Now we are going to generate the alternate week backup set so That you will always have a backup no older than one week. 29. Click - New
Identify the second backup • 30. Click – Backup • 31. Click - OK 32. Type in – Second, then click - New
Identify the same drive to be backed up 33. Select Sources 34. Source volume is again the C drive. 35. Click – ok
Again determining the backup location • Click – OK • Select – Destinations
Selecting the storage for backup B • Choose – Create • New • Choose – File • then click - New
This location can not be the same as the drive as the drive to be backed up • Select location • for backup. • 40. Click - Save
Verifying the backup destination • Click – OK • Click - OK
Setting the final schedule • Select – Schedule • Select - Add
Start date is one week after the first backup • Select – Repeating • Interval, then – OK • Insert date of second • backup. • Insert time • Set repeat interval • Action – Recycle • Click - OK
Verifying the second schedule • Click – OK • Exit out
The task is completed • Click – Save and • exit the next screen. • Select - Preview
Review the weekly schedule – and relax • This is your schedule • of backups. Once you • have gone this far, you • can forget about this • chore for the next few • years. • Exit out and quit the • Program.