Download
1 / 54
540 likes | 702 Vues
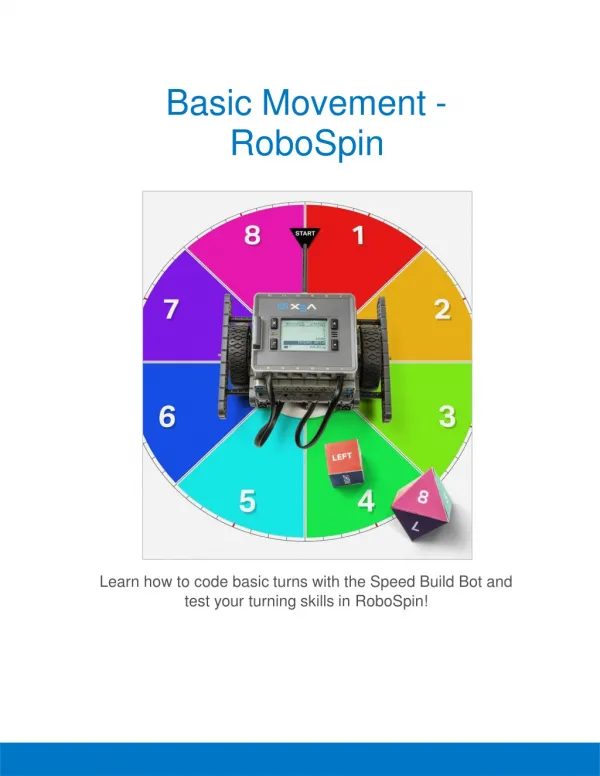
Basic Movement - RoboSpin. Learn how to code basic turns with the Speed Build Bot and test your turning skills in RoboSpin!. Discover new hands-on builds and programming opportunities to further your understanding of a subject matter. The Completed Look of the Build.

E N D
Basic Movement- RoboSpin Learn how to code basic turns with the Speed Build Bot and test your turning skills inRoboSpin!
Discover new hands-on builds and programming opportunities to further your understanding of a subjectmatter.
The Completed Look of the Build Speed BuildRobot This robot is designed so that it can be built quickly and drive around either autonomously or with the Controller in a short amount oftime.
Step 1: Count all pieces before starting your build and have them readilyavailable. • Step 2: When adding the 4x Pitch Shaft, twist the pitch shaft to check for tension while turning. If it spins freely, it is not properly inserted into themotor. • Step 3: Place the 1/2x Pitch Shaft Spacer and the Tire on the 8x Pitch Shaft first before adding the Rubber Shaft Collar and the Mini Standoff Connector. Note, this step shows you how to build one Tire stabilizer. You will build two intotal. • Step 3: After attaching the wheel, twist the wheel. If the wheel spins freely and without tension, the 4x Pitch Shaft has slipped out ofplace. • Step 5: Insert the 1x1 Connector Pins into the 2x8 Beam before connecting the Connector Pins to the 2x Wide 1/2 Corner Connectors. Note this step shows you how to build one bot stabilizer. You will build two intotal. • Step 9: Make sure the motors are aligned and in the correctposition.
Exploration • Now that the build is finished, explore and see what it can do. Then answer these questions in your engineeringnotebook. • How does the Speed Build move? Explain withdetails. • How might the Speed Build be used? Explain with details andsketches. • Why is it important for a robot to be precise in itsmovement?
Test your build, observe how it functions, and fuel your logic and reasoning skills through imaginative, creativeplay.
RobotBehaviors Speed BuildBot • Basic Behaviors • Behaviors are a set of actions a robot performs that are separated into three categories: basic, simple, andcomplex. • Basic behaviors are the most rudimentary of the behaviors and act as building blocks for robotmovement. • Simple behaviors combine two or more basic behaviors that will have a robot perform a simple task. A simple behavior for move forward will turn both motors on at a designated speed for the desireddistance. • Complex behaviors can combine basic and simple behaviors in a sequence to perform a large complextask.
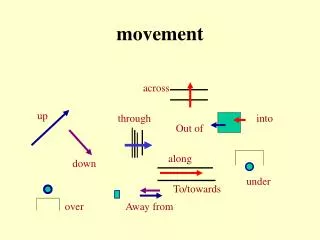
Behaviors can also be used as a way to describe what a robot will do. When turning, a mobile robots can make two different types of turns: a swing turn or a point turn. A swing turn is when two drive motors are set to different values and the robot's path makes a curve to turn. A point turn is when the two drive motors are set to equal values but opposite directions, causing the robot to spin in place or on a point. The size of the wheels and the shape of the robot can affect turning with arobot. These simple robot behaviors will be performed through programming commands. These commands will have parameters that you can change. Parameters such as degrees, rotations, time, and speed can be used in the commands to modify robot movement and behavior.
How to Turn Your Robot — ROBOTC • MaterialsRequired: • ROBOTC for VEX (Windows) or Modkit for VEX (Windows or Mac)installed 1. RobotSetup For the Speed Build Bot, use the Standard Drive Baseconfiguration.
2. TurnLeft Drag the turnLeft command into the programarea Drag a turnLeft command into the program area. The turnLeft command will turn the robot left based on the parameters set. The default parameters for the turnLeft command will turn the robot to the left for 1 rotation at 50%speed. Important: rotation refers to the robot's wheels not the robot itself. 1 rotation of the robot's wheels will not turn the robot 360degrees.
3.Parameters • There are 3 parameters available in the turnLeftcommand • There are 3 parameters that can be changed in this command: quantity: the amount of “unitType” that the robot moveswith. • unitType: the type of unit used for thequantity. • speed: the speed percent the robot willmove. 4.Experiment Play with the parameters of the turnLeft command and then download the changes and run the program on your robot. Pay attention to how changing the parameter settings changes how the robot moves. Does the robot turn more accurately when its speed is faster? What happens when a negative quantity is entered? Record your observations in your Engineering Journal. 5. TurnRight Now try using the turnRight command. Experiment with its parameters. Then download and run your program on the robot and note how your settings change the robot's behavior. See if you can find a formula to accurately turn your 90 degrees. Record your observations in your EngineeringJournal.
How to TurnYourRobot —Modkit • MaterialsRequired: • ROBOTC for VEX (Windows) or Modkit for VEX (Windows or Mac)installed • 1. RobotSetup For the Speed Build Bot, use a Drivetrain with the Left Rear plugged into Port1, and Right Rear plugged intoPort6.
2. Set the TurnSpeed Click on the Blocks button on the top of the Modkitinterface. Drag a when START command from the Control section to the programarea. Drag a set turn speed to command from the Drivetrain section to the program area.
3. TurnLeft Now drag a turn LEFT 45 deg command from the Drivetrain section to the program area. The turn command will move the robot in a direction based on the parameters set. The default parameters for the turn LEFT 45 deg command will turn the robot to the left for 45 degrees, and the default parameter for the set turn speed to command will turn the robot at 60% speed. Important: rotation refers to the robot's wheels not the robot itself. Turning the robot's wheels 360 degrees will not turn the robot 360degrees.
4.Parameters • There are 3 parameters that can be changed in the turn command: direction: the robot can be told to spin right or left. • quantity: the amount of “unitType” that the robot moves with. • unitType: the type of unit used for thequantity. • There is 1 parameter that can be changed in in the set turn speed tocommand: • speed: the speed percent the robot willmove. Important: The command blocks in Modkit provide a dropdown list of parameter values. However, any parameter value can be typedin. 5.Experiment Play with the parameters of the turn LEFT 45 deg and set turn speed to commands and save the changes to your Robot Brain and run the program. Pay attention to how changing the parameter setting changes how the robot moves. Does the robot turn more accurately when its turn speed is faster? What happens when a negative quantity is entered? Record your observations in your EngineeringJournal.
6. TurnRight Now try turning your robot to the right. Experiment with the parameters of the turn and set turn speed to commands. Save your changes to the Robot Brain, run the program, and note how your settings change the robot's behavior. See if you can find a formula to accurately turn your robot 90 degrees. Record your observations in your EngineeringJournal.
RoboSpinSetup 1. Modify YourRobot Position to move the Pitch Standoff To add the extension, first move the Pitch Standoff and the End Standoff Connector one hole to theleft.
2. Add theExtension • Extra parts will need to be added to create a spin indicator for yourrobot • Additional Parts Needed: • 6x PitchStandoff • 1x Wide, 1x1 Offset CornerConnector
3.Print Print the four pieces of the gameboard, the dice, and the score markers. These items can be found in the RoboSpinResources.
4.Cut Cut out the gameboard, the dice, and the score markers. Use the scissors icons as a guide on where tocut.
5.Assemble Assemble the gameboard and dice with glue or tape. Make sure to fold the dice along the dotted white lines before assembling. Also, the last page of the RoboSpin Resources can be used as a visual guide when assembling thegameboard.
RoboSpin Test your programming skills by seeing how accurately you can spin your robot. RoboSpin is an exciting game of skill that can be played by 2 teams of 1 to 4 players. Read below for the rules and gameplayinstructions. 1. Who Will GoFirst? Roll the 8-sided die to determine what team will go first. The team that rolls the higher number can choose to be either Team One or TeamTwo.
2. Position theRobot The game starts with the robot placed in the center of the board with its indicator pointed at the black starttriangle.
3. Team One Starts theGame Team One will roll both dice to determine their spin challenge. For example: If Team One rolls a LEFT and a 8, they will need to spin their robot to the left until it reaches the section of the board marked by the number8.
4. On theLine • If the robot’s indicator stops on the black line that separates the pie-shaped sections of the board, it will be ruled that the robot has stopped on the section clockwise of the line. For example: If the robot stops on the black line separating the 6 and the 7, it will be ruled that the robot stopped on7. • Please note: The robot is technically on section 1 to start the game. If Team One rolls a 1 and a LEFT, their robot will need to spin between 315 and 360 degrees to theleft.
5. SCORE! (orFAIL) If the team successfully spins their robot to the required section, they can place a SCORE piece on the scoreboard. Otherwise, they must place a FAIL piece on the board.
6. It's Team Two's Turn toSpin • Team Two must start their turn with the robot positioned where Team One left it. Team Two will roll both dice to determine their spinchallenge. • If Team Two successfully completes their challenge, they can place a SCORE piece on the scoreboard. Otherwise, they must place a FAIL piece on the board. 7.Repeat A game of Robospin consists of 3 rounds. If the score is tied after three rounds, one overtime round must beplayed.
This game is tied 2-2 after 3 rounds, and an overtime round must be played to determine awinner.
8.Overtime! The robot is closer to the center of the 6 section than the center of the 4. The team that rolled the 6 is the overtime winner! The overtime round is played by the same rules with one exception — accuracy counts! The team that is closest to the red tick mark in the center of their target sectionwins. Important: After Team One has completed their overtime spin, do not forget to record the number of tick marks they are away from their target’s red tick. Team Two's spin must be more accurate to win thegame.
Become a 21st century problem solver by applying the core skills and concepts you learned to other problems.
AutomatedHarvesting By Dan Davison (originally posted to Flickr as combined harvester) [CC BY 2.0 (http://creativecommons.org/licenses/by/2.0)], via WikimediaCommons Precise Movement is Key in AutonomousAgriculture In agriculture, precise movement of machines to plant, monitor, and harvest crops allow for farming to be more efficient and of course more profitable. Automated agriculture has been expanding over the past few years enhancing these precise movements through incorporating new robotic technologies. The uses of Global Positioning Systems (GPS), Global Information Systems (GIS), and algorithms along with sensors such as RADAR (radio detection and ranging) and LIDAR (light detection and ranging) has allowed farmers to more accurately plant, fertilize, and track crop yields offields. One area of application is automated harvesting. The automated system will map outthe perimeter of the field with the help of an operator and record the shape of the field. The system will then use an algorithm to find the most efficient paths to harvest every plant inside thatperimeter. Results of the harvest also yields data from the field highlighting specific areas that produced more crops versus those that don’t. This data along with soil samples is used generate a plan that will allow the farmer to apply the correct amount of fertilizer, pesticides,or
herbicides to specific areas. This will help increase the efficient and crop yield for next season. • Advantages of AutomatedHarvesting: • Increase the efficiency of landuse • Increase of the cropyield • Decrease the amount of people required to plant, maintain, andharvest • Decrease fueluse • Protect farmers from harmful chemical whenspraying • More Automated Agriculture: • Planting – Data from previous harvest and static sensors on the planter can control the rate of seed flow allowing for varying distances between plants based on soilquality. • Harvesting – Real time control, navigation, and obstacle detection with uses of sensors allow tractors towing grain carts to follow a harvester in the correct position for grain unloading. • Monitoring – Drones are used in large fields to detect good and bad plants and surgically apply herbicides to kill off the badplants. • Milking – Autonomous herding, feeding, washing, and milking of dairy cows are done by large robotic systems that use RFID tags to track the food consumption, milk production, and health of each individual dairy cow and theherd.
Is there a more efficient way to come to the same conclusion? Take what you’ve learned and try to improveit.
Prepare for the Robot Rock, Paper, ScissorsChallenge Program Your Action In a predetermined location, you will face off against various opponents in a friendly game of Robot Rock, Paper, Scissors. You will use your knowledge of programming robot movement to compete in a round robin tournament or a winner stayscompetition. You will need to program your robot each round to pick an action: Rock (turn right), Paper (turn left), or Scissors (360 degree turn in eitherdirection).
Improve and Tinker with YourBuild • Answer the following questions in your engineering notebook as you tinker with thebuild. • What do you want to change about the build? Explain at least onechange. • What steps will you follow to change the build? Explain with details and/orsketches. • Do your changes to the build make it work more efficiently or powerfully? Explain how. Do the changes make the build usable for more tasks? Will more people want to use it after the change? Explain how the change affects how it isused.
Robot Rock, Paper, Scissor Challenge Rock, Paper,Scissors • Choose yourAction • To play Robot Rock, Paper, Scissors each player's robot will simultaneously perform one of the following movements: a right turn for Rock, a left turn for Paper, or a 360 degree turn in either direction for Scissors. • Rock, Paper, Scissors Rules: • Rock (right turn) beats Scissors (360 degreeturn) • Scissors (360 degree turn) beats Paper (leftturn) • Paper (left turn) beats Rock (right turn) • In the event of a tie (each robot performing the same movement), the match will be replayed until a winner is designated. Goodluck!
Understand the core concepts and how to apply them to differentsituations. This review process will fuel motivation tolearn.
Review • Higher crop yields are an efficient use of land and advantages of automated agriculture. • True • False • GPS and GIS are an essential part of automatedagriculture. • True • False • Breaking down large, complex behaviors into smaller, more manageable tasks is goodpractice. • True • False • In addition to robot movement, what do you need to complete in Robot Rock, Paper,Scissors? • Download and run aprogram • The rules of Robot Rock, Paper,Scissor • Program robotmovement • All of the above arecorrect • What does the third parameter on the turnLeft command blockcontrol? • Direction ofturn • Unit • Amount • Speed of themotor • What does the second parameter on the turnLeft command blockcontrol?
Direction ofturn • Unit • Amount • Speed of themotor • What does the first parameter on the turnLeft command blockcontrol? • Direction ofturn • Unit • Amount • Speed of theMotor • Program the robot to perform a 90 degree turn to the right would be considered... • Simple Behavior • BasicBehavior • ComplexBehavior • All the above arecorrect
Removing Connectors from Beams andPlates Using a pitch shaft to remove a cornerconnector How to Easily RemoveConnectors You can easily remove corner connectors from beams or plates by placing a metal shaft through one of the holes of the corner connector and pulling outward while holding down the beam orplate.