Basic Movement - Trivial Movement
460 likes | 499 Vues
Basic Movement - Trivial Movement. Learn how to psuedocode and program basic movements and turns with the Speed Build Bot. Then test your skills in the Trivial Movement Game!.

Basic Movement - Trivial Movement
E N D
Presentation Transcript
Basic Movement -Trivial Movement Learn how to psuedocode and program basic movements and turns with the Speed Build Bot. Then test your skills in the Trivial Movement Game!
Discover new hands-on builds and programming opportunities to further your understanding of a subjectmatter.
The Completed Look of the Build Speed BuildRobot This robot is designed so that it can be built quickly and drive around either autonomously or with the Controller in a short amount oftime.
Step 1: Count all pieces before starting your build and have them readilyavailable. • Step 2: When adding the 4x Pitch Shaft, twist the pitch shaft to check for tension while turning. If it spins freely, it is not properly inserted into themotor. • Step 3: Place the 1/2x Pitch Shaft Spacer and the Tire on the 8x Pitch Shaft first before adding the Rubber Shaft Collar and the Mini Standoff Connector. Note, this step shows you how to build one Tire stabilizer. You will build two intotal. • Step 3: After attaching the wheel, twist the wheel. If the wheel spins freely and without tension, the 4x Pitch Shaft has slipped out ofplace. • Step 5: Insert the 1x1 Connector Pins into the 2x8 Beam before connecting the Connector Pins to the 2x Wide 1/2 Corner Connectors. Note this step shows you how to build one bot stabilizer. You will build two intotal. • Step 9: Make sure the motors are aligned and in the correctposition.
Exploration • Now that you've finished the build, test what it does. Play with your build and then answer these questions in your engineeringnotebook. • What are some of the best features of thisbuild? • Would this build be useful to travel longdistances? • If you wanted the Speed Build to move across the room, touch the wall, and then return to you, what moves would it take? Create a list of steps. • If your build was a moving game piece, what games could it be usedfor?
Test your build, observe how it functions, and fuel your logic and reasoning skills through imaginative, creativeplay.
ExplainingPseudocode Computer coding andpseudocode Decomposition Humans and robots work together to complete tasks or solve problems. However for a robot to complete a task you must communicate your set of instructions to the robot. This is done in the form of a program. But before you write this program, you need to generate the plan. This plan or set of instructions that you write in everyday language is calledpseudocode. Pseudocode is a readable description of a program that describes a robot’s behavior when completing a task. A best practice when writing pseudocode is to employ decomposition. Decomposition is breaking down a large problem into smaller more manageable tasks and is a core concept of computational thinking when writing pseudocode or programmingrobots. When pseudocoding:
Make sure you understand the problem and the tasks needed to reach yourgoal • Robots follow your directions, thus instructions should be detailed enough to create the actualcode • Make sure the pseudocode follows the correct order of behaviors need to reach your goal • Emphasize expressing the robot’s behavior rather than the correct programmingsyntax • Breakdown large robot behaviors into smaller one that are more manageable and easier to understand • Write pseudocode that is understandable to others and allows you to communicate your plan
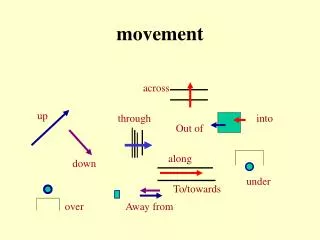
PseudocodeExample Programming andcodes • Solve alabyrinth • In this example the robot is programmed to solve a labyrinth maze using the basic movement commands of forward, turn left, and turn right stopping at each check point along the way and waiting 1second. • Start • Move forward 300cm at mediumspeed • Stop at check point 1 • Wait 1 second • Turn left 90 degrees at a slowspeed • Move forward 500cm at a mediumspeed • Stop at check point 2 • Wait 1 second • Turn right 90 degrees at a slowspeed • Move forward 300cm at mediumspeed • Turn right 90 degrees at a slow speed • Move forward 300cm at mediumspeed • Stop at check point 3 • Wait 1 second • “Success!”
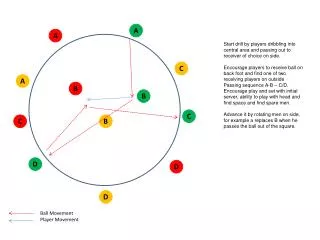
Pseudocoding theGameboard Before playing the game, pseudocode how the robot will move around thegameboard. Program thePath Before we start playing “Robot Movement is Trivial”, pseudocode the robot movements that will be required to traverse the game board. You may need to read the rules of the game before you craft a plan for programming. Make sure the pseudocode you create meets the suggestions stated earlier in this activity pack. You will uses this as a guide to program your robot when performing a move during gameplay.
Trivial MovementSetup • MaterialsRequired: • ROBOTC for VEX (Windows) or Modkit for VEX (Windows or Mac)installed • Trivial Movement Resources (printablePDF) • Sammy's Question Cards (printablePDF) 1. Modify YourRobot • Extra parts will need to be added to your robot to keep score during thegame • Additional Parts Needed: • 2x Wide 1x2 CornerConnector • (3) 1x2 ConnectorPins
To play Trivial Movement the teams will need to add a 2x Wide 1x2 Corner Connector to the front of their Speed Build Bot. This piece will hold the 1x2 Connector Pins which will serve as a way of keeping score. Hint: If the teams are going to share a robot during the game, do not attach the corner connector to the robot. In this case, the teams can keep their Corner Connector and Connector Pins to the side of the gameboard. 2.Print Print the Trivial MovementResources Print the 16 pieces of the gameboard, the RoboTokens, the dice, and the RoboFlags. These items can be found in the Trivial MovementResources.
3.Cut Cut along the black lines marked with a scissorsicon Cut out the gameboard pieces, the robot placeholders, dice, and the scoring flags. Use the scissors icon as a guide on where to cut. Do not cut along the gray lines. They will be used later as assemblyguides.
4.Assemble Use the gray lines as guides when assembling the gameboardpieces. Assemble the gameboard with tape or glue. Use the gray lines as guides to line up the gameboard pieces with their neighboring pieces. The edge of the gameboard piece that is cut should be lined up with the gray line of the adjacent piece. The last page of the Trivial Movement Resources can be used as a visual guide when assembling thegameboard.
5.RoboFlags Attach each of the RoboFlags to a 1x2 ConnectorPin After cutting out the RoboFlags attach each of them to a 1x2 Connector Pin. each team will need a set of 3RoboFlags.
6. Sammy's QuestionCards Place Sammy's Question Cards in the three piles on the center of thegameboard. After assembling the gameboard, print Sammy's Question Cards. Then cut them out and place them in three piles on the center of the board. There are three sections on the center of the board that indicate where the cards should beplaced. Important: Sammy's Question cards must be printed on both sides of thecard.
TrivialMovement The object of the game is to navigate to each of the Question Corners, collect all three RoboFlags by successfully answering Sammy's questions, then be the first to navigate back to Sammy's Station to win the game! Read below for the rules and gameplayinstructions. 1. Sammy'sStation This robot is ready to start thegame! Up to 4 teams can play Trivial Movement. Each team's robot will start the game in Sammy's Station.
2.RoboTokens Avoid gridlock by using the RoboTokens to mark your robot's position betweenturns. The gameboard may become very crowded with robots. To prevent this, each team will pick a RoboToken and use it to mark their robot's position betweenturns.
3. Determine StartingOrder Higher rolls gofirst! The game will start with each team rolling the dice to determine the starting order. The higher rolls gofirst.
4. It's Time toMove Be careful! You will lose your turn if your robot does not move the correct number ofspaces. Teams will start each turn with a roll of the dice. They will then create and download a program (using either ROBOTC or Modkit) their robot to move the exact number of spaces indicated by the dice. Teams can move their robot in any direction, and a team's turns will end after one movement unless they land on a QuestionCorner. Warning: If the robot does not move the correct number of spaces, the teams loses their turn and they must move their robot back to where it was at the beginning of theirturn.
5. Aim for theCorners This team has received a blue RoboFlag pin by correctly answering a blue questioncard. If a team lands on a Question Corner, they will get an opportunity to answer one Sammy's Question Cards. Have a member of an opposing team read a question from a card that matches the color of the Question Corner the robot is on. If they answer the question correctly, they will get a blue question pin and they get to continue their turn. If they answer incorrectly, their turn ends.
6. Go for theWin! Win the game by being the first team to make it back to Sammy's Station with all 3RoboFlags! After a team has collected all 3 RoboFlags, they must be the first team to navigate back to Sammy's Station to win thegame. Important: Teams must land exactly on Sammy's Station to win thegame.
Become a 21st century problem solver by applying the core skills and concepts you learned to other problems.
Competing for Defense and Innovation Defense Advanced Research Project Agency(DARPA) DARPA The Defense Advanced Research Project Agency’s (DARPA) mission is to make pivotal investments in breakthrough technologies for national security. DARPA’s origins date back to the Russian launch of Sputnik, the success of the first satellite into space, in1957. Realizing that the United States and its allies were at a technological disadvantage, DARPA would work with private and public entities to curb these types of advantages and create their own technological breakthroughs. Ultimately over the years DARPA along with its partners have help create not only advanced military innovations such as smart weapons and stealth, but also everyday technologies such as the Internet and Global Positioning Systems(GPS). To foster the continuation of its mission, DARPA holds an annual competition called the Grand Challenge. The Grand Challenge is based off of different scenarios and areas where the agency deems in need of technological advancement. The first Grand Challenge was held in 2004 to spur the development of Autonomous Ground Vehicles(AGV). Unfortunately, none of the robots finished the course. However, Carnegie Mellon University's Red Team and car Sandstorm traveled the farthest distance proving the competition a success by sparking many advancements in this area. The following year, Stanford
University’s AGV finished the course in first place followed by the team from Carnegie Mellon University. In 2007, DARPA announced the Grand Challenge as the “Urban Challenge”. The challenge was to have an unmanned autonomous vehicle navigate an urban area course in under 6 hours while obeying all traffic regulations, avoiding obstacles, and merging into traffic. The competition resulted with Tartan Racing, from Carnegie Mellon University, claiming first with their vehicle "Boss", a Chevy Tahoe. The second-place finisher was the Stanford Racing Team with their vehicle "Junior", a Volkswagen Passat. The Urban Challenge helped pave the way for many advancements in autonomousdriving. Recent Grand Challenges have expanded into other areas such as of cyber security, search and rescue robots and disaster response and communication technologies. Prize monies for winning the a Grand Challenge can range in the millions of dollars, which helps keep teams competitive. DARPA continues these Grand Challenges that will continue its mission of technological advancement that assist us in our everyday life and keep ussafe.
Is there a more efficient way to come to the same conclusion? Take what you’ve learned and try to improveit.
Improve and Tinker with YourBuild • Answer the following questions in your engineering notebook as you tinker with thebuild. • What do you want to change about the build? Explain at least onechange. • What steps will you follow to change the build? Explain with details and/orsketches. • Do your changes to the build make it work more efficiently or powerfully? Explain how. Do the changes make the build usable for more tasks? Will more people want to use it after the change? Explain how the change affects how it isused.
Understand the core concepts and how to apply them to differentsituations. This review process will fuel motivation tolearn.
Review • Turn on the right motor at 50 percent speed would be considereda... • Simple behavior • Basicbehavior • Complexbehavior • All of the above arecorrect • Moving the robot forward for 10 rotations at 50 percent speed would be considereda... • Simple behavior • Basicbehavior • Complexbehavior • All of the above arecorrect • Programming the robot to solve a walled maze would be considereda... • Simple behavior • Basicbehavior • Complexbehavior • All of the above arecorrect • What does the first parameter on the Forward commandcontrol? • Distance • Unit • Amount • Speed of themotor • What does the third parameter of the Forward commandcontrol? • Direction ofturn
Unit • Amount • Speed of themotor • A wait command will timeout the robot for a number of seconds or milliseconds. • True • False • Program the robot to perform a 90 degree turn to the right would be considered... • Simple Behavior • BasicBehavior • ComplexBehavior • All the above arecorrect • What does the first parameter on the turnLeft command blockcontrol? • Direction ofturn • Unit • Amount • Speed of theMotor • What does the second parameter on the turnLeft command blockcontrol? • Direction ofturn • Unit • Amount • Speed of themotor • What does the third parameter on the turnLeft command blockcontrol? • Direction ofturn • Unit • Amount
o Speed of themotor • Breaking down large, complex behaviors into smaller, more manageable tasks is goodpractice. • True • False
Removing Connectors from Beams andPlates Using a pitch shaft to remove a cornerconnector How to Easily RemoveConnectors You can easily remove corner connectors from beams or plates by placing a metal shaft through one of the holes of the corner connector and pulling outward while holding down the beam orplate.
Removing Pins from VEX IQ Beams andPlates Removing a pin from a plate assembly using abeam How to Easily Remove Pins from Beams andPlates You can quickly remove connector pins from beams or plates by pressing a beam against the back of the pin, which partially pushes the pin out, so you can remove it with your fingers. You can use this technique to more easily remove pins from individual plates and beams, or from builtstructures.
Removing Pins from VEX IQ Electronics Removing a 1x1 Connector Pin from a SmartMotor How to Remove Pins that are Stuck in Electronic Components Connector pins can be removed more easily from Smart Motors, sensors, or Robot Brains by using a 1x1 Beam. Push the beam onto the pin and then twist the beam while pulling outward to remove the pin.
Supporting Shafts using Rubber ShaftCollars SupportedShaft Rubber ShaftCollar Added toShaft UnsupportedShaft Supporting a shaft with a Rubber ShaftCollar How to Support Shafts with Rubber ShaftCollars Shafts can fall out of place or alignment very easily if they aren't supported properly. You can make a shaft more secure and prevent it from falling out of place by putting a Rubber Shaft Collar before the end of it. You can then connect the shaft to a support structure with the shaft collar positioned against it. That will allow the shaft to turn but will prevent it from wobbling or fallingout.
Supporting Shafts using Shaft Bushings UnsupportedShaft Shaft Bushing Addedto Shaft SupportedShaft Supporting a shaft with a ShaftBushing How to Support Shafts Using Shaft Bushings Shafts can fall out of place or alignment very easily if they aren't supported properly. You can make a shaft more secure and prevent it from falling out of place by putting a bushing at the end of it. You can then connect that bushing into another beam or additional part. That will allow the shaft to turn but will prevent it from wobbling or fallingout.