Task #1
Create a relational database on computers in a computer classroom using MySQL and MS Access 2013. Design tables, queries, forms, and reports for efficient data management. Learn to connect tables and create data entry forms.

Task #1
E N D
Presentation Transcript
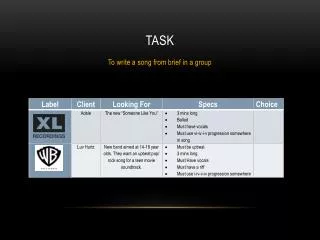
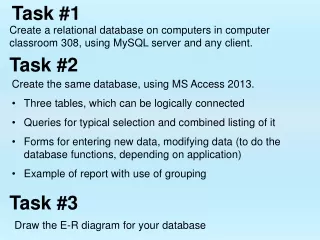
Task #1 Create a relational database on computers in computer classroom 308, using MySQL server and any client. Task #2 • Create the same database, using MS Access 2013. • Three tables, which can be logically connected • Queries for typical selection and combined listing of it • Forms for entering new data, modifying data (to do the database functions, depending on application) • Example of report with use of grouping Task #3 Draw the E-R diagram for your database
Create at least three tables, then insert some testing data.
Define type of each of fields. General text should be the Varchar2 type.Many other properties can be set. Use help if you are not sure.Column description can be set; it is used, when a form is created.
Query can be used for selecting only some of rows by use filtering, or when working with data, presented in more tables, if they are logically connected.Queries is typically used as sources of data for forms.
Connect tables by drag-and-drop a field from one table to the respective field in the other table.Connection line will be added to the scheme. Can be selected by mouse and erased by the "Delete" key on keyboard, or by local menu (use right mouse button)
Now, you can select items from both tables; query will return only connected data (rows) from the tables.
Form can be created using the Create ribbon. You can select "Form design" to create form in the design view. In the next example, the "Form Wizard" is used. Prepared form can be easily adapted (or adjusted), if needed, by "Open in design view" from the list of objects.
Last example is the "Report Wizard".Reports are used when printing data, or exporting to a pdf format.
Skipped: data source selection (query with combination of users and cars, who them rented).Next slide: Grouping options:
Query can be opened in the same style, as table.You can even add new data to original table. If the query doesn't contain some of fields, the default value will be set. If no default value has been defined while designing the table, null will be used. If the null value is not acceptable, an error will be reported.
The next features, as use of the Visual Basic, is not obligatory, but will be counted as some extra points.On the next slide, only cars, for where no client is defined, will be listed.Result = list of available cars.
Lists only cars, where the user id is bigger then zero – zero means “no user”:(for use this convention, the link to user table cannot be fixed as table relation [primary to public key], because of there is no user with id of zero; alternatively specific user, for example with id=1, can be created)
To modify a query, you can use its SQL definition.On the next slides, first create new query, then select table as a data source:
To add all data, click the first line of the list of fields, with the star ( * ) symbol.
To show the query in the SQL form, click to the “View” icon on the Design ribbon.