Download

1 / 46
460 likes | 565 Vues
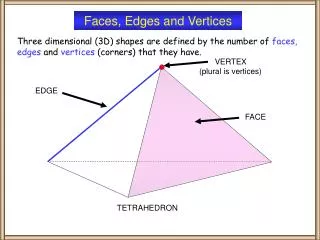
Learn about vertices, finalized structures, and lighting techniques crucial for efficient 3D rendering. Explore vertex layouts, input elements, and shader techniques for optimized graphics rendering in DirectX 10.

E N D
Vertices Finalised and Lighting Begun Paul Taylor 2010
World, View and Projection? Per Object Local World Per Render View Projection
The Vertex Structure D3D10_INPUT_ELEMENT_DESC colourVertexLayout[] = { // Vertex position { "POSITION", // SemanticName 0, // SemanticIndex used for matrix, etc DXGI_FORMAT_R32G32B32_FLOAT, // Format 0, // InputSlot 0 – 15, allows up to 16 vertex buffers per render 0, // AlignedByteOffset D3D10_INPUT_PER_VERTEX_DATA, // InputSlotClass 0 }, // Vertex color { "COLOR", // SemanticName 0, // SemanticIndex DXGI_FORMAT_R32G32B32A32_FLOAT, 0, // InputSlot 12, // AlignedByteOffset D3D10_INPUT_PER_VERTEX_DATA, // InputSlotClass 0 }, }; http://msdn.microsoft.com/en-us/library/bb173059%28v=VS.85%29.aspx
Why Semantic Names? struct PS_INPUT { float4 Pos : SV_POSITION; float4 Color : COLOR0; }; //-------------------------------------------------------------------------------------- // Vertex Shader //-------------------------------------------------------------------------------------- PS_INPUT VS( float4 Pos : POSITION, float4 Color : COLOR ) { PS_INPUT psInput; Pos = mul( Pos, World ); Pos = mul( Pos, View ); psInput.Pos = mul( Pos, Projection ); psInput.Color = Color; return psInput; }
Using SemanticIndex { L"mTransform", 0, DXGI_FORMAT_R32G32B32A32_FLOAT, 1, 0, D3D10_INPUT_PER_INSTANCE_DATA, 1 }, { L"mTransform", 1, DXGI_FORMAT_R32G32B32A32_FLOAT, 1, 16, D3D10_INPUT_PER_INSTANCE_DATA, 1 }, { L"mTransform", 2, DXGI_FORMAT_R32G32B32A32_FLOAT, 1, 32, D3D10_INPUT_PER_INSTANCE_DATA, 1 }, { L"mTransform", 3, DXGI_FORMAT_R32G32B32A32_FLOAT, 1, 48, D3D10_INPUT_PER_INSTANCE_DATA, 1 }, } Per Instance Data? http://msdn.microsoft.com/en-us/library/ee416415%28VS.85%29.aspx
Semantics • Each Vertex Layout must have matching Semantic names with the Shader Technique used: ShaderEffect->GetTechniqueByName • You can have multiple effects in a shader file, but it’s easier to have multiple shaders
Understanding Vertex Buffers Position( 3x Float) Vertex Structure The format of each Vertex passed to the Vertex Shader Colour ( 4x Float) Normal( 3x Float) Element Descriptor Array of Element Descriptors (For each Element in a Vertex) Element Descriptor Element Descriptor Render Effect Render Technique Render Pass Pointer
Create an Input Layout • For each type of Vertex Buffer you will need a matching Input Layout Render Pass Pointer Array of Element Descriptors InputLayout* CreateInputLayout(...)
Using Vertex Layouts • This will enable the layout for each type of buffer you use. (Type being element structure) *Topology is independent InputLayout* IASetInputLayout(...)
The next issue is using Vertex Buffers We know a Vertex Buffer is just a big list of vertices • This list needs to match the Vertex Layout
(Vertex) Buffer Descriptor • How big is the buffer • How is it to be accessed (CPU vs GPU) • How it is to be used
Create a Vertex Buffer (Per Object) A Vertex buffer can hold different types of vertices, but usually holds just one type. Usually the same Vertex type is used for many different components of an object Sphere, Arms, Legs, Etc Buffer Descriptor PC Data Buffer CreateBuffer(...) GPU Buffer Pointer
Now we can Draw Vertex Buffers • Draw(...) • Vertex Count • Start Vertex Location • The means that Multiple Topologies can be drawn from a single buffer • For a contiguous object, this is logical
Topology Settings This is how the Polygons are generated from your Data Buffer The important ones for now are: Point List Line List Triangle List Line Strip Triangle Strip
Point List A B C D E F G H
Line List A B C D E F G H
Triangle List B D A C E F G H ?
Line Strip B D A C E F G H
Triangle Strip B D A C E F G H What about LH VS RH Winding?
Index Buffers We store each index as a DWORD With larger Vertices we can save a lot of room on both the Computer and the Video Card Create a buffer with D3D10_BIND_INDEX_BUFFER DrawIndexed(...)
In Summary we have: • Vertex Layouts (Per Vertex Type) • Vertex Buffers (~Per Object) • Topology Settings (As needed) • Possibly Index Buffers (~Per Object)
Vertex Structure The format of each Vertex passed to the Vertex Shader Position( 3x Float) Colour ( 4x Float) Normal( 3x Float) Element Descriptor Array of Element Descriptors (For each Element in a Vertex) Element Descriptor Element Descriptor .FX File Render Pass Pointer Render Technique Render Effect IASetInputLayout(...) Pass->Apply() CreateInputLayout(...) InputLayout* IASetVertexBuffers(...) Buffer Descriptor PC Data Buffer GPU Buffer Pointer CreateBuffer(...) IASetPrimitiveTopology(...) Draw(...)
What can we use a 3D Texture for? • Terrain • At high vertical displacement very little stretch • Other Solutions to terrain: • Multi-texturing
OpenGL 4.0 • Supports a full parity of Dx11 features • Main deficiencies in GL3 were: • Tessellation Shaders • Compute Shaders
The Problem with lighting • I can’t teach you exactly how to light your game. • In Dx9 you did it their way • In Dx10 you do it your way • In essence we will cover how to perform lighting as typically done in games. • It will be up to you to merge these concepts with future rendering techniques
The Important Properties of Light • It can Reflect, bend, spread and scatter
Most Common Light Sources • Global Illumination • Light Located at Infinity (Distant Light) • Light Located Locally • Uniform Light (Ambient) • Point Source • Intensity is L(p,P0) = (1 / |p-p0|2 ) L(P0) • Spotlights (Directional Lights)
Typical Light Types Point Spotlight Ambient Distant
Point home.elka.pw.edu.pl/.../general/General.html
Spot home.elka.pw.edu.pl/.../general/General.html
Ambient (Area) home.elka.pw.edu.pl/.../general/General.html
Distant (Sun / Moon) home.elka.pw.edu.pl/.../general/General.html
Physical Light Bidirectional Reflection Distribution Function • (BRDF) This is based on 5 Variables: • Frequency • Source Vector (x,y) • Output Vector (x,y) • It also requires a ‘real’ surface
This is a hugely expensive calculation • Most light consists of a large frequency Range • In games we have many fast ways of creating the common effects of light
Firstly we need to get rid of the ‘spectrum’ • The human Eye recognises colours through 3 types of cones • We exploit this behaviour by directly addressing the cones http://www.unenergy.org/index.php?p=1_180_CPV---Concentrated-PV http://www.atmos.ucla.edu/~fovell/AS3/theory_of_color.html
By exploiting this behaviour we can define the colour of light as • Red • Green • Blue • Varying the levels of Red, Green and Blue can make the eye ‘see’ every colour of the spectrum.
The downside to this simplification is that our model of light looses the ability to separate during reflections/refractions. • As a solution to this we can either use multiple lights, or use explicit functions to ‘create’ light separation • For offline rendering you may even consider doing a BRDF Rendering using a more complex Lighting method http://www.tufts.edu/as/tampl/projects/micro_rs/theory.html
Basic Lighting in DirectX http://www.cs.virginia.edu/~gfx/Courses/2002/RealTime.fall.02/Cg/CG%20Effects%20Explained/Cg%20Effects%20Explained.htm
Specular Reflection • Specular • The more specular a surface, the move light is reflected very closely to the angle of reflection • A mirror is a near perfect Specular Surface http://www.indigorenderer.com/joomla/forum/files/specular_material_test_01_168.jpg
Diffuse Reflection(Lambertian reflection) http://torcode.com/ http://www.glenspectra.co.uk/SiteResources/Data/Templates/1product.asp?DocID=389&v1ID=
Emissive • It Glows! http://www.gennetten-concreteartist.com/d-network.html
Translucent Surfaces http://www.trinity3d.com/product.php?productid=1572&cat=293&page=2 http://www.nondot.org/sabre/Projects/Raytracer/
Programming Ambient Light • Sum all of the ambient light sources in the world or partition (usually just one source) • This doesn’t require GPU balls, so we can sum on the CPU, then set a global variable in the GPU shader • Multiply the Colour of each pixel by the ambient intensity. Intensity = 0.0f to 1.0f At 0.0f all pixels are 0,0,0 (Black) At 1.0f all pixels are fully lit, and will match the texture source 1:1
A simple Ambient Pixel Shader float4 Ambient; float4 PS( float4 Pos : SV_POSITION float4 Col : COLOR) : SV_Target { return Col * Ambient; }