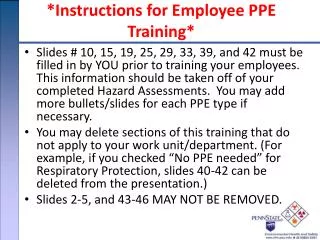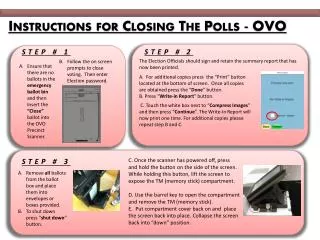
Instructions for Opening Training- OVO
10 likes | 147 Vues
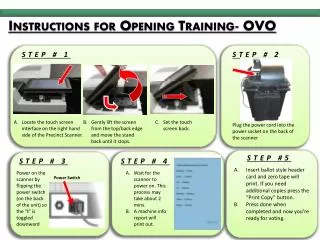
This guide outlines the essential steps to confidently prepare the Precinct Scanner for voting. Start by locating the touch screen interface and gently setting it up. Plug in the power cord, insert the ballot style header card to print the necessary zero tape, and ensure additional copies are available if needed. Follow through by powering on the scanner and waiting for it to initialize, which may take approximately two minutes. A machine info report will be printed, ensuring the scanner is ready for use in the voting process.

Instructions for Opening Training- OVO
E N D
Presentation Transcript
Instructions for Opening Training- OVO STEP # 1 STEP # 2 Locate the touch screen interface on the right hand side of the Precinct Scanner. Gently lift the screen from the top/back edge and move the stand back until it stops. • Set the touch screen back. Plug the power cord into the power socket on the back of the scanner Insert ballot style header card and zero tape will print. If you need additional copies press the “Print Copy” button. Press done when completed and now you’re ready for voting. STEP #5 STEP # 3 STEP # 4 Power on the scanner by flipping the power switch (on the back of the unit) so the “I” is toggled downward Wait for the scanner to power on. This process may take about 2 mins. A machine info report will print out. Power Switch