Download
1 / 30
300 likes | 465 Vues
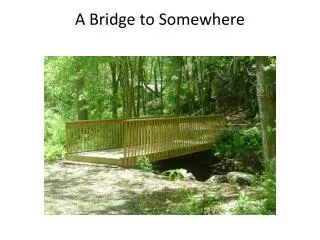
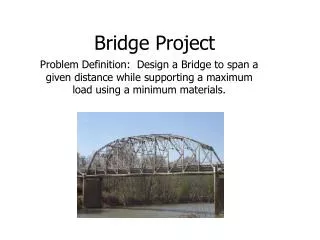
Bridge Project. Problem Definition: Design a Bridge to span a given distance while supporting a maximum load using a minimum materials. Project Goals. The goals for this project are for students to: Learn the design process.

E N D
Bridge Project Problem Definition: Design a Bridge to span a given distance while supporting a maximum load using a minimum materials.
Project Goals The goals for this project are for students to: • Learn the design process. • See practical applications for trigonometry, physics, and engineering statics (force analysis). • Improve skills associated with collecting data and drawing meaningful conclusions. • Experience the usefulness of prototype testing. • Recognize the necessity of good communication skills for engineers by completing memos, reports, drawings, and presentations.
Introduction to Bridge • Bridge Type • Truss Bridge • Arch bridge • Suspension Bridge • Cantilever Bridge
Truss Bridge • Truss design is to support the bridge deck • The truss may have ompression or tension • The joint of truss is important
Truss(force analysis) • Loads members in tension and compression. • Members are pinned at joints (Moment = 0). • Triangles provide stability and strength. • Top members in Compression. • Bottom members in Tension. Hint - Imagine entire truss wrapped in rubber skin, so you have a large rubber box. When you bend it, where would the wrinkles be? They indicate compression.
vs. Beam • Ways to strengthen members in bending. • Decrease overall length (deflections). • Cross section design (moment of inertia) • Use stronger materials (elastic modulus). Compression = Axis of bending Tension Steel
Arch bridge • Appear mostly in Ancient time • New arch bridge is modified to reduce the material
Function of Arch structure • Puts members in compression. • Need horizontal support at abutments. Abutment Arch reduce the bending on the member !
Suspension Bridge • Replace the Beam with cable • Reduce the need for the Pier , Girder and Truss
Suspension • Puts members in tension. • Carries weight up to the top of the towers. • Good for long spans.
Cantilever Bridge • No support at the bridge it self • The material must be very strong • Or the structure must be different
Box Girder Bridge • Box structure reduce the weight and material • Increase the strength on top and bottom to resist compression and tension
Project Constraints testing jig Size: See above & 100 stick limit per bridge Shape: Original ideas encouraged! Strength: Must support a minimum of 15 lbs.
Constraints:Building Materials • 100 Wood tongue depressors (6”) • Glue guns and glue sticks and wood glue • String
Scoring Equation Score = Load at Failure(performance) Weight of Bridge(cost) As engineers, you want to maximize the load held using the least amount of material.
Testing Procedure 2” dowel 2” x 6” thin plate testing jig
Project Break-down • Project Intro (Problem Definition) • Component Strength Tests (Information Gathering) • Individual Brainstorming of Ideas (Idea Generation) • Group Prototype Brainstorming (Idea generation) • Prototype Selection (Idea selection) • Full-Scale Prototype Construction (Implementation) • Prototype Testing (Information Gathering) • Engineering Analysis w/ software (Information Gathering) • Redesign (Idea generation) • Final bridge construction (Implementation) • Final Test Competition! (Information Gathering)
Timeline: Prototype Design, Build, Test – 1 week Final Design, Build, Test – 2 weeks Presentation and report – 1 to 2 classes after Final Test Project Schedule
Grading • Design and testing • Bridge Ideas -10% • Components test Memo-5% • Prototype bridge performance-5% • Draft Report-5% • Project report • Bridge Final Presentation-10% • Competition-5%
Engineering Fundamentals • Mechanics of Materials • Construction Methods & Hints!
What is the easiest way to break a tongue depressor? • Pull? • Push? • Twist? • Shear? • Bend? Principle of Scissors Engineering terms - tension, compression, torsion, shear, & bending
Bending! Thus bridge design Do’s & Don’ts: • DON’Ts • avoid bending bridge members when possible. • avoid compressing long bridge members - causes buckling (a kind of bending). • DO’s • load members in tension and compression (short) when possible. • brace bending members when possible.
Bridge Type we have learned • Truss Bridge • Arch Bridge • Suspension Bridge • Cantilever Bridge • Box Girder Bridge
Quiz Axis of bending • Which orientation of a beam is stronger under bending and why? • Arch members are in T or C? • Label members in T and C I vs. I C C T T T
How can you improve your bridge design? • Incorporate truss structure (triangles). • Design a 3-D structure from the start! • Use short members in compression. • Use string for tension members.(Reduce material and weight) • Avoid overloading joints. • Strengthen base supports and load point.
Component Test-Compression and buckle Test-1 • Compress your spaghetti until it start to buckle(When you don’t feel you need to apply additional force but the structure still keep bending) • Hold(use you hand) the center point to see how much force you need to increase to have buckling • Hold another two point to see how much force you need to increase to reach buckling
Component Test-Compression and buckle Test-2 • Cut the spaghetti in half and try again • Cut the spaghetti in half again and try again • Record all the force and Test Situation
Tension Test on the joint • Specimen preparation • Use four depressor • Two as a group. Glue them together • Drill one hole on the each group • Overlap two group according to test procedure and glue them together • Use hook to hold the structure • Start tension and compression test by force gauge and scale • Do unit conversion if necessary • Take your record home and make excel plot and report
Fatigue Test • Bend Paper clip and count how many cycle it is needed to break it! • Test 5 Paper clip
Torsion Test • Twist a chalk and see how it break • Explain why it happen(explain in Components test Memo )