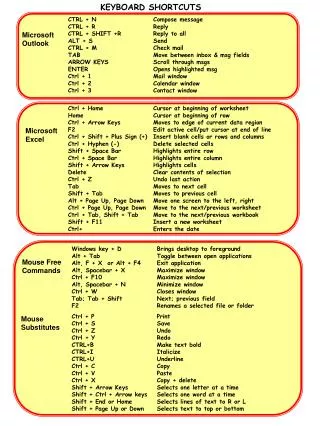
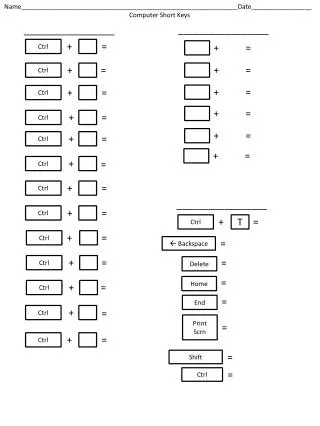
CTRL + Z
CTRL + Z. is your best friend. Use it to undo anything! You can even undo multiple mistakes!. CTRL + C. is a copycat. Use it to copy highlighted text. Even works between programs or off of the internet!. CTRL + V. Is just plain awesome. Use in conjunction with

CTRL + Z
E N D
Presentation Transcript
CTRL + Z is your best friend. Use it to undo anything! You can even undo multiple mistakes!
CTRL + C is a copycat. Use it to copy highlighted text. Even works between programs or off of the internet!
CTRL + V Is just plain awesome. Use in conjunction with CTRL + C to paste what you’ve copied anywhere that you can type new text!
Word Basics Start a new document. It will be blank and have the default formatting. Open a document that you’ve previously created and/or edited. Save the document that you are currently editing. If this is your first time saving this document, the computer will ask you where to save it. Print the document that you are currently viewing.
Word Basics Choose the printer that you want to use. Microsoft Office usually defaults to “Send to OneNote 20XX” which does not print the document. You MUST select a printer before you can print. Printers to select at Northwest U: Rice Lab – select “Rice Lab Laser” Library – Select “Library Copier” or “Library Color Copier”
Word Basics Pick a location. Word will save your document in whatever folder is displayed here. Type a file name here. The box below contains options for saving your document in a variety of formats. To be safe, with papers always use “Word Document” unless your professor prefers a different format.
Word Basics Always head over to the view tab first thing after starting a new document. Why, you ask?
Word Basics Because if you can’t see your document and all of your tools, you can’t work! Print layout is default, and also best for papers. Always enable the ruler. We’ll get to that later. Zooming out to 90% or 80% is usually best.
Word Basics The Home tab has all of the basics that you’ll need for text editing. Current font. Unless otherwise stated, all work for classes should use “Times New Roman” font. Font size. Unless otherwise stated, most assignments should be size 12 font. Text alignment. To center text, choose the option at the tip of this arrow.
Word Basics To modify a section of your document, you must highlight it. To highlight, click and drag your mouse cursor from one point to another. Highlighted! Modify by clicking the buttons directly beneath the font and size boxes.
Word Basics The ruler can help you in many ways. This is the slider. Drag it to move any highlighted body of text to that margin point. The slider.
Word Basics Set-Up for a basic paper that measures 8.5in x 11in Block quote: 2 inches TAB-to point: 1.5 inches Beginning point: 1 inch
Word Basics Insert pictures from your hard drive. Insert default “Clip-Art” images that come standard with MS Word. Edit your header. This will take you to a special editing bar. The header stays the same across an entire document. This tool is what you use for the “RUNNING HEAD” Part of an APA research paper. Page numbers! Word makes it easy to insert page numbers for both APA and MLA Style papers.
Word Basics For APA research style, you MUST be able to have a different first page header. To enable this option in Word, click this box. Now you can format correctly.
Word Basics Before you can continue editing your main document, you must first close the header editing function by clicking here.
Word Basics The page number function will help you easily put a page number into your document. Both APA and MLA writing style require a page number. “Page Number 3” will put the page number at the top right, exactly where you need it.
Word Basics Back at Home tab. Now we need to double-space our paper. To do this, we must edit the paragraph options. Click the VERY small arrow at the bottom right corner here.
Word Basics Make sure this is set to “none.” Under line-spacing options, after selecting your entire document (CTRL + A), select “double.” This will double-space your document. If you accidentally change something else, simply click “default” at the bottom next to “OK.”
Word Basics The review tab is handy for checking your word count and spell-checking. These options are located under the “Home” tab when the review tab is selected.
Word Basics For styles such as Chicago/Turabian that require footnotes, and to add endnotes to any paper, use these tools on the reference tab. The references tab helps you organize and customize your citations. You can even change the style to MLA, APA, and others.

![Board - boats : Boat [] - board : int[][] - counter : int - ctrl : Control + Board(ctrl : Control)](https://cdn2.slideserve.com/4236986/slide1-dt.jpg)