Formatting Webpages With Tables
This tutorial explores the use of HTML tables for webpage formatting, which were once the primary method for web layout. While CSS has largely taken over this role, tables can still be effectively utilized for organizing content. Learn to create various table structures: a single column table for image centering, a two-column layout for "Hot Topics," and more. The guide includes hands-on projects such as creating engaging homepages, aligning images, adding captions, and even merging cells. Ideal for those looking to enhance their web design skills!

Formatting Webpages With Tables
E N D
Presentation Transcript
Formatting Webpages With Tables Working With Websites 6 February, 2012
Tables • Tables used to be the main way to format a webpage • Dreamweaver’s early rise = it built tables well • Table code is cumbersome • CSS (Cascading Style Sheets) do most of the heavy lifting now • You can still use tables to “build shelves” inside an element, and place content on the shelves
Today • Build a 1 column, 1 row table • You can’t center an image in HTML • Put the image in a table, center the table! • Build a 1 column, 2 row table • Image in top row, caption in lower row • Build a 2 column, 3 row table • Home page “Hot Topics” area • Thumbnails at left, short description at right • Thumbnail and title link to entire article • Build a 2 column, 2 row table • Place images and text in cells • Bonus tutorial: merging cells
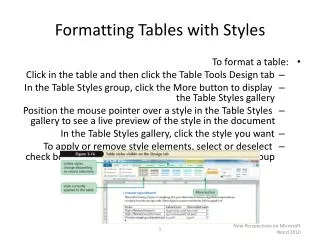
Tutorial 1 • Center a Facebook button • Insert image (tree icon) • Create the table (1x1) • Width of 80 pixels • Drag the image into the table • Select the table (NOT the image) • Align>Center
Tutorial 2 • Add a caption under a photo • Create a table (2x1) • Width of 205 pixels • Insert the photo into the upper cell • Type your caption into the lower cell • Give it a header style • Center the caption: lower left corner of the PI • Align left or right to allow text to wrap
Tutorial 3 • Create a more engaging home page • Find 2 or 3 timely fact sheets or articles • Find thumbnails to match (75x75 px) • Some are already in the “images” folder • Create the table (3x2) • Width of 95% • Center it • Insert thumbnails into left-hand cells • Type or paste a title and short description into the right-hand cells • Format title as h3, text as “none” • Link the thumbnail and the title to the full fact sheet/article
Tutorial 4 • Formatting a page • Create a table (2x2) • Width at 95% • Center it • Insert photos into upper left and lower right cells • Type or paste text into upper right and lower left cells
Bonus Tutorial: Merging Cells • You can merge two cells together by: • Left click and drag across both cells to select them, then… • Click the Merge icon • Same tutorial as last time, but with 3 columns • Merge upper left cells • Merge lower right cells