Law Enforcement Guide: Apprehension & Arrest Procedures
310 likes | 565 Vues
Learn about when to apprehend and arrest suspects, including hand-cuffing procedures, use of force, and risk factors. Discover step-by-step instructions for safe and effective handcuffing techniques. Essential for officer safety.

Law Enforcement Guide: Apprehension & Arrest Procedures
E N D
Presentation Transcript
Apprehension and Arrest • When to apprehend? • When do you need to make an arrest or take someone into custody? • Discuss as a class.
Apprehension and Arrest You need to have what in order to make an arrest? Need to have PC PC to arrest: a set of facts and circumstances which would leave a reasonable and prudent person to believe that a crime has been committed.
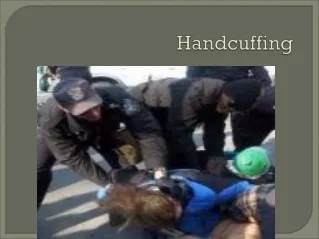
Apprehension and Arrest Contd. • What type of force can be used to apprehend a person/suspect? • The minimum amount of the force necessary to apprehend or arrest a subject. • All subjects that have been taken into custody MUST be handcuffed. - This is for officer safety.
Apprehension and ArrestContinued • Frisk and pat down after handcuffing. • What is the difference between a pat down/Frisk and a search? • Pat Down is a pat down of the outer clothing and feeling for weapons. - Search is limited to those areas where a weapon could be concealed and later retrieved by the person in custody for the use against the officer.
Initiating the Apprehension • Wait for a back up unit, if possible. • When making the approach, remain alert and evaluate the suspect’s demeanor and physical conditioning. • Maintain a safe distance during the initial contact. • Advise the subject of the offense after they are handcuffed. • Take actions quickly and remove the subject to a safe place to avoid bystander interference.
Low Risk HandcuffingProcedure/High RiskHandcuffing Procedure Searching Apprehended Subjects
PREPARING FORHANDCUFFING • Hands up at chest level. • Load handcuffs – make them ready • Make sure they are unlocked/not doubled locked • Check your stance (Bladed Position) • Hands in interview position
Risk Factors inHandcuffing • Know the suspects mental attitude/ behavioral disorders. • Time and location • If the subject is intoxicated • Officer’s attitude.
STANDING HANDCUFFING • STANCE: • Bladed position • At the 2 ½ position • VERBAL COMMANDS: • Get your hands out of your pockets. • Turn around. • Spread your feet apart. • Bend over at the waist • Put your hands behind your back • Palms towards the sky • Look to the left/right • Slowly move in to handcuff the subject. • Grab the subjects right thumb on the right hand. • Place the bottom handcuff on the subjects right wrist. • Shake the left/right hand (grab the fingers not thumb) and place the top handcuff on the left wrist. • DOUBLE LOCK THE HANDCUFFS
KNEELING POSITION • Hands out of pockets • Turn around • Drop to your knees • Put your hands behind your back • Palms towards the sky • Bend over at the waist • Cross your feet • Look away from me • Slowly move in to handcuff the subject. • Grab the subjects right/left thumb on the right/left hand while placing your foot on the subjects right/left foot. • Place the bottom handcuff on the subjects right wrist. • Shake the left/right hand (grab the fingers not thumb) and place the top handcuff on the left wrist. • DOUBLE LOCK THE HANDCUFFS
APPROACHING AT PRONEPOSITION • Check your stance. • Load your handcuffs • Lower your center of gravity (squat as you go in) • Slowly move in dragging your gun side leg • Grab the right/left thumb. • Place the bottom handcuff on the subject.
APPROACHING AT PRONEPOSITION cont… • Drop down without putting any weight onto the subject. • Place the handcuffed hand and arm as close to the left/right leg as possible. • Tell the subject to bring his/her other hand to the middle of their back. • Shake the hand and place the other handcuff onto the subject. • DOUBLE LOCK THE HANDCUFFS WHILE THE PERSON IS STILL DOWN. • Search the subject.
PRONE HANDCUFFING • Drop to your knees • Lay face down • Spread your hands out to your side. • Cross your feet. • Look away from me • Slowly move in to handcuff the subject. • Grab the subjects right/left thumb on the right/left hand while kneeling down. • Place the bottom handcuff on the subjects right wrist. • Tell the suspect to bring hand towards their other hand. • Shake the left/right hand (grab the fingers not thumb) and place the top handcuff on the left wrist. • DOUBLE LOCK THE HANDCUFFS
Direct Approach • Advantage - Observe all movements • Disadvantage - Lose surprise element and vulnerable to resistance
Rear Approach • Advantages - Surprise - Reduces probability of direct attack • Disadvantages - May provoke physical response.
Searching Apprehended Subjects • Keep Balance • Keep Subject off balance • Watch head and shoulders of subject for movement • Keep commands brief • Grab and squeeze the clothing • Find out what is inside the pockets • Always search from the rear. • Search males and Females alike.
Standing Search Position • Start with the subject’s head, hair and cap • Move down to the neck area • When search or frisk the waistband do the front dot the right front right side first. • Search the right back of the subject • Search the waist band • Search the right out of the subject’s leg • Search the bottom right of the leg, including the socks and inside the shoe.
Standing Search cont…. • Move up the inside of the subject’s right leg • Search the groin and buttocks area • Search the left side of the upper body, both front and rear • Move down the inside of the leg • Search the left outside of the leg • Search the left sock and shoe area. • Move back towards the waistband.