Download

1 / 9
90 likes | 216 Vues
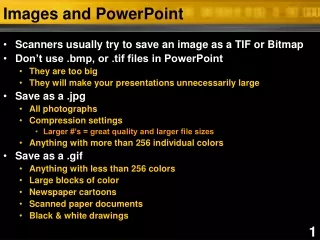
Learn to enhance your PowerPoint presentations by adding images with these simple steps. Begin by clicking the 'Insert' tab, then use the 'Picture' button to access images stored on your hard drive, flash drive, or CD. Locate and select the desired image in the Insert Picture box, and it will appear on your slide. Once inserted, click the image to see formatting options and adjust as needed. Resize or crop your images easily with tools located in the Format tab. Perfect your presentations with visually engaging content!

E N D
7 steps Adding images to a powerpoint
Adding Images to a PowerPoint STEP 1: Click the insert tab
Adding Images to a PowerPoint STEP 2: Click the Picture button to retrieve images from the hard drive, flash drive, and/or CD
Adding Images to a PowerPoint STEP 3: The Insert Picture box will appear. Locate the file folder containing the image. Click the image you want and then click the Insert button.
Adding Images to a PowerPoint STEP 4: The image will appear
Adding Images to a PowerPoint STEP 5: Now click the image one time and notice the formatting dots
Adding Images to a PowerPoint STEP 6: Notice the Format tab highlighted. To make adjustments to your image you will need to select options from this tab.
Adding Images to a PowerPoint STEP 7: Most people need to change the size of their image or crop their image. You will find this tool at the end of the tool bar.
THANK YOU Instructional Support Services