Download
1 / 15
150 likes | 165 Vues
This tutorial provides clear instructions on creating a TFC blank template for construction details, including a concept explanation, attention to construction phase needs, and action steps. It also includes links to CAD detail files and videos for additional guidance.

E N D
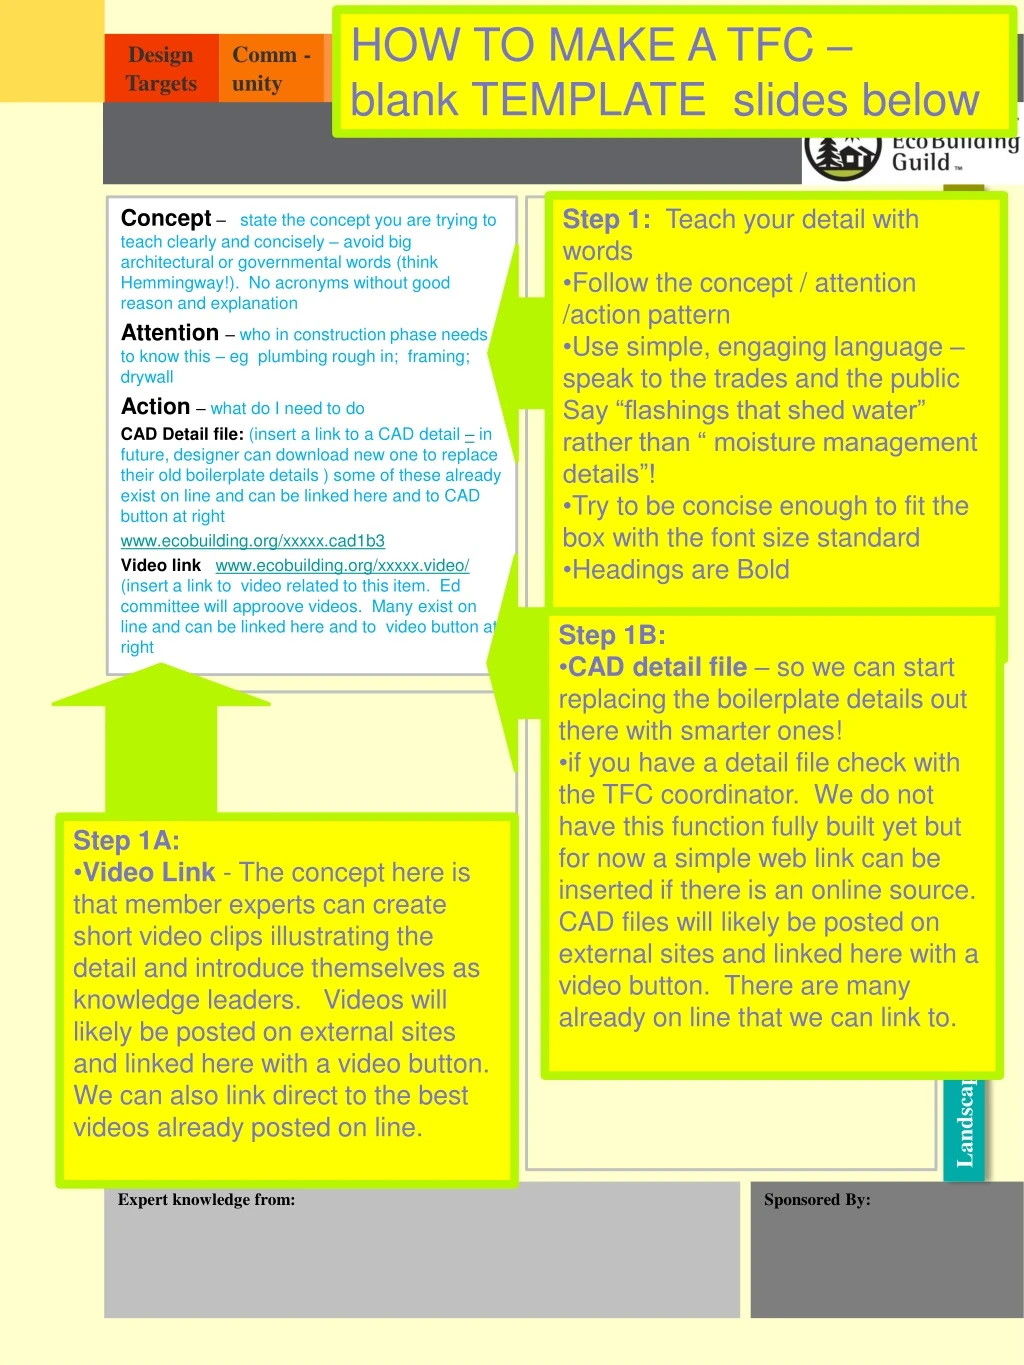
HOW TO MAKE A TFC – blank TEMPLATE slides below • Concept – state the concept you are trying to teach clearly and concisely – avoid big architectural or governmental words (think Hemmingway!). No acronyms without good reason and explanation • Attention – who in construction phase needs to know this – eg plumbing rough in; framing; drywall • Action – what do I need to do • CAD Detail file: (insert a link to a CAD detail – in future, designer can download new one to replace their old boilerplate details ) some of these already exist on line and can be linked here and to CAD button at right • www.ecobuilding.org/xxxxx.cad1b3 • Video link www.ecobuilding.org/xxxxx.video/(insert a link to video related to this item. Ed committee will approove videos. Many exist on line and can be linked here and to video button at right • Step 1: Teach your detail with words • Follow the concept / attention /action pattern • Use simple, engaging language – speak to the trades and the public • Say “flashings that shed water” rather than “ moisture management details”! • Try to be concise enough to fit the box with the font size standard • Headings are Bold • Step 1B: • CAD detail file – so we can start replacing the boilerplate details out there with smarter ones! • if you have a detail file check with the TFC coordinator. We do not have this function fully built yet but for now a simple web link can be inserted if there is an online source. CAD files will likely be posted on external sites and linked here with a video button. There are many already on line that we can link to. • Step 1A: • Video Link - The concept here is that member experts can create short video clips illustrating the detail and introduce themselves as knowledge leaders. Videos will likely be posted on external sites and linked here with a video button. We can also link direct to the best videos already posted on line.
Template for new TFC – delete this box • Concept – state the concept you are trying to teach clearly and concisely – avoid big architectural or governmental words (think Hemmingway!). No acronyms without good reason and explanation • Attention – who in construction phase needs to know this – eg plumbing rough in; framing; drywall • Action – what do I need to do • CAD Detail file: (insert a link to a CAD detail – in future, designer can download new one to replace their old boilerplate details ) some of these already exist on line and can be linked here and to CAD button at right • www.ecobuilding.org/xxxxx.cad1b3 • Video link www.ecobuilding.org/xxxxx.video/ (insert a link to video related to this item. Ed committee will approove videos. Many exist on line and can be linked here and to video button at right • Step 2: Teach your detail with a Drawing , Chart, or Graphic • For construction Details, a simplified cross section view is best. • Simple section drawings can be created right in power point draw tools, or imported as a .jpg picture file from another program. • This box is 3 units wide to 3.5 units high. If you use the same shape (aspect ratio) your drawing will fit just right. • Please use original drawings and charts – not copied from the web. Anything copied should be public property or you should have the right to publish it and fully accred it • simplify the drawing and use color to make details clear • Step 2: • Charts and Graphs - In some cases these may be better than a section drawing, especially in concept cards, materials, etc. • For Example, a bar graph showing 1/10 the energy use may have the most impact on understanding what a Passive House is. • A chart comparing the Global Warming Potential (GWP) of several types of foam insulation would be very useful Try to find the most Elegant, simple visuals that really get the point across! An interesting reference: http://www.amazon.com/Back-Napkin-Expanded-Problems-Pictures/dp/1591843065/ref=pd_sim_b_3
Template for new TFC – delete this box • Concept – state the concept you are trying to teach clearly and concisely – avoid big architectural or governmental words (think Hemmingway!). No acronyms without good reason and explanation • Attention – who in construction phase needs to know this – eg plumbing rough in; framing; drywall • Action – what do I need to do • CAD Detail file: (insert a link to a CAD detail – in future, designer can download new one to replace their old boilerplate details ) some of these already exist on line and can be linked here and to CAD button at right • www.ecobuilding.org/xxxxx.cad1b3 • Video link www.ecobuilding.org/xxxxx.video/ (insert a link to video related to this item. Ed committee will approove videos. Many exist on line and can be linked here and to video button at right Step 3: Take a photo of the wrong way to do this detail. If you need help finding a photo, check with the TFC coordinator or other contacts . We want to use original photos from NW projects if possible Photos must be yours to use or be fully credited and with permission of the owner to be published in a TFC. Photos must be minimum resolution of 150 dpi Step 3: Photos – don’t use photos that are copied from the web or other people’s publications unless by specific permission. Credit photos you get from others with a caption set inside the lower part of the photo space Try to use photos from your own or other real NW projects that are recent. Use low resolution for web site photos - 150-300 dpi is OK So we can make a print version of the TFC, please send medium high resolution copies of all photos in your card to the NWEBG TFC coordinator. Photos for print should be 400 dpi or higher
Template for new TFC – delete this box Step 4: Take a photo of the RIGHT way to do this detail. Click on the icon here and the file you select will automatically insert and size in this placeholder If you need help finding a photo, check with the TFC coordinator or other contacts . We want to use original photos from NW projects if possible Photos must be yours to use or be fully credited and with permission of the owner to be published in a TFC. Photos must be minimum resolution of 150 dpi • Concept – state the concept you are trying to teach clearly and concisely – avoid big architectural or governmental words (think Hemmingway!). No acronyms without good reason and explanation • Attention – who in construction phase needs to know this – eg plumbing rough in; framing; drywall • Action – what do I need to do • CAD Detail file: (insert a link to a CAD detail – in future, designer can download new one to replace their old boilerplate details ) some of these already exist on line and can be linked here and to CAD button at right • www.ecobuilding.org/xxxxx.cad1b3 • Video link www.ecobuilding.org/xxxxx.video/ (insert a link to video related to this item. Ed committee will approove videos. Many exist on line and can be linked here and to video button at right Try to find the most Elegant, simple visuals that really get the point across! An interesting reference: http://www.amazon.com/Back-Napkin-Expanded-Problems-Pictures/dp/1591843065/ref=pd_sim_b_3
Template for new TFC – delete this box • Concept – state the concept you are trying to teach clearly and concisely – avoid big architectural or governmental words (think Hemmingway!). No acronyms without good reason and explanation • Attention – who in construction phase needs to know this – eg plumbing rough in; framing; drywall • Action – what do I need to do • CAD Detail file: (insert a link to a CAD detail – in future, designer can download new one to replace their old boilerplate details ) some of these already exist on line and can be linked here and to CAD button at right • www.ecobuilding.org/xxxxx.cad1b3 • Video link www.ecobuilding.org/xxxxx.video/ (insert a link to video related to this item. Ed committee will approove videos. Many exist on line and can be linked here and to video button at right Step 5: Insert your company Logo in a title block here Block can include a brief description of your expertise or services. Logo Block must be minimum resolution of xxx and 000 x 0000 pixel size
Template for new TFC – delete this box Step 6: SPONSOR BLOCK Insert your SPONSOR Logo in a title block here SPONSOR Block must be minimum resolution of xxx and 000 x 0000 pixel size • Concept – state the concept you are trying to teach clearly and concisely – avoid big architectural or governmental words (think Hemmingway!). No acronyms without good reason and explanation • Attention – who in construction phase needs to know this – eg plumbing rough in; framing; drywall • Action – what do I need to do • CAD Detail file: (insert a link to a CAD detail – in future, designer can download new one to replace their old boilerplate details ) some of these already exist on line and can be linked here and to CAD button at right • www.ecobuilding.org/xxxxx.cad1b3 • Video link www.ecobuilding.org/xxxxx.video/ (insert a link to video related to this item. Ed committee will approove videos. Many exist on line and can be linked here and to video button at right
Design Targets Comm - unity Land Energy Water I E Q Material • EXPANDER TABS SOURCE SLIDE • 00 Design STEP 7 - COPY AND INSERT TABS Use these expanded borders to copy and paste the block labels that relate to your specific card subject If you copy and paste them without moving them, they will center on the same tab and show as an expanded tab. Select more than one label if it applies then copy. The tabs can then be used in print versions as a way to find sections in a stack of cards USE MORE THAN ONE TAB IF NEEDED EXAMPLE: I have designed a TFC on how Insulate foundation footings for Passive House, I would copy and paste each of 3 expanded tabs to my card: Energy Design Targets Foundation Foundation Framing Mechanical Insulation / Wall Finish Landscape
Design Targets Comm - unity Land Energy Water I E Q Material • EXPANDER TABS SOURCE SLIDE • 00 Design STEP 8 - PROPOSED LETTER &NUMBER The TFC coordinator will work with you on assigning a letter/number code for the top left corner. You may propose a code in this spot if you like. These simple codes will help people identify and find your card Examples would codes like: AS 1.0 - air sealing detail 1 AS 1.2 - air sealing detail on similar assembly GRF 2.0 -green roof EXC 3.0 - 3rd card on excavation Foundation Framing Mechanical Insulation / Wall Finish Landscape
Concept – text for concept • Attention – text for who should pay attention (GC, sub, architect, etc.) • Action – details for actual steps to implement this strategy Alternate Step: The next three slides are alternate layouts, if your concept or detail does not fit the TFC template, Try these alternate layouts! In each case, use the instructions above to enter the text section at upper left, a cross section or chart, and photos that show your detail. Remember to use photos that teach, rather than just decorate! THAT’S IT! The next several slides are Templates in 3 formats to start your own TFC! Please submit to the TFC coordinator for peer review and publication – and ask for help if you need it!
Concept – text for concept • Attention –text for who should pay attention (GC, sub, architect, etc.) • Action – details for actual steps to implement this strategy • Links – to web sites, materials, etc • Video Link – to 3 min video – you own is best, or one already on line
Concept – text for concept • Attention –text for who should pay attention (GC, sub, architect, etc.) • Action – details for actual steps to implement this strategy • Links – to web sites, materials, etc • Video Link – to 3 min video – you own is best, or one already on line • AS 2.0
Concept – text for concept • Attention – text for who should pay attention (GC, sub, architect, etc.) • Action – details for actual steps to implement this strategy • Links – to web sites, materials, etc • Video Link – to 3 min video – you own is best, or one already on line
Concept – text for concept • Attention – text for who should pay attention (GC, sub, architect, etc.) • Action – details for actual steps to implement this strategy • Links – to web sites, materials, etc • Video Link – to 3 min video – you own is best, or one already on line
Energy • Concept – warmer indoor air in winter rises with the “stack effect” and escapes into attics. Create a continuous air barrier at the insulated ceiling plane • Attention - Framing or Punch list • Schedule - Pre Insulation • Action - reduce hidden air leakage from hidden chases and openings from interior walls to attics. Pre-rock before building soffits or use plywood., or rigid foam board, carefully sealed at edges. Seal soffit ends if they meet exterior • Use non toxic foams and caulks. Use Fire rated caulks and sheet metal at flues/chimneys • Use foam with no CFC or HFC propellants • AS 5.0 • SOFFIT AT CEILING/WALL Example TFC Correct Fire tape corners Incorrect Soffit open to cavities Insulation / Wall
Energy • Concept – In multi-level homes the stack effect creates pressure differences , and thus air flow into the attic from many cracks and holes. Seal the partition top plates to make the whole ceiling act like a continuous air barrier. This reduces heat loss, moisture in the attic, and the “draw” of air from the crawl space or garage. • Attention – Drywall or Punch list crew following drywall – after lids but before walls • Action – reduce hidden air pathways along plates and uneven wood joints. • Seal top plates on both sides to drywall with continuous bead of glue, caulk, foam, or gasket at all partition walls • CAD Detail file: link tbd • Video link linktbd • Resource: • AS 2.0 • AIR SEAL: DRYWALL at INTERIOR PARTITION WALL Example TFC Insulation / Wall


