Comprehensive Guide for Classroom Performance System (CPS) Program
Learn how to download, set up, and effectively use the Classroom Performance System program for interactive teaching in the classroom environment. Obtain step-by-step instructions for installing, managing databases, creating lessons, importing content, and conducting assessments effortlessly.

Comprehensive Guide for Classroom Performance System (CPS) Program
E N D
Presentation Transcript
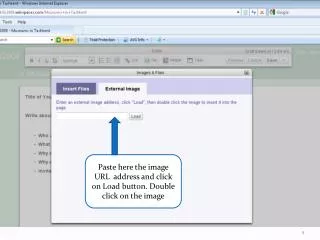
website address: http://www.einstruction.com
Downloading the Classroom Performance System (CPS) program click: SUPPORT & DOWNLOADS
Scroll down to:Classroom Performance System (CPS) 5.62click: DOWNLOAD
If you have an older version of CPS on your computer, you need to remove it. go to: Start, Control Panel, Add or Remove Programs. find Classroom Performance System and click: Remove
You’ll get this icon on your desk top. click on the icon, and this will pop up click: run click something like: next, I accept, next, install…etc.
You now have a copy of the program.You now need to get a copy of your database • Each kit is unique in this school. • Your eInstruction bag has a 3 digit number. • That is the number of your database (aka: hybrid roster)
to get hybrid roster (you can only do this at school) click: my computer, G drive, TECHSTUFF, eInstruction, Hybrid Rosters. Drag your database onto your desktop. (If this does not work, let me know.)
open your database • click Prepare tab • Classes & Students • enter info (under First Name, start with Pad/remote number) • NCwise # under ID
You can make copies and rename your database • right click and choose rename • each class needs its own database • rename by homeroom • make a folder • drop database into folder
Prepare tab Lessons & Assessments tab click the +
right click on database name to add folders. right click on folder to add lessons to a folder. right click on lesson to add questions to lesson.
choose question type (MC4 = multiple choice) type your question and answers click save and next for another question click big save on your last question
Importing lessons Close the database that has your completed lesson. Open the database that needs the lesson. In Prepare, Right click on the place you want lesson. Choose Import Browse until you find the database you wrote your question in. Open the database Choose the lesson
Plug your receiver into any USB port. You’ll want it as close to the center of the room as possible. Your kids should be able to see it.
click on the receiver tabclick on Detect CPS Receiver We have infrared (IR) serial pads (remotes).
To give lesson: choose Engage tab check lesson choose type click advanced to put in grade book click engage click green arrow
To end lesson: play with the buttons on the bar move bar around by dragging blue arrows click Close
To give an Examview test right click on Examview folder choose “Add File” find your tests (usually in a folder inside on Examview folder) Do this on the computer you’ll be giving the test with. (Not your computer at home.)
Report tab • Reports can give you scores after a lesson • Gradebook lets you manually input scores and entire assignments