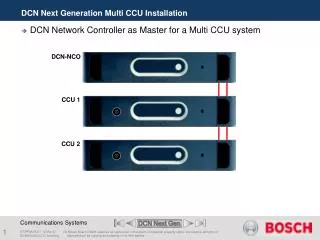
DCN Next Generation Multi CCU Installation
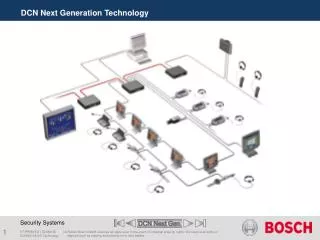
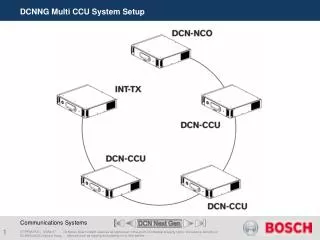
DCN Next Generation Multi CCU Installation. DCN Network Controller as Master for a Multi CCU system. DCN-NCO. CCU 1 . CCU 2. DCN Next Generation Multi CCU setup. Connection by optical fiber. DCN-NCO. CCU 1 Slave ID-1. CCU 2 Slave ID-2. DCN Next Generation Multi CCU setup.

DCN Next Generation Multi CCU Installation
E N D
Presentation Transcript
DCN Next Generation Multi CCU Installation • DCN Network Controller as Master for a Multi CCU system DCN-NCO CCU 1 CCU 2 DCNNG MCCU IO Installing
DCN Next Generation Multi CCU setup • Connection by optical fiber DCN-NCO CCU 1 Slave ID-1 CCU 2 Slave ID-2 DCNNG MCCU IO Installing
DCN Next Generation Multi CCU setup • DCN Network controller as Master for a Multi CCU system DCN-NCO CCU 1 CCU 2 AEX-A DCNNG MCCU IO Installing
DCN Next Generation Multi CCU setup • Connection by optical fiber DCN-NCO CCU 1 Slave ID-1 CCU 2 Slave ID-2 AEX-A DCNNG MCCU IO Installing
Extension Power Supply Extension Power Supply 255 W 85 W 85 W 85 W 85 W 85 W 85 W 255 W Installing and Operating Central Equipment • Centralised Powering Network Controller 65 W Central Control Unit 65 W 65 W 130 W Central Control Unit 65 W 65 W 130 W Audio Expander I&U Instructions DCNNG MCCU IO Installing
Central Control Unit Extension Power Supply Max.50m Max. 100m Extension Power Supply 65 W 65 W 130 W 255 W 85 W 85 W 85 W 85 W 85 W 85 W 255 W Audio Expander Installing and Operating Central Equipment • Centralised powering • De-Centralised powering Central Control Unit 65 W 65 W 130 W Audio Expander I&U Instructions DCNNG MCCU IO Installing
Navigation and operation I&U Instructions DCNNG MCCU IO Installing
Navigation and operation DCNNG MCCU IO Installing
Language setting delegate/chairman units • The 6 default fixed languages in a stand-alone system available are displayed as follows: • English, German, French, Italian, Spanish, Dutch • Optional as 5 languages can be changed with a temporary PC (download and licence tool) or in a system with PC-Control: 5 of total 21 • English, German, French, Italian, Spanish, Dutch, Portuguese, Catalan, Finnish, Latvian, Swedish, Japanese, Czech, Russian, Chinese (Simplified), Chinese (Traditional), Lithuanian, Slovenian, Polish, Slovak, Romanian. • Notes: • English is always in the system and can not be changed! I&U Instructions DCNNG MCCU IO Installing
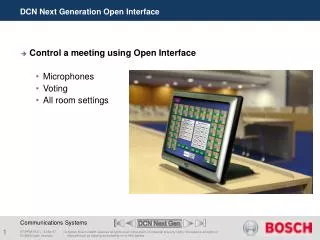
Intercom setting • Assign ‘Stand-alone’ Intercom Operator or Chairman. • Only one Unit can be set with the intercom operator function. • Only units equipped with hand-set can be set as the intercom operator. I&U Instructions DCNNG MCCU IO Installing
Initialize the system • Initialize all units connected to the DCN Multi CCU system this has to be done for each CCU individual. • For more information go to the DCN stand alone technical training part or use the Installation User Instructions. I&U Instructions DCNNG MCCU IO Installing
Installing and Operating Central Equipment End of section MCCU Menu DCNNG MCCU IO Installing