DCN Next Generation Open Interface
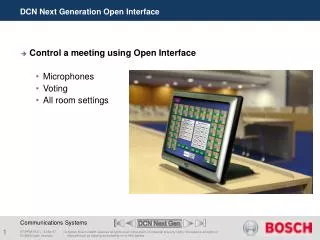
DCN Next Generation Open Interface. Control a meeting using Open Interface Microphones Voting All room settings. Touchscreen Control. Activate Microphone. Touch panel and interface box + custom made software. Custom made SW for controlling DCN. Assigning applications

DCN Next Generation Open Interface
E N D
Presentation Transcript
DCN Next Generation Open Interface • Control a meeting using Open Interface • Microphones • Voting • All room settings DCNNG Open Interface
Touchscreen Control Activate Microphone • Touch panel and interface box + custom made software DCNNG Open Interface
Custom made SW for controlling DCN • Assigning applications • Microphone control and mode selection • Voting control and showing results • Activating Attendance Registration DCNNG Open Interface
Page for selecting DCN voting modes DCNNG Open Interface
Control equipment from AMX & Crestron • www.amx.com • www.crestron.com DCNNG Open Interface
How to handle • Bosch Security Systems BV is not supplying touch screen equipment. • Contact AMX or Crestron dealer locally. • React proactive. Select the dealer which has experience and is dealer for Bosch and AMX or Crestron. DCNNG Open Interface
Synoptic Panel Control DCNNG Open Interface
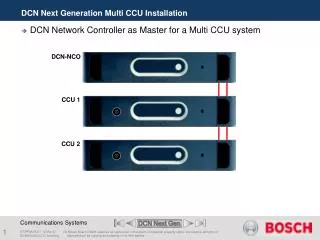
Remote Controller with Single CCU • Authorization Code for Open Interface (LBB4187) needed. • Register your CCU online together with the authorization code to get a license key. • Connect PC to Port 1 of the CCU • Baudrate 115200 • Protocol Full • Enter License key into the CCU using the Download and License Tool. Download & License Tool DCNNG Open Interface
Remote Controller with Single CCU • Configure Port 1 of the CCU for Simple Protocol. • Connect Open Interface Device to Port 1 of the CCU • Baudrate 115200 • Protocol Simple • Open Interface protocol ready for use. Open Interface Open Interface Device DCNNG Open Interface
Open Interface Applications • (SC) System Configuration • (SI) System Installation • (DB) Database • (MM) Microphone Management • (VT) Voting • (AT) Attendance Registration • (MD) Message Distribution • (IN) Simultaneous Interpretation • (IC) Intercom • (LD) Text Status Display • (CC) Camera Control DCNNG Open Interface
System Structure CCU RS232 Open Interface SC SI DB MM VT IN MD AT IC LD CC ACN Units DCNNG Open Interface
Communication • The communication between the CCU and the remote controller is message based (remote functions and update notification). DCNNG Open Interface
Support & Information • DCN Open Interface (DOS) Tool (CCU_DDTK.EXE) • Open Interface Documentation • Protocol Description • Open Interface Commands DCNNG Open Interface
Open Interface Documentation • All information which is needed to make an Open Interface program is described in the Open Interface Documentation. DCNNG Open Interface
CCU_DDTK tool • DOS-based (also Windows DOS-Box) • Uses Simple or Full protocol for communication • Full has handshaking • Simple no handshaking • Definition file (fnid.def) with: • Names • Function number • Input and/or output structures DCNNG Open Interface
System setup Open Interface Training DCN-CCU Central Control Unit RS-232 DDTK PC Chairman Unit ID 1 Del. without LCD ID 2 Del. with LCD ID 3 Del. with LCD & CR ID 4 DCNNG Open Interface
Hands On • Install the DDTK Toolkit • CCU_DDTK -PS -S1:19200 • Note : FNID.def file and CCU_DDTK.exe should be in the same folder. DCNNG Open Interface
Practice 1 System Configuration • Collect System configuration • Use Open Interface document for SC-commands and parameters explanation • Use following commands: • SC_C_START_APP • SC_C_GET_CCU_VERSIONINFO • SC_C_GET_CCU_CONFIG DCNNG Open Interface
Practice 2 System Configuration • Fill DB with your name residing on a unit • Check it with MM Speakers info on LCD. • Use following commands to fill Database with one record: • DB_C_START_APP • DB_C_MAINT_CCU_DB1 1 1 3 1 1 0 0 3 1 1 1 1 1 “Test” DCNNG Open Interface
Practice 3 System Configuration • Add your neighbor to another unit and do not give him voting authorization • Check by running a voting round • Use Following commands: • DB_C_CCU_APPLY_ONE 1 1 3 1 2 0 0 4 1 1 1 0 1 • DB_C_STOP_APP • SC_C_STOP_APP DCNNG Open Interface
Practice 4 System Installation • Try behavior of SI functions : • SC_C_START_APP • SI_C_START_INSTALL 1 • SI_C_SELECT_UNIT 1 1 (turns Unit 1 on) • SI_C_SELECT_UNIT 2 1 (turns Unit 2 on) • SI_C_SELECT_UNIT 2 0 (turns Unit 2 off) • SI_C_STOP_INSTALL • SC_C_STOP_APP DCNNG Open Interface
Practice 5 Microphone Management • Start MM on DDTK and check behavior Remote controller • Turn On/Off Microphone • Add delegate to request list • Change Max number of speakers • Change Microphone mode to override • MM_C_START_MM • MM_C_SET_MICRO_ON_OFF 1 1 • MM_C_SPK_APPEND 3 • MM_C_RTS_APPEND 2 65535 • MM_C_SET_ACTIVE_MICS 3 • MM_C_SET_MIC_OPER_MODE 2 • MM_C_STOP_MM DCNNG Open Interface
Practice 6 Voting • Prepare YES/NO voting • End voting time = 10 seconds • Flashing secret response • Use present key for presence • No Notifications • Results not Compressed • Show result on stop voting DCNNG Open Interface
Suggestion • VT_C_START_APP 0 0 10 • Preparation: • VT_C_SET_GLOBAL_SETTINGS 2 1 0 0 0 0 1 0 0 0 • VT_C_SET_VOTINGPARAMS 1 2 0 0 1 • VT_C_DOWNLOAD_SUBJECT 234 “Voting Test” “Mymotion” • Execution: • VT_C_START_VOTING • VT_C_HOLD_VOTING • VT_C_GET_RESULTS • VT_C_RESTART_VOTING • VT_C_STOP_VOTING 1 • VT_C_GET_RESULTS • VT_C_STOP_APP DCNNG Open Interface
Protocol Layout • Header and Checksum are protocol dependent! Header Message Checksum DCNNG Open Interface
Simple Protocol VS Full Protocol Simple Protocol • Checksum over messages • No acknowledgement • No retransmissions • No line checking • Controller can check use SC_C_CHECK_LINK function Full Protocol • Line checking • Starts after first message • Checksum over messages • Acknowledge of message reception • Retransmissions on failures • We will use Simple Protocol in this training! DCNNG Open Interface
Protocol Layout • The header has a fixed length and forms a leader to recognize the start-point of a message • ESC value = 0x1B • ‘$‘ value = 0x24 • CR value = 0x0D Header Message Checksum ESC $ CR DCNNG Open Interface
Protocol Layout • Currently the following types are defined for communication with the CCU: • MDSM_REMOTEPROCEDURE_REQ : Always transmitted to the CCU. • MDSM_REMOTEPROCEDURE_RSP : Respons back from the CCU • MDSM_NOTIFY : Notification from the CCU Header Message Checksum Type Length Data DCNNG Open Interface
Protocol Layout Header Message Checksum Type Length Data • Defines the actual length of the data present in the array following. • Only this amount of data of the ‘byData’ array is transmitted. DCNNG Open Interface
Protocol Layout Header Message Checksum Type Length Data • The actual function (+ if necessary some parameters) or notification which has to be sent or received. DCNNG Open Interface
Protocol Layout • The Checksum is calculated using the following sequence: • Sum all bytes over the header and the message. • Take modulo 256 of the calculated checksum and do a bitwise invert of the checksum. • This calculated checksum is sent along with the packet. The receiver executes the same calculation and verifies the calculated checksum with the received checksum. Header Message Checksum Checksum Byte DCNNG Open Interface
Packing a request message Header Message Chk Checksum Calculation 1b 24 0d 03 04 00 30 00 1c 00 == 09F 9F hex ESC $ CR 60 30 00 1C 00 03 04 00 Type 28 Length MM_C_SPK_APPEND Inverse 60 DCNNG Open Interface
Unpacking a response message Header Message Chk 30 00 00 00 params 03 04 00 Type Error code Length MM_C_SPK_APPEND DCNNG Open Interface
Unpacking a notification Header Message Chk 05 04 00 0E 00 1C 00 Type Length MM_C_SPK_APPEND_ON_PC 28 DCNNG Open Interface