Download

1 / 34
420 likes | 615 Vues
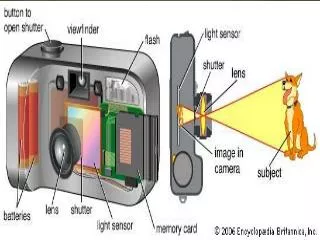
Photography Notes. Range Finder Vs. SLR. SLR- Single Lens Reflex A camera with a built in mirror system which enables viewing focusing to be carried out through the camera lens itself, instead of a separate viewfinder. Look through the lens What you see is what you get

E N D
Range Finder Vs. SLR • SLR- Single Lens Reflex • A camera with a built in mirror system which enables viewing focusing to be carried out through the camera lens itself, instead of a separate viewfinder. • Look through the lens • What you see is what you get • You can adjust Aperture and Shutter speed • Can control the mood of the photograph • In an SLR there is no parallax error because the viewfinder and the lens receive the same view. The light comes through the lens and is bounced off a “reflex” mirror system to the viewfinder. • Range Finder • A focusing aid used on 35mm cameras. A double or split image is shown in the viewfinder until the camera is properly focused, when only one image appears. • Look next to the lens • The image through the lens and through the viewfinder converge • What you see isn’t always what you get • Few, if any, adjustments • Pro- less fragile, good in rough conditions
Parallax Error The difference between the image which you see through the viewfinder and the image which reaches the film through the camera lens. Many of the viewfinders have Parallax correction marks for you to place the subject in so that you have a more accurate idea of where the image will show the most focus (less than 6 ft.) http://en.wikipedia.org/wiki/File:Parallax_Example.svg
Automatic vs. Manual Focus • Automatic Focus- the camera uses sensors to pick a spot to focus on (usually an area of contrast) and that point will be in focus, image usually blurs out from that point of focus. • Manual Focus- You select the area you want to be in focus.
When to use Manual Focus • When doing Macro work- These shots have a narrow depth of field which means that you need to be precise with focusing. Being even slightly out of focus or having your camera choose the wrong area to focus on can completely ruin the shot. When using manual it is a good idea to use a tripod to eliminate movement. • http://digital-photography-school.com/5-situations-when-manual-focus-is-better-than-auto-focus
When shooting in low light- Camera lens often struggles to take a shot in dim light, which can be extremely frustrating when trying to take a candid shot. Switch to manual mode and you can quickly find your focusing point and get the shot you’re after.
When doing portrait shots- majority of your shots of people will need to have their eyes in perfect focus however, sometimes you may want another part of the face to be in focus, while everything else is out of focus.
Shooting through glass or fences- Camera will often get confused and not know what to focus on. By switching to manual you can have precise focus for your shot without noticing the window/fence.
Action photography- When shooting fast moving objects, your camera may have trouble focusing on an object. One way to overcome this is to switch to manual focusing and pre focus on a point that the subject will move through – and shooting at that point. You need to get your timing just right – but you’ll find that it’ll often give better results than relying upon auto focus modes (particularly if you shoot in continuous shooting/burst mode).
Exposure • A photograph's exposure determines how light or dark an image will appear when it's been captured by your camera. Believe it or not, this is determined by just three camera settings: aperture, ISO and shutter speed (the "exposure triangle").
Aperture • One of the exposure controls. It determines the width of the opening that admits light to the sensor. The wider the aperture the more light can reach the sensor, making it possible to take pictures in dimmer light. Compare to iris (dilates when dim, squint when bright). • Measured in F-stops. • Larger the f-stop (smaller number), the more light that is admitted. • The smaller the f-stop (larger number), the more your image will be in focus. • As f-stops get smaller (larger number), exposure time must be increased to let in the same amount of light.
Bracketing • What is bracketing? bracketing is when you take several shots using different exposure settings in order to be sure to get the correct exposure. –4 stops –2 stops +2 stops +4 stops
Depth of Field • Depth of field refers to the distance in a photograph from the nearest point that is in focus to the furthest point away that is still in focus (sharp). It varies depending on camera type, aperture and focusing distance, although print size and viewing distance can also influence our perception of depth of field. • Depth of field gradually becomes softer/ out of focus. • Pictures taken with a small aperture have a larger depth of field. Pictures taken with a large aperture have a small depth of field. http://www.bing.com/images/search?q=Depth+of+Field+Comparison&FORM=RESTAB#view=detail&id=FD2D4A55A8560A6762A81A9EA9916CC0683A57BE&selectedIndex=1
Shutter Speed • The shutter speed specifically refers to how long this light is permitted to enter the camera. "Shutter speed" and "exposure time" refer to the same concept, where a faster shutter speed means a shorter exposure time.
Slow shutter speed Fast shutter speed
Blurred Shot • When taking a blurred shot, remember that the whole image shouldn’t be blurred. If you are shooting as man running, his legs and arms may be blurred but the rest of him should be clear and in focus.
Frozen Motion- Freeze shot When taking a freeze shot remember that the faster your object is moving, the faster your shutter speed needs to be. If depth of field isn’t a concern, then set your camera to the fastest shutter speed. If you are wanting to achieve a greater depth of field then you will have to experiment with your shots.
Panning • A way to reduce blurring is to pan the subject. This works best if you keep the camera moving smoothly both before and after exposure. The tendency is to top panning as you release the shutter speed which can disturb the synchrony of the procedure. Panning helps reduce blur in the main subject, but stationary elements become streaked due to camera movement. • When taking a panned shot, pivot at the waste ax you depress the shutter release button. A Tv of 30 or 60 is a good place to start.
Exposure Triangle • Each setting controls exposure differently: • Aperture: controls the area over which light can enter your cameraShutter speed: controls the duration of the exposureISO speed: controls the sensitivity of your camera's sensor to a given amount of light • One can therefore use many combinations of the above three settings to achieve the same exposure. The key, however, is knowing which trade-offs to make, since each setting also influences other image properties. For example, aperture affects depth of field, shutter speed affects motion blur and ISO speed affects image noise.
ISO • ISO determines how sensitive the image sensor is to light. Determines how noisy the photo will be.
General Rules for using ISO • Use an ISO of 100 or 200 when taking photographs outside in sunny conditions. • If the sky is overcast or it is evening time, then use an ISO within the range of 400 to 800. • Night time or in cases of low light you might need to set your digital camera ISO to 1600 if photographing moving subjects like people or if you are hand holding the camera. The result may be a grainy / noisy image, however it is possible clean that up in post processing.Another alternative is to put your camera on a tripod and use a much lower ISO with a longer exposure. This is the recommended method for landscape night shots.
DYNAMIC RANGE • Dynamic range describes the ratio between the maximum and minimum measurable light intensities. In the real world, one never encounters true white or black — only varying degrees of light source intensity and subject reflectivity. • The dynamic range of a digital camera can be described as the ratio of maximum light intensity measurable (at pixel saturation), to minimum light intensity measurable (above read-out noise). The most commonly used unit for measuring dynamic range in digital cameras is the f-stop, which describes total light range by powers of 2. • SLR cameras can usually capture a great range of light to dark without having the image become solid white or black, respectively (a higher "dynamic range"). This reduces the chance of blown highlights in the sky or other bright objects, and can preserve more details in the deep shadows.
White Balance • White balance basically means color balance. It is a function which gives the camera a reference to "true white" — it tells the camera what the color white looks like, so the camera will record it correctly. Since white light is the sum of all other colors, the camera will then display all colors correctly. • If taken in RAW format, white balance can be applied after the image has been taken. • Incorrect white balance shows up as pictures with orange or blue tints, as demonstrated by the following examples: http://www.mediacollege.com/video/camera/white-balance/ • DSLR cameras have the option of an Auto White Balance (AWB) or Custom White Balance. This Custom white balance is achieved by opening up the settings of your camera and taking a reference shot of something that is neutral in color (white or grey).
Photograph vs. Snapshot • Snapshot • clutter or distractions detract from the subject • heavy shadows or bright washouts • subject can lead viewer out of photo • Unfocused • not composed/point and shoot • Photograph • no distractions in foreground or background • lighting adds to effect • subject positioned for dynamics focused • composed (purpose of lesson)
Composition • The arrangement of subject matter or visual elements within a photograph • Visual Elements –line, shape, position, balance, perspective, texture…
Line • Purpose • Define and separate • Lead in/out • Establish perspective/depth • Determine mood/action • 4 Types • Horizontal—natural, pleasing, short and wide • Vertical—stability, strength, tall and narrow • Oblique— (neither perpendicular or parallel) action lines • Curved/s-shaped—soothing, softer, inviting
Texture • Refers to the feel or visual Touch of the surface of an object • Provides a secondary interest, depth and realism • Influenced by light • Side light is usually best • Time of day (early morning late afternoon)
Shape • Combining or joining of lines • Helps us recognize objects • Avoid conflict • Objects/shapes should be in harmony with each other
Negative Space • Area between the object itself and the border of the photograph • Visual Harmony is created when the negative space closely resembles the main object • Visual Tension is strongest when an object almost touches another object or when it almost touches the border of the photograph
Weighting Influences the impression or feel of a photo • Weighting refers to where the main subject or object is positioned. • Top weighting—can be effective, top heavy, unstable, limited use—(Ice cream cone) • Centre weighting—boring, static, good for formal portraits • Bottom weighting—stable, no movement—(pyramid) • Side weighting—suggests movement either into or out-of the photo
9 Zone Grid and Golden Triangles 9 Zone Grid • Place the main area of interest on an intersection of the 9-zone grid • Odd numbered objects best—secondary objects should also be positioned on an intersection point Golden Triangles • Used for photographs with diagonal lines • Divide into triangles and roughly place the subjects in the triangles.
Rule of Thirds • The rule of thirds is a guideline which applies to the process of composing visual images such as photographs. The guideline proposes that an image should be imagined as divided into nine equal parts by two equally-spaced horizontal lines and two equally-spaced vertical lines, and that important compositional elements should be placed along these lines or their intersections. Aligning a subject with these points can create more tension, energy and interest in the composition than simply centering the subject would.
References Notes compiled from : http://www.cambridgeincolour.com/tutorials/white-balance.htm Wikipedia (insert defined term) Google images (insert defined term) Bill Bradley- compiled resources