Download
1 / 11
110 likes | 225 Vues
This guide outlines the steps to create and save a multimedia slide show presentation. Begin by opening a new file and selecting a slide design. You can easily insert text, photos, clip art, shapes, and sound files using the INSERT tab. After enriching your slides, remember to save your work using the "SAVE AS" option, ensuring compatibility with older software versions. Once completed, you can preview your presentation by clicking on the slide show option from the beginning. Enhance your presentation effectively with multimedia elements!

E N D
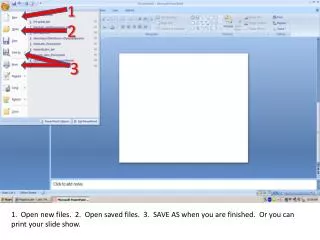
1 2 3 1. Open new files. 2. Open saved files. 3. SAVE AS when you are finished. Or you can print your slide show.
1 2 1. Creating a new slide. 2. Choose your slide design.
2 • 1 • 1 • 2 1. Click in the box to insert words. You can change the font and size and color by highlighting the words after you type them. 2. Go to the INSERT tab to put in a picture or sound.
1 • 3 • 4 • 5 • 2 1. Put in a picture. 2. Put in clip art. 3. Put in shapes. 4. Put in more words. 5. Put in some sound.
3 • 2 • 1 • 4 1. Click on CLIP ART. 2. Type in your key word. 3. Click GO. 4. Double click the picture or click and drag the picture to put it on your slide.
3 • 1 • 1
5 • 4 • 1 • 2 • 6 You can put sound on your slide the same way. 1. Click INSERT. 2. Click SOUND. 3. Click SOUND FROM CLIP ORGANIZER. 4. Type in the sound you want to hear. 5. Click GO. 6. Choose your sound by double clicking on the sound to put it on the slide. You will see a speaker appear when the sound is there.
Tigers • Tigers are big and yellow with black stripes. • Tigers live in the jungle. • I have a stuffed tiger on my bed.
1 • 2 1. Once you are finished, it is time to SAVE AS. 2. SAVE AS a 97-2003 so you can work on a computer that does not have the new Office suite programs. 3. Give it a name you will remember. Click SAVE.
1 • 2 Now it is time to watch your show. 1. Click SLIDE SHOW. 2. Click FROM BEGINNING.