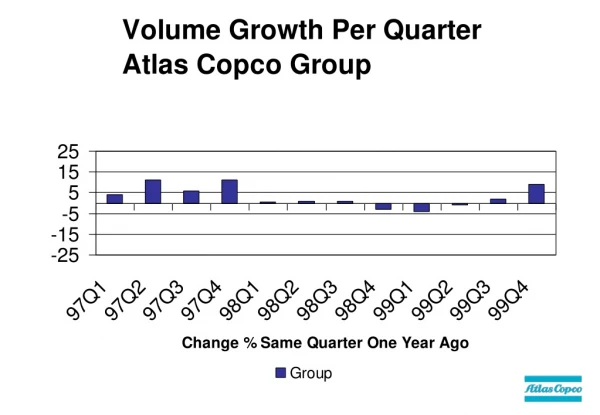
Group 11
Group 11. Daniel Rodriguez, Omar Rodriguez, Pooya Nejad , Joseph Nyamogo. Motivation. Finding a parking spot in one of UCF’s garages during rush hour is frustrating and time consuming.


Group 11
E N D
Presentation Transcript
Group 11 Daniel Rodriguez, Omar Rodriguez, PooyaNejad, Joseph Nyamogo
Motivation • Finding a parking spot in one of UCF’s garages during rush hour is frustrating and time consuming. • There is currently no effective way of determining the closest available parking spot to your final destination.
Objectives • Low Cost • Easy Installation - retro fit • Low Maintenance. • The nodes must have an energy harvesting power source. • Scalable design applicable to any garage size
Specifications • Cost < $50 • 15 seconds or less on lag time. • Detection proximity <= 2 ft. • Wireless range ~ 300ft • Low Power (82.5 mW max load) • Max. transmission power ~ 18.5dBm
Specifications • Max. current draw (idle) ~ 10µA • Max. current draw (transmission) ~ 22mA • Scalable to 1024 nodes. • Minimal maintenance ranging in the time frame of at least 10 years (e.g. replacing batteries where needed) • Installation cost per node is not to exceed $5
Sensor Node • Its function is to simply monitor a parking spot. If a car is occupying a spot, the sensor in the node will recognize it and the node will then transmit that information to the gateway. It is composed of(1) the sensor, (2) the transceiver, (3) the microcontroller, (4) power supply.
Sensor Selection • Inductive loop. • Mechanical Switch/Generator. • Piezoelectric.
Inductive loop • Disadvantages • Power requirements are relatively very high. Trucks would set the minimum sensing distance • Retrofitting is expensive.
Mechanical Switch/Generator • Disadvantages • The sensor requires that the vehicle runs over it, most of the components would have to be strong which could increase our budget. • Wear and tear can reduce the device lifetime. • It is not a proven application for detecting cars. • Complex design
Piezoelectric • Disadvantages • Require a channel to be sawed into the pavement. Retrofitting on existing garages more time consuming and expensive. • We would need a least a meter to ensure that the vehicle would compress the cable when entering or exiting the parking spot.
Anisotropic Magnetoresistive(AMR) sensor (Magnetometer). • The primary function of Anisotropic Magnetoresistive (AMR) sensors is to measure magnetic fields. They can be used to sense low fields (< 1 microgauss), medium fields (1 microgauss to 10 microgauss) and high fields(> 10 gauss). • The sensor monitors the changes in the earth’s magnetic field 0.6 gauss (48 A/m). When a vehicle approaches the sensor a distortion in the earth’s magnetic field will be measured. This measurement can be used to detect the presence of the vehicle.
Magnetometer • The sensor is less prone to false readings. • small enough to fit within a small sturdy housing, such as a light reflector which you find on the highways. Can be shielded from weather elements. • Affordability and low cost of the sensor ($3.79 at digikey ).
Magnetometer • Meets our low energy requirements • Potential use in reading multiple parking spots) • During normal operation, the AMR might need to be auto-calibrated. This can be done with offset straps which is easier than the implementation on other magnetometers (degaussing coils).
Microcontroller • The Microchip PIC24FV32KA304 was chosen. • PIC24F products support 1.8V-3.6V operation • Low-Power Consumption: • Run mode currents down to 8 μA, typical • Idle mode currents down to 2.2 μA, typical • Deep Sleep mode currents down to 20 nA, typical • 1uS wake-up from Sleep • Multiple Serial Communication modules: • Two 3-/4-wire SPI modules • Two I2C™ modules with multi-master/slave support • Two UART modules supporting RS-485, RS-232,
Communications • MRF24J40MA Transceiver module is used to transmit and receive data from the sensor board to the sub gate . • Integrated PCB Antenna with Simple four-wire SPI interface to PIC microcontroller • 2.4 GHz transceiver module that is certified to IEEE 802.15.4 standard. • It has integrated antenna and supports ZigBee, MiWi and MiWi P2P protocols. • Low current consumption- TX 23mA- Rx 19mA- Sleep 2uA
Circuitry • The operating voltage for the transceiver module is 3.3V. This power provided by the Power Management System. • The Transceiver module requires 3 additional pins on top of the four standard SPI pins. The pins include the Interrupt, Wake and Reset.
Network Protocol • We decided to choose the Microchip MiWi wireless networking protocol because it provides a low cost and easy to use development with our Microchip microcontroller. • A network using the MiWi™ protocol is capable of having a maximum of 1024 nodes on a network. • Each coordinator is capable of having 127 children, with a maximum of 8 coordinators in a network. • Packets can travel a maximum of 4 hops in the network and 2 hops maximum from the PAN coordinator. • For implementing a larger network, we need a more complex networking solution like ZigBee but for proof of concept the MiWi protocol is sufficient.
MiWi functionality • The basic function of wireless communication protocol is to transmit and receive data between multiple nodes.
Power Management System • There are three major components that make up the power management system. • Li-Polymer Battery • Power Management Integrated Controller (PMIC) • Solar Panel
Li-Polymer Battery • E-flite Li-Polymer Battery • Capacity: 150mAh 1S 3.7V • 37.5mm x 12.2mm x 5.5mm • Maximum Continuous Discharge :25C • Maximum Continuous Current :3.75A
Solar Panel • AM-1815 • Amorphous Silicon Solar Panel • Typical output at 200 lux: 3.0V , 42uA • Dimensions are 58.1mm x 48.6mm x 1.3mm
PMIC • Linear Technology’s LTC 3105 • Wide VIN Range: 225mV to 5V • Small footprint gives flexibility in PCB design. (3mm × 3mm × 0.75mm)
Sensor Node Firmware • The sensor will be sampled and the data will be stored in the memory • The sensor will be sampled every 15 seconds to conserve battery power • Every sampled data will be compared to the previous value stored, if the delta is greater than the specified threshold, an event will be triggered
Gateway • The Gatewayserves as a coordinator node in our MiWi network, there can be a maximum of 8 sub gates per network. • All the sensor nodes in a floor will be transmitting their data to a Gate Way. • The difference between the Gatewayand sensor node is the lack of the magnetometer sensor in the Gateway. However we will use the same PCB design in case we will need a reference sensor which we could potentially place in any or all the Gateway. • The Gateway is connected to the server directly. However, in a real world application where the distance can be larger, the Sub gate is required as intermediary.
GatewayFirmware • The Gatewayhas a very simple function. All it does is relay messages. • It will receive data from the sensor nodes, and it will relay thedata to the network daemon.
Server The server will do the majority of the data processing, it consist of three main components: • Network Daemon – Processes the network data makes necessary computations and stores values into the MySQL database. • MySQL database – Serves as a medium to store the data • HTTP server – Processes data retrieved from the SQL database and formats for display to an end user. Also provides an interface to configure certain aspects of the system.
Network Daemon • Will run as a background process on the server and is constantly monitoring the serial connection to the wireless sensor network. • Parses the serial data retrieved and determines if any computations need to be performed with the current data. • Calculate the percentage of vacant spaces per Location/Garage/Floor. • Stores the data into the MySQL database. • Will be written in Python
MySQL Database • Will store all the data acquired from the network as well as other computed values. • Will be created and stored in a Linux based VM to allow portability to design and testing across different platforms. • Needed fields include the node Name, node Network ID, node Status and necessary hierarchal data (i.e. the ID and parent ID). • Queries will be performed using built in PHP functions. • We opted with the Adjacency list Model to organize our data due to its simplicity and ease of implementation.
HTTP Server • Apache 2 will be used as the http server. • PHP and MySQL related modules will be loaded to facilitate other properties of the project. • Will be part of the VM where the MySQL database resides.
User Interface • The main focus of the user interface is ease of use and fast information recognition. We want the end user to identify the relevant data as easy and fast as possible. This is mainly due to the fact that the user will most likely be driving while using the application. • The user interface will be written using the jQuery Mobile platform to allow for cross platform device compatibility. • Well known standards are used when for the user interface i.e. HTML, CSS, JavaScript and PHP.
User Interface • The main features of the home page are: • Locations List • Main Navigation bar which includes a Locations/Home link and a Find car Link.
User Interface • Once a location has been chosen the user then chooses a garage. • The main feature on this and every page is the percentage available to the right. Based on this percentage a user will choose which Location/Floor/Garage they will like to park in. • The Percentage will updated using AJAX to avoid page refreshes.
User Interface • The Floor page is exactly like the garage and Locations page as you may have noticed. This is by design as we would like to create consistency allowing users to quickly identify information. • All the location list are generated using PHP loops that dynamically set values for each list item that is used in the SQL queries to retrieve necessary data.
User Interface • The Spaces page differs from the three previous pages due to the fact that will want a 2D representation of the floor in question to provide a sense of direction to the user. • Available spaces will be highlighted and can be chosen from the drop down list when a user is ready to park. If the Park Now button is chosen the user is then registered in the system as being parked in that spot. However it is not necessary as the back end will also identify the parked vehicle. • Future version of this application may provide GPS assistance as well.
User Interface • The find my car link will give the user information on where he/she parked. • Future version of this application may incorporate a positioning system to allow a user to find his/her vehcle.
DONE! Thank you for your time and attention!!