Download
1 / 15
180 likes | 657 Vues
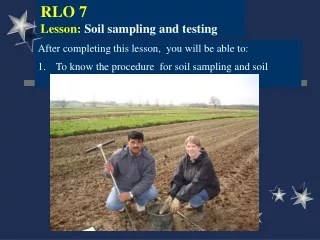
RLO 7 Lesson: Soil sampling and testing. After completing this lesson, you will be able to: To know the procedure for soil sampling and soil testing. Soil testing.

E N D
RLO 7 Lesson: Soil sampling and testing After completing this lesson, you will be able to: To know the procedure for soil sampling and soil testing
Soil testing Soil testing is an acceptably accurate and rapid soil chemical analysis for assessing available nutrient status for making fertilizer recommendations. The major steps in practical soil testing are: Soil sampling Preparation of soil sample Extraction/ analysis of available nutrients by an appropriate laboratory method Interpretation of soil analysis data
1. Soil sampling • Soil sample must be true representative of the field or the part of the field being tested. • The following figure provides the suggested sampling procedure for a small field and for a large field (Peck and Melsted, 1967). • Contd…
Best time for sampling is before sowing or planting. Each sample should have a label describing field identification, farmer’s name and address, previous crops, and the crop for which nutrient recommendation is sought. • Abnormal soil patches, areas near a fence or used for storing animal manure or crop residues should not be sampled . • For soil sampling, special augers with a core diameter of 1–2 cm are convenient, but small spades can also be used. In any case, a uniform slice of soil should be taken from top to bottom of the desired sampling depth. • About 20 cores are taken from a field of 1 ha.
When using a spade the technique given below should be adopted: • Make a V-shaped cut 15-20 cm deep and take a 1 cm slice from the smooth side. Trim sides with a sharp blade or a pen knife leaving a 2 cm strip. Collect this into a clean bucket. Take a number of such samples to make a composite sample.
Sampling Tools: • Shovel, spade, khurpi, augers • Use clean tools • Sample from the proper depth and location • Place samples in clean bucket for mixing
2. Preparation of soil sample After the sample reaches the laboratory or processing room it has to be dried, ground and sieved. Drying:Samples are generally air-dried (25-35oC; relative humidity 20-60%) and stored. For certain determinations such as ammonium and nitrate N, exchangeable K, acid extractable P and ferrous iron, fresh samples from the field without any drying are required. Results of soil analysis are expressed on oven dry basis. contd….
2. Preparation of soil sample Sieving:Field moist samples prior to drying can be made to pass through a 6 mm sieve (about 4 mesh per inch) by rubbing with fingers. This practice seems of much advantage in case of heavy soils. Soils in the right moisture condition can even be passed through a 2 mm sieve (about 10 mesh per inch). contd….
Grinding:A roller, rubber pestle in an agate mortar, or a motorised grinder are commonly employed. Crushing of the gravel and primary sand particles should be avoided. For heavy soils, it is better to pass these through a 2 mm sieve before allowing them to get completely air dried. Mixing:Sample should be thoroughly mixed by rolling procedure. Place the dried, ground and sieved sample on a piece of a cloth. Grasp the opposite corners and then holding one corner down pull the other corner across the sample. Now process is repeated back in the reverse direction. contd…
Storing:Store the soil in paper cartons (Soil sample box) using a polythene bag as an inner lining. Label the carton properly giving cultivators or experimenter's name, plot number, date of sampling and your initials.
3. Extraction/ analysis of available nutrients by an appropriate laboratory method • Several extractants are used to extract the available nutrients from soil in the laboratory. The list follows: • Available nitrogen – Alkaline permanganate • Available phosphorus – Sodium bicarbonate (for neutral or alkaline soils), Bray and Kurtz extractant No. 1 (for acid soils) • Available potassium - Ammonium acetate • Micronutrient cations (Zn, Cu, Mn, Fe)- diethylenetriaminepentaacetic acid (DTPA) • Boron – Hot water • Molybdenum - Grigg’s reagent (ammonium oxalate of pH 3)
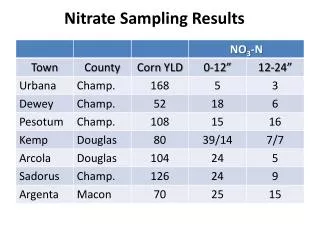
4. Interpretation of soil analysis data For macronutrients, the results generally classified into categories of supply, e.g.: low, medium and high (see Table below ). For these categories, the nutrient amounts required for an optimal or stated yield level are estimated. For micronutrients, a critical level is generally used to decide whether an application of that nutrient is needed.
For nutrients other than N, P and K, a single critical level is usually designated below which a soil is considered to be deficient in that nutrient, hence requiring its application. General soil test limits used for classifying soils into different fertility classes in the following Table:
Concluding remarks: After soil testing, nutrient supply maps can be drawn for farms, larger regions and countries. Such maps provide a useful generalized picture of the soil fertility status. However, the extent to which soil fertility maps can be used for planning nutrient management strategies depends on how thorough, recent and representative the soil sampling has been done. Macro level maps are more useful as an awareness and educational tool rather than for determining out nutrient application strategies. Hence, soil testing is a must to obtain economic yields from crop plants.