Driver Station
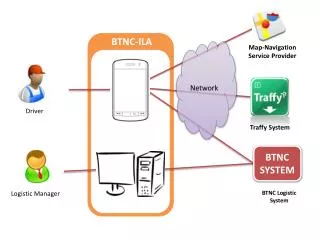
Driver Station. MVRT 2009 – 2010 Season. Add information . Classmate PC. USB Hub. Breadboard. Joysticks. Stop Button. Classmate PC. Classmate PC Accounts Developer – Like regular PC Account Administrator Driver Driver Station software can be installed on other computers

Driver Station
E N D
Presentation Transcript
Driver Station MVRT 2009 – 2010 Season
Add information Classmate PC USB Hub Breadboard Joysticks Stop Button
Classmate PC • Classmate PC • Accounts • Developer – Like regular PC Account • Administrator • Driver • Driver Station software can be installed on other computers • 2 USB ports • 1 Ethernet • 16 gigabyte hard drive • Downsides: • Very small key size – making it very difficult to code • Relatively slow • Advantages: • First provides a charger during the match for the classmate during competition (as of 2010-11 season)
Stop Button • Connected by the USB hub to the computer • Acts as an Emergency Stop button • In general the program can not be run without connecting the stop button • Although you can bypass this by switching to Diagnostics tab, double-clicking on the red LED labeled Stop Button, and acknowledging the message • Press Ctrl-Alt-Enter • Have to reboot the cRio after pressing the stop button • Reboot Robot button no longer works after Stop button is pressed, so manual reboot is needed. • Sometimes it does not work when plugged into the USB hub
Cypress FirstTouch • PSoC 3 • A board you can attach to a standard breadboard that allows you to use digital and analog devices with your driver station. • Need to install PSoC programmer in order to install the firmware on the board • Need to both install firmware (a hex file) onto the board and a USB interface image for Labview in order to get the FirstTouch running. • Only Digital and Analog Pins work with the Dashboard, other functions such as the accelerometer are disabled.
Dashboard • Shows the camera output • Shows the communication with some of the inputs and outputs including the solenoid, PWM
Dashboard Customizing • Able to customize dashboard by editing the dashboard project
Operations Tab • Shows the battery's volts on the robot • Shows communication with the robot • Shows whether code uploaded • Shows whether stop button is connected • Able to choose between teleoperated, autonomous and practice mode • Enable and disable buttons • Even if you are in a different window, the space bar will enable or disable the robot • Has elapsed time since you enabled the robot • Shows PC battery • Can choose which team you are (red or blue)
Diagnostics Tab • Shows a detailed report of the communication with each of the connected devices • Detailed error log • Helpful for debugging code • Button for rebooting the cRio
Setup Tab • Set team number • Sets IP address by itself • Allows you to set variables in a simulated match • Button to run practice match is in operation tab
I/O Tab • Simulates digital inputs and outputs • Simulates analog inputs and outputs
Labview Changes 8.6 2009 – 2010 Season
What is LabVIEW? • Graphical data flow language • Easy drag-and-drop functions • Used by scientists and engineers • Uses VI’s (Virtual Instruments), which comprise of a block diagram and a front panel, to manipulate data.
Changes in LabVIEW • Examples Update • Robot Framework • Global Variable Changes • Initializing global variables • Inputting global variables • SubVI Compatibility • LabVIEW diff • LabVIEW Clean up
Examples Updated Analog Input Example The examples have directions on how to wire the device.
Robot Framework • LabVIEW 8.5 has Basic and Advanced frameworks when creating a new project • Now we only have one framework, which is similar to last year’s Advanced Framework
Initializing Global Variables Old New • DevRefs initialized • DevRefs grouped into a bundle • bundle goes to the global variable ‘Robot Data’ • Advantages • Easier to keep track of where variables change • DevRefs initialized • DevRefs become global variables (becomes part of Refnum registry) • Advantages • neater and cleaner • easier
Inputting Global Variables Old New • input ‘Robot Data’ • unbundled ‘Robot Data’ to access DevRefs • Advantages • Easier to keep track of where variables change • input global variables • Advantages • neater and cleaner • simpler
SubVI Compatibility • SubVIs made in LabVIEW 8.5 can not be used directly in LabVIEW 8.6 • To use the 8.5 SubVIs • Open the old SubVI in LabVIEW 8.6 • Save the SubVI as an 8.6 file • Make sure the DevRef names match • If you do not transfer the SubVIs correctly, it gives an error message while running
What is LabVIEW Diff • LabVIEW 8.6 includes a new feature for FRC teams called Diff • LabVIEW Diff allows us to compare two Vis and find out all the differences • This can be very useful in comparing LabVIEW 8.6 default code with LabVIEW 8.5 default code to see what has changed • It can also be used to see the differences between different versions of your own code.
The first choice, Compare VIs, only compares VIs within a project.
The second option, Compare VI Hierarchies, compares any two VIs.
Pick what attributes of the Vis you want to compare here. This is what you will see when you first press Compare VI Hierarchies.
Then press Browse Files and navigate to the two VIs you want.
This shows the differences in writing. This is what it looks like after pressing Compare Hierarchies The symbols seen here show what is different. Double click on any of the VIs under the VIs in Hierarchies
After double clicking one of the VIs, this screen appears showing the differences and details.
After double clicking on any of the differences, LabVIEW highlights the differences graphically.
Clean Up Feature • In LabVIEW 8.6 the clean up feature allows us to clean up the whole block diagram with the press a button. • The shortcut is Ctrl-U to clean the block diagram. • Another shortcut is the broom icon • This can be extremely useful when cleaning messy code.
First we go to Edit tab and under it we click Clean Up Diagram. Another way to do this is to press Ctrl-U or click the broom icon.
When you press clean up diagram again it shows another way it can be arranged Take notice to the position of the comments in this code
This another way it can be arranged Comments are kept near the things they start with
Thanks to... Beach Bots, Team 330 FIRST