Download
1 / 21
220 likes | 1.02k Vues
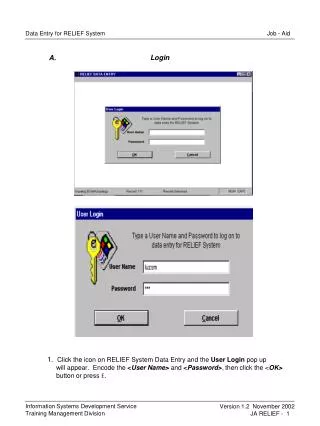
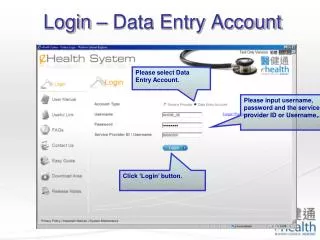
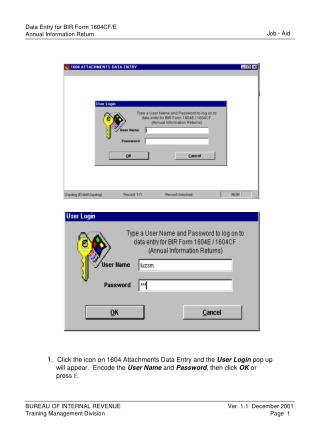
1. Click the icon on 1604 Attachments Data Entry and the User Login pop up will appear. Encode the User Name and Password , then click OK or press E. 2. The Main Menu will appear together with the BIR System Message pop-up. Then click Yes or press E .

E N D
1. Click the icon on 1604 Attachments Data Entry and the User Login pop up will appear. Encode the User Name and Password, then click OK or pressE.
2. The Main Menu will appear together with the BIR System Message pop-up. Then click Yes or pressE. Note: The BIR System Message pop-up will appear only on the initial installation of this program to capture information of the Withholding Agent. 3. The Withholding Agent Informationscreen will appear. Fill in all mandatory fields, then click Save button. The Revert button is used to undo encoding or when the user does not want to save the encoded data of the withholding agent. Once the Withholding Agent Informationscreen is filled up, the next time you view the same screen to update information, Edit & Close buttons are activated. Note: If field validation rule is violated, an Error Messagepop up will appear.
Add/Update 1604CF Attachments 4. After saving the encoded information of the withholding agent, the Main Menu screenwill appear. The selection buttons for attachments will be activated. Click 1604CFbutton or pressE. 5.The 1604CF Menu (Annual Information Return of Income Taxes Withheld on Compensation and Final Withholding Taxes)screen will appear. The Year ofReturn Periodfield is defaulted at the system year but the user has the option to enter the same.
1604CF Schedule 5 Data Entry 6.In the 1604CF Schedule 5 Data Entryscreen, click Addbutton to add or encode a record. Take note that after clicking the Addbutton, the Save, Revert and Exitbuttons are activated.
7. All mandatory fields must be properly filled up. After encoding data on the last field, press E. Note: An Errorpop up screen will appear when there is still a mandatory field not yet filled up. 8. A Question pop up message will appear. Click Yes to add another record and No if not. The cursor will go back to the original screen. Click the Exitbutton.
9. A pop up message will appear asking if you want to exit, click Yes button to return to 1604CF Menu screen. 10. All buttons are displayed and activated when you have encoded and saved multiple data. User may use all activated buttons (i.e. Top, Next, Prev, Bottom, Inquiry) to go to other records.
1604CF Schedule 6 Data Entry Note: Follow the same procedures in encoding data for 1604CF Schedule 5 (Nos. 6 to 9).
1604CF Schedule 7.1 Data Entry Screen Note: Follow the same procedures in encoding data for 1604CF Schedule 5 (Nos. 6 to 9).
1604CF Schedule 7.2 Data Entry Screen Note: Follow the same procedures in encoding data for 1604CF Schedule 5 (Nos. 6 to 9).
1604CF Schedule 7.3 Data Entry Screens Note: Follow the same procedures in encoding data for 1604CF Schedule 5 (Nos. 6 to 9).
1604CF Schedule 7.4 Data Entry Screens Note: Choose among the folders (i.e. Non-taxable, Taxable, Other Payments) in encoding data. Follow the same procedures in encoding data for 1604CF Schedule 5 (Nos. 6 to 9).
Add/Update 1604E Attachments 11. To add 1604E attachment, click the 1604E button and the 1604E Menu (Annual Information Return of Creditable Income Taxes Withheld [Expanded] / Income Payments Exempt from Withholding Tax)screen will appear. The Year of Return Period field is defaulted at the system year. Click Add/Update button to add/encode a record. Then follow procedures in encoding data for 1604CF Schedule 5 (Nos. 6 to 9).
1604E Schedule 3 Data Entry Screen Note: Follow the same procedures in encoding data for 1604CF Schedule 5 (Nos. 6 to 9).
1604E Schedule 4 Data Entry Screens Note: Follow the same procedures in encoding data for 1604CF Schedule 5 (Nos. 6 to 9).
Print / Inquire on a Taxpayer Screen (1604CF/E) 12. To print or inquire a record, click Print/Inquire button and the Inquiry Screen will appear. To view the entire report in excel format click eXcel Report button.
13.Click the Searchbutton and the Search Entrypop-up will appear. Encode the TIN or Taxpayer’s Name you want to inquire. Click the Okbutton and the record you are inquiring will be highlighted. Note: All other schedules (i.e. 1604CF Schedules 6, 7.1, 7.2, 7.3 & 7.4 1604E Schedules 3 & 4) have the same inquiry screen.
14.Click Viewbutton to view the report on line or eXcel Report button to the report in excel format. Click the Printer icon on the Print Preview tool bar to print the report. Then close program to go back to Inquiry Screen.
To Load / Save File 15. To load / save data encoded into the diskette, click Generate File button. A Save As pop up screen will appear, choose the folder where you will save data then click Save button.A pop up message asking if you want to view the file created will appear. Click Yes and the flat file of the data will appear. Click No and pop up message informing that the file was successfully created will appear. Click Ok to go back to 1604 CF Menu screen
Utilities 16. Click Utilities button on the Main Menu. Utilities Menu screen will appear. Select and click the button you will use.
Note: If user click Printer Setup button on the Utilities Menu screen, the Print Setup screen will appear. Click Ok to print report. Note: To change user, click Change User button on the Utilities Menu screen. User Login screen will appear then fill in the new user name and password, then click Ok.
Note: To delete other users, click the Delete User button on the Utilities Menu screen, then the Delete User Login screen will appear. Only user with “ROOT” Access Code can delete other users with code “ADD” and “INQ”. Note: To change password, click the Change Password button on the Utilities Menu screen, then the Change Password screen will appear. Fill in all enterable fields then click OK.