Inserting WordArt
Inserting WordArt. WordArt has been enhanced for Word 2010 with more vibrant colors and shapes and a gallery of text styles. When you insert a WordArt object, the Drawing Tools Format tab opens. In this exercise, you learn to insert WordArt in a document. . Step-by-Step: Insert WordArt.

Inserting WordArt
E N D
Presentation Transcript
Inserting WordArt • WordArt has been enhanced for Word 2010 with more vibrant colors and shapes and a gallery of text styles. • When you insert a WordArt object, the Drawing Tools Format tab opens. • In this exercise, you learn to insert WordArt in a document.
Step-by-Step: Insert WordArt • USEthe document that is open from the previous exercise. • Select Margie’s Travel. Click the Page Layout tab and, in the Paragraph group, click the up arrow button in the After box to change the Spacing After to 66 pt. This creates spacing between the heading and subheading. • Click the Inserttab and, in the Text group, click the WordArtbutton to display the menu as shown at right.
Step-by-Step: Insert WordArt • In the WordArt gallery select Fill – White, Drop Shadow (first row third option).The Drawing Tools Format tab opens. The lettering of the Margie’s Travel heading takes on a new appearance and style. • The WordArt heading, Margie’s Travel is selected. A box appears around the WordArt; place your insertion point to the center-right sizing handle until it changes to a double-headed arrow, and drag to the right margin. The subheading automatically moves down one line as you resize the heading. • In the WordArt Styles group of the Format tab, click the Text Effects button, then select Transform, and under the Warp section select Inflate in the first column, sixth option.
Step-by-Step: Insert WordArt • The WordArt, Margie’s Travel,is still selected. In the WordArt Styles group, click the Text Fills button. In the Theme Colors, select Dark Blue, Text 2,Darker 25%.The text is outlined in white while the text coloring is dark blue. • In the WordArt Stylesgroup, click the Text Outlinebutton. Under the Theme Colorssection of the Text Outline select Red, Accent 2,Darker 50%. The document should resemble the one at right. The WordArt is formatted with a red outline. • SAVE the document as travel_flowchart2 in your USB flash drive in the lesson folder and close the file. • LEAVE the document open to use in the next exercise.
Using SmartArt Graphics • SmartArt graphics are visual representations of information that can help communicate your message or ideas more effectively. • SmartArt graphics and designer-quality illustrations can contribute to eye-catching documents that draw the attention of the target audience. • The table on the next slide gives some examples of the type of information you can display with each category of SmartArt graphics. • Earlier in this lesson, you learned to convert pictures to SmartArt with captions.
Using SmartArt Graphics • In the following exercise, you learn to insert SmartArt graphics into Word documents and add a caption to the graphics.
Step-by-Step: Use SmartArt Graphics • OPENa new, blank document. • Click the Insert tab, in the Illustrations group, click the SmartArt button. The Choose a SmartArt Graphic dialog box appears. • Click the Relationshipcategory and then select Equation as shown at right. Use the scroll bar to locate the equation graphic in the third column sixth option. • Click OK to insert the Equation SmartArt graphic into your document. The placeholders are placed in the graphic and ready for you to key information. Text can be keyed in the placeholders or in the Text Pane
Step-by-Step: Use SmartArt Graphics • On the Design tab, click the Text Pane button to enable—the text pane appears enabling you to key text in each element of the graphic equation. The first placeholder is selected by default and ready for you to key text as shown above. • Key the information as displayed at right. Click to move to the next element and key the remaining text. As you key text, Word auto-matically adjusts the text to fit in the graphic. If you press the Enter key at the end, another element is added to the equation. Click the Close button in the Text Pane or in the Create Graphic group; click the Text Pane button to close.
Step-by-Step: Use SmartArt Graphics • In the Design tab, in the Layouts group, click the drop-down arrow at the More arrow to produce the Layouts gallery, then select More Layouts. The Choose a SmartArt Graphic dialog box appears. Select Picture, then select Bubble Picture List (third column sixth option) from the menu that appears. Click OK. The equation’s graphic is replaced with the Bubble Picture List, and text is carried over to the new layout. The text you added in step 5 now appears as captions beside the bubbles in the SmartArt graphic. An image icon appears in the middle of each circle. • To add an image to a bubble, click the first image icon for the Palm Trees; the default Insert Pictures dialog box opens. Use the scroll bar to locate your USB flash drive and click the lesson folder. Click the image for the palms to select, then click Open or double-click on image. The image is inserted in the first bubble and is automatically resized and adjusted.
Step-by-Step: Use SmartArt Graphics • Click the image in the bubble for the second image by Beach. The Insert Picture dialog box opens. Select the beach picture, and click Open or double-click on the image. The beach image is inserted in the bubble by the caption, Beach. • For the Relaxation Bubble List, click the image in the bubble. The Insert Picture dialog box opens. Select the relaxing at the beach picture and click Open or double-click on the image. The relaxing at the beach image is inserted in the bubble by the caption, Relaxation. The document should resemble the one at right.
Step-by-Step: Use SmartArt Graphics • On the Design tab, in the SmartArt Styles group, click the Change Colors button. Then under the Primary Theme Colors section, click Dark 2 Outline. The Bubble graphic now has an outline style applied. Click outside the Bubble graphic layout to deselect. • SAVEthe document as travel_sign in your USB flash drive in the lesson folder and close the file. • LEAVE Word open to use in the next exercise.
Inserting and Formatting Clip Art • Clip art is a collection of media files available for you to insert in Microsoft Office documents that can include illustrations, photographs, video, or audio content. You can search the entire Microsoft Office Clip Art Gallery, or you can limit your search by using the Clip Organizer. • The Clip Organizer collects and stores clip art, photos, animations, videos, and other types of media to use. You can categorize clips into a collection for easy access. • After you insert a clip art object into your document, you can position it within text on the page, add a caption, resize the clip art, apply artistic effects, compress the clip art, and more.
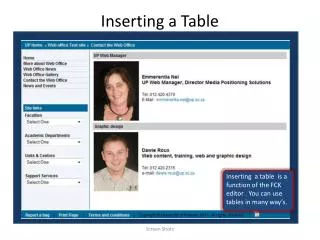
Inserting, Resizing, and Adding a Caption to Clip Art • Clip art refers to picture files and are inserted in a document. • The clip can be resized for better management within the document so that you can position it correctly. • In this exercise, you learn how to insert a clip art graphic image file, resize the image, and add a caption to it.
Step-by-Step: Insert, Resize, and Add a Caption to a Clip Art • OPENa new, blank Word document. • Key Explore the World and select text. On the Home tab, Font group, change the font to Cambria, and font size to 36 pt. In the Paragraph group, click the Center button. Deselect text. • Press Enter. • Click the Insert tab and, in the Illustrations group, click Clip Art. The Clip Art pane appears to the right of your document. • In the Search For box, key travel. Clip art appears in the results box. • In the Results Should Be box, click the drop-down arrow to view the four types of media searches. Maintain the default selection: All Media Types (if you wanted to limit your search, you could click to deselect this check box then click the check boxes beside the collections you wish to search). • Click Go to produce the search results.
Step-by-Step: Insert, Resize, and Add a Caption to a Clip Art • In the Results pane, scroll down and in the first column sixth option click the airliners, airplanes, concepts . . . option. A screen tip will appear displaying the keywords for the clip art. Click the drop-down arrow by the clip art, and then click Insert. The image should match the at right. • The clip art is selected, hold the Shift key (to maintain the proportions of the clip art picture) as you click and drag the bottom right sizing handle of the clip art to make it smaller—2.11” in height and 3.17” wide. You can also use the Height and Width buttons in the Size group to crop by precise measurements.
Step-by-Step: Insert, Resize, and Add a Caption to a Clip Art • CLOSEthe Clip Art pane. • SAVEthe document as travel_overseas in your USB flash drive in the lesson folder. • Select the travel clip art image you have inserted in your document to display the Picture Tools Format tab. • In the Picture Styles group, click the Picture Layout button and, in the menu that appears, select Snapshot Picture List (first row fourth option). The original image is carried over into the new layout with a [Text] placeholder.
Step-by-Step: Insert, Resize, and Add a Caption to a Clip Art • The Snapshot Picture Listcon-tains a placeholder for text. In the text placeholder, key Traveling by Air. Traveling by Airis a caption describing the picture. Click outside the SmartArt graphic to deselect. Your document should look like the one above. • SAVE the document with the same file name in your USB flash drive in the lesson folder. • LEAVE the document open to use in the next exercise.
Formatting Clip Art • As you’ve seen in earlier exercises, the Picture Tools Format tab provides a number of commands for enhancing your document’s appearance. • You can use these tools to apply Artistic Effects features to a clip art picture, and then position the clip art automatically around the text. • Compressing reduces the file size of clip art. • In this exercise, you learn to add Artistic Effects to clip art, reposition the clip art, and compress the clip art image.
Step-by-Step: Format Clip Art • USEthe document that is open from the previous exercise. • Place the insertion point after the Snapshot Picture List layout SmartArt graphic and press Enter twice to create blank lines. • Select the clip art image you inserted into the document during the preceding exercise to display the Picture Tools Format tab. • Click the Format tab, and click the Adjust group drop-down arrow to display the Artistic Effects menu. • Select the Pencil Sketch option from the menu in the first row, fourth option, and click outside the image to deselect it. The picture changes to a sketch making it appear as though it was hand drawn.
Step-by-Step: Format Clip Art • Move the insertion point to the first blank line below the Pencil Sketch SmartArt image. Key the following text: Word 2010 has enhanced the Illustration and Graphics commands by adding the Artistic Effects feature. Applying an artistic effect to a picture or clip art gives it a compelling new look. This feature might not have all the photo-editing capabilities but it can change an original picture to make it look like a sketch, drawing, or painting. • Select the text and on the Font group of the Home tab, change the font size of the text you’ve keyed to 14 pt, then click the Align Text Left button. • Select the Pencil Sketch SmartArt image layout, and then click the Format tab. In the Arrange group, click the drop-down arrow to display the Position menu.
Step-by-Step: Format Clip Art • Select Position in Top Left with Square Text Wrapping. The image is positioned in the top left margin with the heading to the right side and text below (see right). • SAVE the document as exploring_world_flyer in your USB flash drive in the lesson folder and close file. • LEAVE the program open for the next exercise.
Organizing Clip Art • The Microsoft Clip Organizer collects and stores clip art, photos animations, videos, and other types of media to use. You can use the organizer to add, delete, copy, and move clips, and to change keywords and captions. • You also can take clips from a file, scanner, or camera, or online and place them in a personalized folder or in one of the existing folders in the organizer. • These folders are categorized into collections for easy access. • In this exercise, you learn to expand and collapse folders and add an image from a target location to the Clip Organizer in a specific folder.
Organizing Clip Art • This table displays the types of media files you can add to the Clip Organizer and their file extensions.
Step-by-Step: Organize Clip Art • OPENa blank document. • On the task bar, click the Start button. • In the Search box, key Microsoft Clip Organizer, the Microsoft Clip Organizer will open on your screen, as shown at right. In the left pane of the Organizer, a folder named My Collections contains two subfolders—Favorites and Unclassified Clips.
Step-by-Step: Organize Clip Art • Click the plus + symbol beside the Office Collections folder to expand the folder, and then notice the subfolders it contains. Scan through some of the subfolders to view the categories of clips they contain. Click the minus – symbol to collapse the Office Collections folder contents. • Click the plus + symbol to expand the Web Collections folder, and then scan through the subfolders to view the categories of clips they contain. Click the minus – symbol to collapse the Web Collections folder contents. • To begin the process of inserting a picture from your data files in the lesson folder and adding it to the Favorites folder, select the Favorites folder from the Collection list. The Favorites folder is the active folder.
Step-by-Step: Organize Clip Art • On the Menu bar, click File, then click the right arrow at Add Clips to Organizer, to select On my Own. The Add to Clips Organizer dialog box opens. • Locate your lesson folder and select the beach picture. In the Add Clips to Organizerdialog box, the file name is added to the Clip Name text box. Click the Addbutton. The picture is added to the Favorites folder as shown at right.
Step-by-Step: Organize Clip Art • Click the Word document to minimize the Clips Organizer. On the Insert tab, in the Illustrations group, click the Clip Art button to produce the Clip Art pane on the right side of the window. In the Search For box, key beach, and then click GO. The beach picture appears in the results box at the bottom of the pane. Close the Clip Art pane. • CLOSEthe Microsoft Clip Organizer. • LEAVE Word open for the next exercise.
Compressing and Resetting Images • When you compress an image, it reduces the file size thereby reducing the resolution and making the documents more manageable to share. • You can compress images for clip art and pictures. • Larger images may take up space on your USB flash drive. • When you compress an image, you can make it occupy less space on your hard drive or USB flash drive, which will allow you to open and save your document more quickly and reduces the download time for file sharing. • Resetting a picture will discard all formatting changes you made to the picture, including changes to contrast, color, brightness, and style.
Compressing Images • Compressing and resetting images will save space when sharing images by email. • In this exercise, you learn to compress and reset an image in preparation for sharing by email.
Step-by-Step: Compress Images • OPENthe travel_palms2 document competed in an earlier exercise. • To display the Picture Tools, select the travel_palms2 picture. • Click the Format tab, in the Adjust group, and click the CompressPicturesbutton to display the Compress Pictures dialog box, shown above.
Step-by-Step: Compress Images • In the Compress Options section, check marks indicate which features are activated. • In the Target Output section, select the E-mail (96 ppi): minimizedocument size for sharing radio button. By selecting the radio button, the picture file size will be compressed to make the document ready for sharing via email. The other Target Outputs compress the picture to print correctly on printers and screens and to view on web pages and projectors. • Click OK to apply your choices. • SAVEthe document as travel_pic_compress in your USB flash drive in the lesson folder. • LEAVE the document open to use in the next exercise.
Resetting an Image • When resetting a picture’s brightness and contrast, the color is reset using the Reset Picture command. • You may also choose to Reset Picture and Size. • In this exercise, you learn to reset an image.
Step-by-Step: Reset an Image • USEthe document that is open from the previous exercise. • To display the Picture Tools, select the travel palms picture. • Click the Format tab, in the Adjust group, click the drop-down arrow to display the Reset Picture menu then select ResetPicture. Formatting changes you made to the picture earlier are discarded. • SAVEthe document as travel_reset to your USB flash drive in the lesson folder and close the file. • LEAVE the document open to use in the next exercise.
Making Text Graphically Appealing • Word’s Text Box command lets you insert professionally formatted text elements such as pull quotes and drop caps quickly. • A drop cap is a large initial letter that drops down two or more lines at the beginning of a paragraph to indicate that a new block of information is beginning and to give interest to newsletters or magazine articles. • A pull quote is a sentence or other text displayed within a box on the page for emphasis and for ease of movement, and they are often used along with drop caps in newsletters, advertisements, and magazines.
Creating a Drop Cap • Drop caps are used to add visual interest to newsletters or magazine articles. • In this exercise, you learn to add a drop cap to a Word document.
Step-by-Step: Create a Drop Cap • OPENthe coho document from the data files for this lesson. • In the first paragraph of the second column of the article written by John Kane, select the S that begins the sentence Sincewine is my business. • Click the Insert tab, in the Text group, and click the Drop Cap button; the Drop Cap menu appears, as shown below.
Step-by-Step: Create a Drop Cap • Select Dropped fromthe menu. A drop cap is inserted and extends down three lines in the paragraph—the default line drop length. • In the Text group, click the drop-down arrow to display the Drop Capmenu, select DropCapOptionsto produce the Drop Cap dialog box. You can use the options in this dialog box to change the position, font, and size of the drop cap. The default settings for Font, numberof Lines to drop, and Distance from text are shown above.
Step-by-Step: Create a Drop Cap • Click the Fontdrop-down arrow to change the font to Bookman OldStyle. Click OK to apply your changes and close the dialog box. Click outside the drop cap to deselect it. The drop cap font is set to Bookman Old Style for the selected text, while the remaining text is unaffected. • SAVEyour document as coho_newsletter in your USB flash drive in the lesson folder. • LEAVE the document open to use in the next exercise.
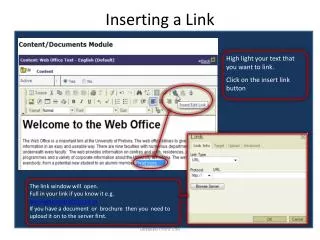
Creating a Pull Quote • Word has built-in pull quotes that can be inserted in a document. • The pull quotes are preformatted and shown within a box. • In this exercise, you learn to insert a pull quote and add existing text from the document and place it in the pull quote.
Step-by-Step: Create a Pull Quote • USEthe document that is open from the previous exercise. • On the Insert tab, in the Text group, click the TextBox button. A menu of built-in quotes and sidebars appears. • Scroll down and select Contrast Quote, as shown at right. The pull quote box is inserted into the document. • Select the text below the first paragraph beginning with You should drink whatever wine . . .you like. Do not select the hidden paragraph mark; this will help you avoid adding an extra blank line in the text box. Press and hold the left mouse button and drag and drop in the text box.
Step-by-Step: Create a Pull Quote • Position the insertion point on the bottom border of the pull quote box until the pointer becomes a four-sided move arrow. • Click and drag the quote down until the pull quote box is about ⅔ of the way down to the bottom of the page, as shown at right. • SAVE the document as coho_newsletter_draft in your USB flash drive in the lesson folder. • LEAVE the document open to use in the next exercise
Software Orientation • Before you begin working with text boxes, it is a good idea to become familiar with the new tools in the Ribbon. • When you insert a text box, the Text Box Tools appear in the Ribbon, as shown below. • The Text Box Tools provide commands for editing text boxes. Use this figure as a reference throughout this lesson as well as the rest of this book.
Applying and Manipulating Text Boxes • A text box is an invisible, formatted box in which you can insert and position text and/or graphic objects. • Text boxes can be used for a variety of purposes. • Most often, they are used to insert text within other document text or to lay out text for specific emphasis or visual interest. • After you insert a text box, you can format it.
Inserting a Text Box • Word provides a gallery of built-in text boxes with pull quotes and sidebars that you can insert in a document. • When you need a different kind of text box, you can draw and insert your own empty, unformatted text box. • In this exercise, you will insert a preformatted text box and draw a text box.
Step-by-Step: Insert a Text Box • USEthe document that is open from the previous exercise. • At the top-left of the document, click before the H in Harvest Celebration . . . to position the insertion point at the beginning of the document. • On the Insert tab, in the Text group, click the Text Box button. A menu of built-in quote and sidebar text box styles appears. • Click the Contrast Sidebar option. The text box, containing placeholder text, is inserted at the top of the document. • The placeholder text is selected; key Coho Winery. Press Ctrl+E to center. Press Enter. • Key September 20XX Newsletter and press Enter.
Step-by-Step: Insert a Text Box • Key Daily tours with complimentary. Press Shift+Enter to create a line break. Then key wine tasting.Press Enter. Creating a line break keeps lines together. For instance, if you were to align text to the left, both lines would automatically align to the left. • Key Monday–Saturday: 10 am to 5 pm and press Shift+Enter to create a line break. • Key Sunday: Noon to 5 pm. Press Ctrl+R to Align Text Right. Both lines automatically align right. Notice you didn’t need to select the lines of text; they aligned to the right together. • In the first column, above the Wine Facts heading, place your insertion point on the blank line.
Step-by-Step: Insert a Text Box • Click the Insert tab, in the Text group, and click the Text Box button then Draw Text Box. A crosshair (+) appears. Press and hold the left mouse button to draw a text box in the blank line above the Wine Facts heading. It should be approximately 2.22” wide and .95” in height. For the precise measurements, change the height and width on the Size group of the Format tab. • Select the four lines beginning with October 17 (do not select the hidden paragraph mark—if selected, this will extend the selection to the text box). Press and hold the left mousebutton and drag and drop the text into the text box, then press Ctrl+E to center the text within the text box.
Step-by-Step: Insert a Text Box • Select the text box until you see the four-sided move arrow to move the text box above Wine Facts and below the first paragraph. Deselect the text box. • Click the Insert tab, in the Text group, click the Text Box button then Draw Text Box. A crosshair (+) appears. Draw a text box in the upper-left corner of the docu-ment. It should be approximately 1.1”wide and 2.7” in height. Key Newsletterin the text box. Your document should look similar to the one shown at right. • SAVEthe document as coho_newletter_draft1 in your USB flash drive in the lesson folder. • LEAVE the document open to use in the next exercise.
Formatting a Text Box • After you insert a text box, the Text Box Tools appear on the Format tab. In this exercise, you practice using these tools to format a text box.
Step-by-Step: Format a Text Box • USEthe document that is open from the previous exercise. • In the first column, above Wine Facts, select the text box that contains the date, cost, and RSVP information. • Click the Format tab, in the Arrange group, of the Drawing Tools, click the Position button and select Position in Bottom Left with Square Text Wrapping from the drop-down menu that appears. The text box is moved to the lower-left corner of the document in the first column. • The text box is still selected. On the Format tab, in the Shape Styles group, click the More button to display the gallery of styles. • Click the Subtle Effect – Black Dark 1 style in the Shape Styles gallery. The text box is formatted with the preformatted style.