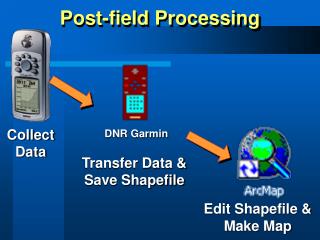
Post-field Processing
Post-field Processing. Collect Data. DNR Garmin. Transfer Data & Save Shapefile. Edit Shapefile & Make Map. ArcMap. Connect Garmin to Computer. Connect GPS to PC with download cable. Connect cable to Serial Port. No serial port? Use USB adaptor cable. Turn Garmin On, Turn GPS Off.

Post-field Processing
E N D
Presentation Transcript
Post-field Processing Collect Data DNR Garmin Transfer Data & Save Shapefile Edit Shapefile & Make Map
Connect Garmin to Computer • Connect GPS to PC with download cable Connect cable to Serial Port • No serial port? • Use USB adaptor cable
Turn Garmin On, Turn GPS Off Press Menu Press Enter - Eliminates status messages - Saves battery power
Verify Connection to Receiver Note Banner Title
View Splashscreen Note Version
ArcMap/DNR Garmin Connect Note Banner Title (it changed) DNR Garmin Toolbar Opened in ArcMap
ArcMap Window Docked DNRGarmin Toolbar Table of Contents Map Legend or Key
Viewing a Map Layout View Data View prepare print version manipulate data
Data Frame Collection of Layers - Default name “Layers” - Can rename - Minimum of one required
Rename Data Frame highlight click inside again type new name
Open Data Frame Properties Window right-click or double-click on Data Frame
Apply Selection Note information
General Tab – Select Display Units Display Units select for measuring distance on map Map Units locked in when Coordinate System selected
X Goal: Download Points
X Select Waypoint Download Download – transfers a copy of data, does not remove data from receiver
X View Waypoint Data Table show/hide data table scrollbar
X Note: Total # of Waypoints “ident” lists waypoint names lists all waypoints 4 waypoints total, 0 selected
X Note: Waypoint Coordinates Latitude/Longitude WGS84 Projected X/Y (NAD83 UTM Zone 16N)
X Select Files and... highlight all records to be saved verify all records selected Saving Strategy All rows highlighted – all rows saved No rows highlighted – all rows saved Some rows highlighted – those rows saved
X ...Save...
X ...As Text File First! A Text File should always be saved First as a back up file to the ESRI (ArcView) Shapefile
X Status Window
X ...Save Again...
X ...As ArcView Shapefile Projected shapefile uses projected coordinates. Unprojected shapefile uses WGS84 coordinates.
X Shapefile Added To ArcMap Automatically Adds to TOC Automatically Adds to Map
X Locate Point Shapefile(s) on Computer Note file path Note additional files
Select Track Download Download – transfers a copy of data, does not remove data from receiver verify Coordinate System
View Track Data Table show/hide data table scrollbar scrollbar resize window watch download
Track Information # points from active track log “ident” lists track name. Saved track has name, unsaved tracks called “Active Log” blue -start of new track segment 55 track points total 0 selected
Note: Track Point Coordinates Latitude/Longitude WGS84 Projected X/Y (NAD83 UTM Zone 16N)
Remember... highlight all records to be saved Saving Strategy All rows highlighted – all rows saved No rows highlighted – all rows saved Some rows highlighted – those rows saved
...As Text File First! A Text File should always be saved First as a back up file to the ESRI Shapefile Note waypoints file already there
...As ArcView Shapefile... Note points files already there Projected shapefile uses projected coordinates. Unprojected shapefile uses WGS84 coordinates.
Shapefile Added To ArcMap Automatically Adds to TOC Automatically Adds to Map
Locate Track Shapefile(s) on Computer Note file path Note additional files