Creating a New Project in Photo Story: A Step-by-Step Guide
Learn how to create a new project in Photo Story with our detailed instructions. Begin by choosing 'start a new story' and importing your images in various formats. You can also edit and arrange your photos by moving or deleting them as needed. We emphasize the importance of saving your progress frequently, particularly after importing images and making edits. Additionally, we explore tips for cropping pictures, applying special effects, and adjusting colors to enhance your final story. Follow these steps for a successful project!

Creating a New Project in Photo Story: A Step-by-Step Guide
E N D
Presentation Transcript
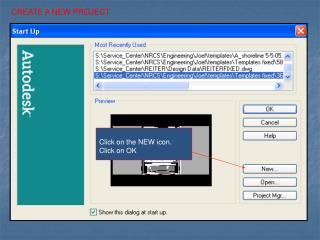
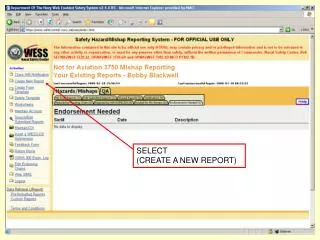
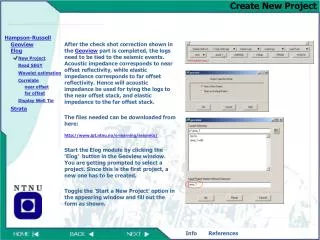
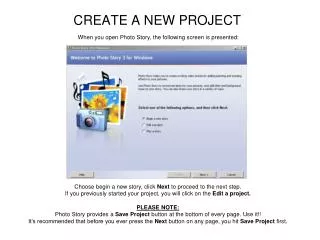
CREATE A NEW PROJECT When you open Photo Story, the following screen is presented: Choose begin a new story, click Next to proceed to the next step. If you previously started your project, you will click on the Edit a project. PLEASE NOTE: Photo Story provides a Save Project button at the bottom of every page. Use it!! It’s recommended that before you ever press the Next button on any page, you hit Save Project first.
IMPORT PICTURES The first step in Photo Story is to import into the project the images that you will be using. Photo Story allows you to import the most common image formats, including .bmp, .dib, .eps, .gif, .jhif, ljpe, .jpeg, .jpg, .pcd, .pcx, .png, .psd, .rle, .tga, and .tif. You can import a maximum of 300 images per project. Tips: Choosing the right image format can make a big difference in the final story. The key here is the resolution of the image. The higher the resolution, the better the final product (but also, the larger the file size). In particular, be careful with scanned images – if they are scanned at too low a resolution, they will "pixelate" when zoomed in. Once you click the Import Pictures button, you will be presented with a dialogue box where you can select the images you want to use. Navigate to the folder where the images are located. You can select one photo at a time by clicking on the photo to select it and then clicking OK. This is a rather time consuming way to import pictures. Let's do it in a batch: click on the first picture to select it. Then, scroll down to the last picture HOLD DOWN THE SHIFT KEY and click on it. This will select ALL the pictures in the folder. Or select one and click CNTR and A together. Now click "OK" and all the pictures will be imported into your project.
ARRANGE OR DELETE PICTURES Click the SAVE button, give the file a name, be sure to save it in your personal folder, then click "OK.“ Warning: By default, Photo Story automatically saves projects into the "My Videos" folder. Be sure to change to your personal folder when saving EVERYTHING. TO DELETE A PICTURE: If you want to delete a picture from the Photo Story select the picture (if it is not already selected) by clicking once on it. Once selected, it will have a blue border around it, as you see in the example above. Now hit the DELETE key. TO ARRANGE PICTURES: Notice that the pictures were imported in alphabetical order according to filename. To move a picture, select its thumbnail in the timeline and drag it to the position you want. If you only want to move it over one spot, you can also use the arrow keys to the right of the timeline. Repeat this process until the pictures are in the order you want.
EDIT PICTURES Many of the easiest photo edits can be done with a single click from within Photo Story. To correct the color level of a photo, select the photo (click once on it), then click the color adjustment button below the photo. To remove red-eye, select the photo, then click the red-eye button. To rotate your photo 90 degrees right or left, select the photo, then click on the appropriate rotate button. More advanced edits (but still VERY simple) may be made by selecting a photo and then clicking the edit button: To edit another picture click on it once.
CROP PICTURES Once you check the "Crop" box, an area box will appear in the center of the photo. Check the box. You can move the box around the photo and resize it until you get the area you want to keep. Once you are satisfied, click the Save button and your photo will be cropped to your specifications. You can work on one photo at a time, or you can advance through the timeline by clicking the right arrow to move to the next photo to be edited. When you have finished, click Close.
AUTOFIX AND ADD EFFECTS By clicking on the Auto Fix tab in the Edit Photos window, you can automatically adjust the contrast levels, the color, and red-eye by turning these options on. Be sure to SAVE any changes you make. You may want to add some "special effects" to your photos. You might want to add a sepia effect to the photos to make them appear "old." Or, you may want to change the last color photo to black and white so that it matches the rest. All of this can be accomplished with the third tab, the Add Effects tab. Simply click on the down arrow to open the list of effects, select the one you want and click Save.. You can work on one photo at a time, or you can advance through the timeline by clicking the right arrow to move to the next photo to be edited. When you have finished, click Close
REMOVE BLACK BORDERS When you import pictures for your story, Photo Story checks to be sure that they are in the landscape orientation. If it finds any pictures that are in a "portrait" orientation, Photo Story displays the Remove Black Borders button on the Import and arrange your pictures page. In the photo on the left (BEFORE), we can move the box around and resize it until it fits properly into the format space. The result of the adjustment is shown on the right (AFTER): When you are satisfied with the picture, click Yes. Notice that you will need to sacrifice some of the "length" of a portrait style picture in order to accommodate the format of the video. Removing the borders in a Photo Story project picture DOES NOT alter the original picture that is stored on your computer. Repeat this process with all of the pictures that started out in portrait orientation. Once all the pictures are done, you will be returned to the Import Pictures page. Click Next at the bottom of that page to move on with your project.
ADD AND EDIT TITLES In the text box, type the title. You can change the size, color, and style of the font. Click on the font button. Make it large enough for a title, choose a color that will contrast sufficiently with the photo and choose a font style that pleases you. When you have made your selections, click OK and they will be applied. Click on the pictures to add titles to all of them. To move the title click the alignment buttons. Be sure to SAVEand click Next to move on with your project. MAKE SURE THAT ALL THE TITLES ARE READABLE!!!!!!
ADD MOTION (optional) Make sure the first picture in the timeline is selected, then click on the Customize Motion button: The dialogue box will open up to the Motion and Duration Tab. When you check the "Specify start and end position of motion" box, you can set the start and end points of your motion in the two boxes that are presented. If you want to zoom in, start with a full size image on the left and then reduce the size of the box on the right. If you want to zoom out, do the opposite: start with a small box on the left and move to a full size image on the right. You can move the boxes around by clicking and dragging them. You can resize the boxes by grabbing a handle and dragging from the corners to the middle. Set durationautomatically option. When you record your narration, Photo Story will automatically adjust the duration of the motion to the length of the narration. You can preview the effect by clicking the Preview button. Click on the transition tab (upper left) to move to the next activity for the same slide.
ADD TRANSITION (optional) The next step is to add a transition. Click the tab at the top that says Transition. In the transition dialogue box, be sure you check the box that says "Start current picture using a transition." Then select the transition you want. Be sure to set the transition duration to be automatic. Finally, preview your selections. When you are satisfied, click Save. The program will then advance to the second slide. Repeat the process: customize the motion, add a transition, preview, save it and move to the next until you have completed all images. When you are done, click Close. Click on Save Project to save your work before moving to the next task.
ADD NARRATION Before you begin, of course you have to have something to say. There is a text box where you can copy and paste the text of your narration so that when it comes time to actually verbalize it, you will have it right in front of you . Or you can actually just read it from a piece of paper To begin recording, press Record. When you reach the end of the narration for the first slide, press Stop. Click the Preview button to listen to what you've got. If you're not satisfied, click the Delete button and try again. When you are satisfied with the narration for the first slide, select the second slide and repeat the process. Continue until you have recorded the narration for all the slides. You can record up to a maximum of five minutes per slide. MAKE SURE THAT YOUR NARRATION IS CLEAR… IT IS THE MOST IMPORTANT PART OF YOUR PROJECT! When you have finished narrating your story, save your project and click Next to proceed on.
ADD MUSIC (optional) You can either select music that you have already downloaded to your computer, or you can create music from selections provided by Photo Story with the Create Music option. CREATE MUSIC: To begin, select the first image where you want the music to begin playing, and then click the Create Music button. From here you will make your choices: Select the genre, style, band, mood, tempo and intensity that suits your piece. To test out your choices, press Play. When you're satisfied with your choices, press OK. Once you press OK, the music is added to your piece and is shown by a bar above the image timeline. This is a good time to preview your project. Be sure the first slide is selected so it will play from the beginning, then click the Preview button and watch the show. If you decide you don't like your music choice after all, just click the Delete Music button and start over selecting music for your piece. Click Next to move to the final task.
FINALIZE YOUR PROJECT When you save your project, Photo Story creates a .wp3 file. This is the project file that you will want to re-open for future edits. However, be aware the .wp3 files can be opened ONLY by Photo Story 3. In the final step, we will output the story into a format that is suitable for viewing by your professor. We are going to select the first option, to save our story for playback on a computer. This will allow you to show the video full screen (it will play in Windows Media Player). Be warned -- you need Windows Media Player 10. If you have not updated your Media Player now is the time to do it. Get it from the Microsoft website. These videos will not play in older versions of Windows Media Player. First, select the Save for Playback on a computer option. Next, click the Browse button to select the location where you want to save your project. Click Next and what happens next is that Photo Story begins the process of "rendering" your video, putting it into the format you have selected. Depending on the length of your story and the speed of your processor, this can be a lengthy process. Select View Your Story by clicking once on this option and then watch your finalized story. Burn this file (the one with extension WMP) into a CD and bring it to your professor! (If you have a problem burning the CD, please bring all of your Photo Story files – pics, wp3, wmv – to the lab in 2S-114.)