Ray Tracer Help Session Outline
Learn the basics of ray tracing including ray, vec.h and mat.h, isect, and requirements to implement shading, reflection, refraction, and more. Explore tips and tricks, memory leaks, and artifact requirements.

Ray Tracer Help Session Outline
E N D
Presentation Transcript
Ray Tracer Help Session
Outline • Introduction • ray • vec.h and mat.h • isect • Requirements • Tips and Tricks • Memory Leaks • Artifact Requirement • Ray Tracing Surface of Revolution • Using ply Models • Bells and Whistles
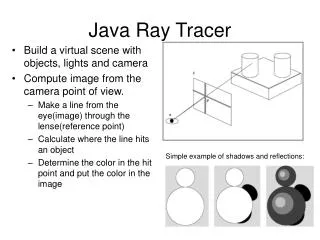
Ray Tracer • Given a ray “caster”, you have to implement: • Shading (multiple parts) • Reflection and Refraction • Sphere Intersection • Triangle Intersection • Complex objects consist of a 3D mesh made up of triangles
ray • A 3D ray is a fundamental component of a ray tracer. • ray r(start position, direction, RayType) • RayType, an enum, includes: • VISIBILITY • REFLECTION • REFRACTION • SHADOW • Example: • ray r(foo, bar, ray::SHADOW); • r.at(t) – direction of r * distance t • Returns the end position of the ray r after going a distance of t from its start position
vec.h and mat.h • vec.h provides useful tools for 2D, 3D, and 4D vectors • Easy Vector Construction – Vec3d x = Vec3d(0,0,0); • Basic operators are overridden: • + and – arthimetic, Vec3d v3 = v1 + v2; • *, multiply by a constant, Vec3d v2 = 2*v1; • *, dot product, double dot = v1 * v2; • ^, cross product, Vec3d cross = v1 ^ v2; • For other useful functionality, such as normalize(), length(), and iszero(), read vec.h for complete details • mat.h is very similar, but for matrix operations not heavily used in this project
isect • An isect represents the location where a ray intersects an object • Important member variables: • constSceneObject *obj – the object that was intersected • double t – the distance along the ray where it occurred • Vec3d N – the normal to the surface where it occurred • Vec2d uvCoordinates – texture coordinates on the surface [1.0, 1.0] • Material *material – non-NULL if exists a unique material for this intersect • const Material &getMaterial() const– return the material to use
Requirements • The following requirements need to be implemented: • Sphere intersection • Triangle intersection • Blinn-Phong Specular-Reflection Model • Multiple light sources • Shadow attenuation • Reflection • Refraction
Requirement: Sphere Intersection • Fill in Sphere::intersectLocal in SceneObjects\Sphere.cpp • Return true if ray r intersects the canonical sphere (sphere centered at the origin with radius 1.0) in positive time • Set the values of isect i: • i.obj = this • i.setT (time of intersection) • i.setN (normal at intersection)
Requirement: Triangle Intersection • Fill in TrimeshFace::intersectLocal in SceneObjects\trimesh.cpp • Intersect r with the triangle abc: • Vec3D &a = parent->vertices[ ids [0] ]; • Vec3D &b = parent->vertices[ ids [1] ]; • Vec3D &c = parent->vertices[ ids [2] ]; • Return true if ray r intersects the triangle • Need more help? See triangle intersection handout linked to on project website: • http://www.cs.washington.edu/education/courses/cse457/handouts/triangle_intersection.pdf
Requirement: Blinn-Phong Specular-Reflection Model • Fill in Material::shade in material.cpp • Refer to the Ray Tracing lecture • To sum over the light sources, use an iterator as described in the comments of the code • CAUTION: If you are on the inside of an object, the object’s normal will point outside. For this case, you will need to flip the normal for any shading, reflection, or refraction.
Requirement: Multiple Light Sources • Fill in PointLight::distanceAttenuation in light.cpp (distance attenuation for directional light is done for you) • Use the alternative described in the ray tracing lecture where: • a – constant term • b – linear term • c – quadratic term • These terms are defined in light.h
Requirement: Shadow Attenuation • Fill in DirectionalLight::shadowAttenuation and PointLight::shadowAttenuation in light.cpp • The ray tracing lecture shows you where to insert this factor into the Blinn-Phong equation (a_shadow for each light) • Rather than simply setting the attenuation to zero if an object blocks the light, accumulate the product of k_t’s for objects which block the light (use the prod function from vec.h) • Count each intersection with an object by the shadow ray (includes entering and exiting) • Extra Credit: Better shadow handling (caustics, global illumination, etc.)
Requirement: Reflection • Modify RayTracer::traceRay in RayTracer.cpp to implement recursive ray tracing, which takes into account reflected rays • See Shirley, et. al. and lecture slides
Requirement: Refraction • Modify RayTracer::traceRay in RayTracer.cpp to create refracted rays • Remember Snell’s law, watch out for total internal reflection, and consider the case when the ray is exiting a material into air (think about the direction of the normal) • You can test refraction with simple/cube_transparent.ray • Unlike reflection, this routine has several cases to consider: • An incoming ray • An outgoing ray • Totally internally reflected ray nglass=1.5 nair=1.0003
Tips and Tricks • Use the sign of the dot product r.getDirection() with i.N to determine whether you are entering or exiting an object • Don’t write too much code without testing! • Lots of dependencies, you need to know what works to proceed • Use RAY_EPSILON (which is defined as 0.00001) to account for computer precision error when checking for intersections RAY_EPSILON
The Debugger Tool • USE THIS, IT WILL SAVE YOUR LIFE! • Shipped with skeleton code • Find out how to use it here: • http://www.cs.washington.edu/education/courses/cse457/13sp/projects/trace/extra/debug.html
Memory Leaks • A memory leak can (and probably will) ruin your night hours before your artifact is due • To test, try to ray trace a complex model (the dragon) with depth 10, anti-aliasing, HUGE Image • Cause: not calling free after allocating memory • Object constructors, vector (array) creation • Solution: free stuff! • Call the “delete [object]” on ANYTHING you create that is temporary • i.e. 3 byte temporary vectors in the rayTrace function • It is HIGHLY RECOMMENDED you have no memory leaks
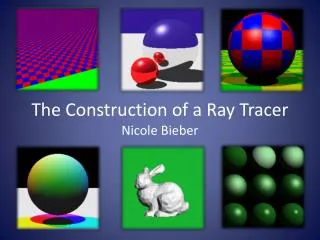
Artifact Requirement • Draw a pretty picture! • One JPEG/PNG image traced with your Ray Tracer submitted for voting • Has to be a (somewhat) original scene • For each image submitted for voting, a short .txt description of the scene or special features • Examples of each bell/whistle implemented with an accompanying readme.txt specifying which image demonstrates which feature (and where/how)
Ray Tracing Surface of Revolution • Use this code snippet to write triangle mesh into a file: • http://www.cs.washington.edu/education/courses/cse457/13sp/projects/trace/code/write_revolution_rayfile.c • Use this .ray file as a template • http://www.cs.washington.edu/education/courses/cse457/13sp/projects/trace/code/revolution.ray • It contains default lighting of modeler • Replace polymesh{} part with your own surface of revolution • Render your new .ray file in tracer!
Sample Results texture mapping
Using ply Models • ply is one of the standard formats for 3D models: • http://en.wikipedia.org/wiki/PLY_(file_format) • There are a plethora of ply models available online • We provide a simple tool (ply2ray) that converts ply models into .ray files • It is in your source folder, so check it out! • You still need to add lightning and material property
Comparison Tool • We will be using this tool (link on the course webpage) to evaluate your solution versus the sample. So you should check too !! • Demo of comparison tool
Bells and Whistles • TONS of awesome extra credit! • Anti-aliasing – A must for nice scenes (to render scenes without “jaggies”) • Interpolate trimesh material properties – will make them look nicer • Envrionment/Texture/Bump Mapping – Relatively easy ways to create complex and compelling scenes • Single Image Random Dot Stereograms • Depth of field, soft shadows, motion blur, glossy reflection – most images we’re used to seeing have at least one of these effects • NOTE: Please add control boxes for substantial ray tracing modifications so that required extension are easily gradable • See sample solution style
Constructive Solid Geometry • Allows for complex objects while still just intersecting simple primitives