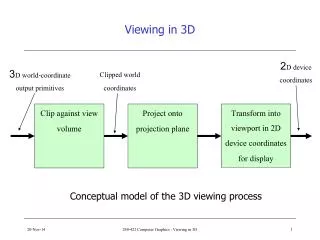
Understanding 3D Viewing: Positioning the Projection Window and Volume
This resource delves into the fundamentals of 3D viewing, specifically focusing on the arrangement of the view/projection window and view volume. It explains how the rectangular window in the view-plane captures a scene and the significance of the projection reference point (PRP). Key concepts include the definition of view volume, the relationship between front and back planes, and the transformation of the viewing frustum. Learn about parallel and perspective projections, clipping planes, and their effects on depth perception and scene representation.


Understanding 3D Viewing: Positioning the Projection Window and Volume
E N D
Presentation Transcript
Viewing in 3D BASICS
VIEW/PROJECTION WINDOW • A rectangular window in view-plane is used to decide as to how much of the scene is caught and displayed. • Edges of the window are parallel to the Xᵥ, and Yᵥ axes. • Window boundary positions are described using viewing coordinates. • View window can be placed any where on the view-plane. • View volume is setup using window boundary.
VIEW/PROJECTION WINDOW View Volume: • Four sides of view volume are planes that pass through the edges of the window. • Object falling with in the view volume appear in the generated display on output device, all others are clipped off. • Size of the view volume depends on the view-window, its shape depends on the projection to be used.
VIEW/PROJECTION WINDOW • For parallel projection, four sides of the view volume form an infinite parallelepiped. • For perspective projection, the view volume is a pyramid with apex at the Projection Reference Point(PRP). • Zᵥ boundary planes are introduced for limiting the extent of view volume. These are called front plane and back plane.
3D Viewing: Positioning the planes • Both, front and back planes must be on the same side of the PRP. Back-plane must be farther from PRP than the front-plane. • The front and the back planes can be any position relative to the view plane, as long as the PRP is not between the front and the back planes.
Viewing: Positioning the planes ₐ yₐ = d . (y/z)
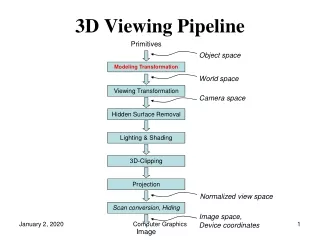
Normalizing the Viewing Frustum:Transform frustum to a cube before clipping
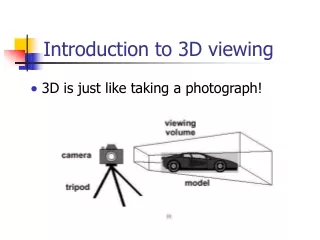
The Pinhole model Look Vector Object Pinhole Film Plane Image projected on image plane • We can think of the synthetic camera as a pinhole. • As you look through the pinhole, you see a certain volume of space. • Rays of light reflect off objects and converge to the pinhole to let you see the scene • Similar to the ideas we’ve discussed earlier • In this model: • Pinhole = camera position • Volume of space = view volume • Create a projection plane that is the screen
Positioning the Planes Orthographic parallel projections are not affected by view plane positioning, because the projection lines are perpendicular to the view plane regard less of its positioning. Back plane View plane View plane Back plane View plane Back plane Front plane Zᵥ Front plane Front plane Zᵥ Zᵥ Front and back clipping planes allow us to eliminate parts of the scene from the viewing operations based on depth.
Width angle Height angle Back clipping plane Front clipping plane Object Pinhole Image projected on image plane
View Window Perspective affects depth on the positioning of the PRP relative to the view plane View Window View Window PRP PRP at Infinity PRP
Positioning effects in Perspective Projections • If view plane is in front of the object, near PRP, then the projected size will be smaller. • When view plane is behind the object then the projected size is increased. • For static view of a scene, view plane is placed at the viewing coordinate origin, then by adjusting the size of the window, to include all parts of the scene, becomes easier.
In an animation sequence place the PRP at the viewing coordinate origin and place the view plane in front of the scene, move through the scene by moving the viewing reference frame. PRP is at the origin