
Measuring Angles Direct Method
E N D
Presentation Transcript
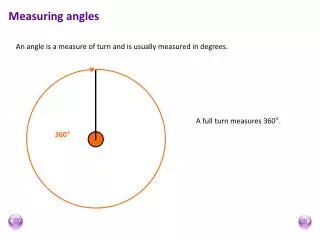
2. Angles An angle defines the rate at which two lines or planes diverge from a common point.
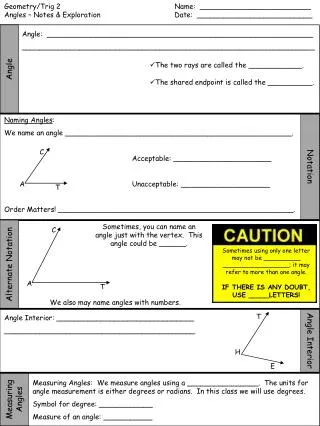
3. Angles All angles have three parts
Backsight: The baseline or point used as zero angle.
Vertex: Point where the two lines meet.
Foresight: The second line or point
4. DD & DMS Two systems are used for recording angels
Decimal Degrees (DD): Fractions of a degree are expressed as a decimal.
Degrees-Minutes-Seconds: Partial degrees are expressed as minutes (�) and partial minutes are expressed as seconds (�)
5. DMS One degree equals 60 minutes
One minute equals 60 seconds
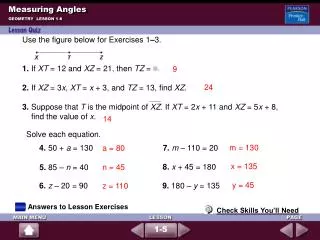
6. Adding & Subtracting DMS Is more difficult in DMS method.
Ie. Add 20� - 45� � 25� to
30 � - 24� � 33�
69� and 62� are not possible and therefore must be reduced
Step 1 � subtract 60 from the seconds until remainder is less than 60. Add the number of whole 60�s to the minutes.
Step 2 � is subtracted from the minutes until the remainder is less than 60. Add the number of whole 60�s to the degrees.
The result is the correct angle
20� 45� 27�
+ 30� 24� 35�
step 1 50� 69� 62�
60
step 2 50� 70� 02�
60
51� 10� 02�
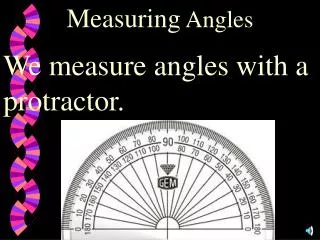
7. Direct Method of Measuring Angles Requires an instrument
To measure vertical angles the scope must be able to rotate up and down
Transits
Theodolites
Total Stations
Precision is a major difference
Levels: usually limited to one degree
Total Station and Theodolites: capable of less than 20 minutes
8. Angle Measurement Steps Center the instrument
Zero set the angle scale
Align the scope on the backsight
Turn the angle
Record the angle
9. Centering the Instrument For complete accuracy the instrument must be centered over the vertex of the angle.
This is done by suspending a plumb bob from the center of the instrument usually over a surveyors nail or stake.
If done incorrectly the potential for error is great.
10. Centering the Instrument Procedure
Most instruments allow for slight adjustments after mounting by loosening the instrument from the tri-pod or the leveling screws.
To set the tripod use the plumb bob through the mount center as a guide.
Mount and level instrument leaving base slightly loose for later adjustment.
11. Centering the Instrument When centered the base is tightened and instrument re-leveled.
Re-check plumb bob for center
If wind in present use a wind block to lesson wind effect.
12. Zero Setting the Instrument After the instrument is centered the angle scale can be moved to zero or any other starting angle.
Loosen the scale lock
Align scope on backsight
Rotate scale until desired angle is set
Snug scale lock
13. Aligning the Instrument of the Backsight When shooting longer distances very small scope movement may result in large swings of the crosshairs.
Use the tangent screw to make fine adjustments to increase ease and accuracy.
14. Turning the Angle Now rotate the scope until the crosshairs are aligned with the second scope.
15. Record the Angle All instruments measure angles but different makes use different scales.
Most manual instruments use a vernier scale.
16. Reading Angles � David White Instrument The 360� horizontal circle is divided into quadrants 0-90�
The circle is marked by degrees and numbered every 10 degrees
The horizontal circle is referred to as the degree scale
The instrument vernier divides each degree on the circle into 12 equal parts of 5 minutes each. (60 minutes per degree)
17. Reading Angles � David White Instrument The vernier is marked in minutes starting at 60� in the center and reading both left and right to 30�. The 60� mark is both 60� and zero.
Up on the vernier scale is the same direction as up on the degree scale.
18. Reading Angles � David White Instrument Example:
Note point at which 60� on the vernier touches degree scale. If 60� coincides exactly with a degree mark there are no fractions of a degree.
If 60� on vernier does not coincide exactly with degree mark, your degree reading is the line which 60� has just passed plus a fraction of the next degree.
19. Reading Angles � David White Instrument Example continued:
Start at 60� on the vernier and read up until you find a minute line that coincides exactly with a degree line.
Each line on the vernier represents 5� (5�, 10�, 15�, 20�, 25�, 30�)
Example 71� 20�
20. Reading Angles � David White Instrument Example continued:
If no minute mark up coincides read the vernier scale back.
When reading back from 30� to 60� the 60� mark is now 60� not zero. Therefore your reading will be 30�, 35�, 40�, etc.
Example 71� 45�
21. Assignments LAB
How to measure horizontal angles with a level. HOMEWORK
Read chapter 7 Landscaper Surveying