Wire Figures
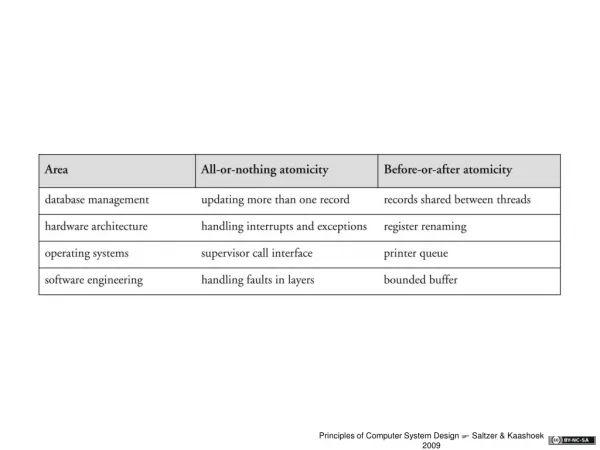
Wire Figures. 7.5 heads tall Shoulders are 3 heads wide Arms: “ wingspan ” is equal to the height of the figure (7.5 heads) Torso and neck: 2 heads Waist & Pelvis: 1 head. Designing your figures is like doing a gesture drawing The essential elements of a pose Props can help

Wire Figures
E N D
Presentation Transcript
7.5 heads tall • Shoulders are 3 heads wide • Arms: “wingspan” is equal to the height of the figure (7.5 heads) • Torso and neck: 2 heads • Waist & Pelvis: 1 head
Designing your figures is like doing a gesture drawing • The essential elements of a pose • Props can help • Your figure should tell a story
Conductor Bass Player Professional Artist Rudy Kehkla @ rudykehkla.com
Leonardo Da Vinci Picasso Professional Artist Rudy Kehkla @ rudykehkla.com
What is Required of Your Sculpture: • Construct a humanoid figure using correct proportions • At least 2 parts of the figure must enclose volume • You may build your figure using a skeletal structure, contour structure, or any combination • Tell a story with your figure • The figure must be able to stand up on its own
Sketch: • Two views of your proposed sculpture • Demonstrates volume in at least two places • Tells a story • Shows how it will be supported • This is a formative grade. • As soon as your sketch is approved we can start your sculpture!
Starting the Figure Day 2
Steps: • Start with the sketch. • Next, construct the head, spine, and shoulders of the figure – everything else attaches to this. • From there you will work constructing the figure however your logic dictates. • The last step will be to make sure the figure can securely stand on its own.
Safety Concerns: • Be aware of where the end of wire is at all times. • Place a small loop on the end of the wire to prevent harm.
Tool Use: • Needle-nose pliers have two parts: • A cutter, located where the round circle or indent is • Pincers, used to grab and bend the metal • Watch the pliers as you use them, they can pinch or cut
Braiding • The best way to join two pieces of wire is to braid them • It makes a strong connection • It does not make a clump or knot which is unattractive • This is done by twisting or twining two piece of wire together over a length
Crimping • Most of the time the wire can be bent by hand • Crimping is using the pliers to squeeze wire together, to create a smaller space between two ends of the wire • This can be used to create small details, like ribs or fingers
Outline w/twist Stick Figure
Outline w/bones Wrapped Leg