Mastering Comments and Change Tracking in Microsoft Word 2010
Discover how to effectively track changes and add comments in Microsoft Word 2010. This guide covers the Under Markup options, allowing you to customize the display of insertions, deletions, and formatting changes using different colors. Learn to track content movement, highlight table changes, and use balloons for comments. You can insert comments directly in the document and review them in the Reading Pane, choosing between horizontal and vertical displays. Enhance collaboration by responding to existing comments, making your document review process seamless and efficient.

Mastering Comments and Change Tracking in Microsoft Word 2010
E N D
Presentation Transcript
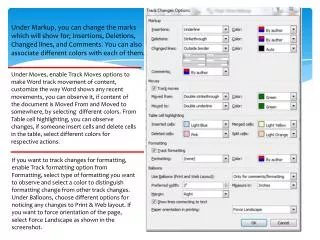
Under Markup, you can change the marks which will show for; Insertions, Deletions, Changed lines, and Comments. You can also associate different colors with each of them. Under Moves, enable Track Moves options to make Word track movement of content, customize the way Word shows any recent movements, you can observe it, if content of the document is Moved From and Moved to somewhere, by selecting different colors. From Table cell highlighting, you can observe changes, if someone insert cells and delete cells in the table, select different colors for respective actions. If you want to track changes for formatting, enable Track formatting option from Formatting, select type of formatting you want to observe and select a color to distinguish formatting change from other track changes. Under Balloons, choose different options for noticing any changes to Print & Web layout. If you want to force orientation of the page, select Force Landscape as shown in the screenshot.
Tracking Changes Text Changes Formatting Changes Vertical Lines Contrasting Color Balloons (Oblong boxes) Left Margin next to text that has been changed
Comments A comment is a note or annotation that an author or reviewer adds to a document. Microsoft Word displays the comment in a balloon in the margin of the document or in the Reviewing pane. In Word 2010 you can insert comment inside the document. This can be done by using the New Comment option available as part of the Review menu. Select the Word or sentence for which you want to insert a comment and click on the Review menu –> New Comment
Insert Comment To insert a comment in a document, highlight the area of text where you want to comment on. Click the Review tab on the Ribbon then click New Comment. http://www.howtogeek.com/howto/26867/how-to-add-comments-to-documents-in-word-2010/
That opens up a balloon pointing to the highlighted text you can leave your comment in. You can leave as many comments as needed in the document, in this example we created three comments in different areas. Now you or anyone you’re sharing the document with will be able to read the comments.
Review Comments You might want to just take a look at the comments you’ve made in the Reading Pane. Again click the Review tab and then select Reading Pane, and how you want them to display, either Horizontal or Vertically. Here is an example of reviewing the comments in Horizontal View. You can see the comments, when they were made, and by whom. Click on an individual comment and it will take you to the section in the document where it’s at Here is what it would look like to have your comments show in the Reading Pane Vertically on the left side. You can choose whichever view works best for you.
Leave Comments to the Comments Sometimes you might want to respond to a comment and can do so by leaving one to the existing comment. This feature really comes in handy when collaborating on documents and for brainstorming. Just highlight the existing comment and click the New Comment button. Then you can leave another comment to the existing comment underneath it.