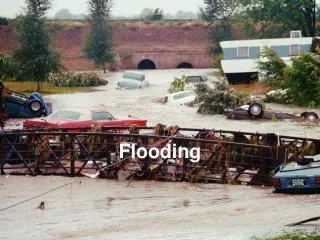
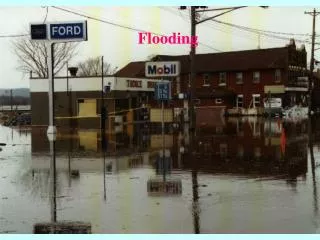
FLOODING CONTROL FOR SMALL VESSELS
FLOODING CONTROL FOR SMALL VESSELS. Damage Control Equipment. Damage Control Equipment 1. de-watering pump suction hose with strum extension suction hose discharge hose Suction head lift 26 ft. Damage Control Equipment 2.

FLOODING CONTROL FOR SMALL VESSELS
E N D
Presentation Transcript
Damage Control Equipment 1 • de-watering pump • suction hose with strum • extension suction hose • discharge hose • Suction head lift 26 ft
Damage Control Equipment 2 • assorted sized soft wood plugs, assorted sized soft wood wedges, wooden mallet, oakum
Damage Control Equipment 3 • hacksaw, small wood saw, • assorted hose clamps(with screwdriver),
Damage Control Equipment 4 • small pieces of fire hose(chaffing gear), • small diameter marline rope, 20+ feet of manila line,
Damage Control Equipment 5 • 4 ft x 4ft piece of rubber, 4 ft x 4ft piece of canvas.
Preparations • If an incident is a call about a vessel taking on water, time is the essence, as with every minute the vessel will be going deeper in the water, and the water flow will be increasing with the extra draught.
Preparations Damage control gear to be prepared: • De-watering pump • Suction hose and extension • Discharge hose just in case needed • Plugs, wedges, mallet • Fothering canvas
Preparations Remember to do a full Stop, Assess, Plan to determine particular dangers of and surrounding the vessel. Determine whether the vessel is already too deep in the water to safely board, by looking for a pronounced list, slow roll with a hang at each extreme, or extreme trim by the head or stern.
Preparations Determine possible causes of flooding from: • hull damage from grounding, • hull damage from hitting deadhead or other debris • collision damage • heavy weather damage • internal failure of pipe work.
Arrival Alongside If safe to get alongside, get all unnecessary passengers to don lifejackets, and get them off. This will reduce top weight.
Arrival Alongside Speak to the master/owner to best determine the circumstances and actual problem, and get all the relevant information available. Ask what may be obvious questions as the owner may have forgotten the most basic actions due to the emergency. Try to ask questions, which require a full answer (use “who”, “what”, “where”, “why”, “how” and “what”).
Pump Set Up Get the de-watering pump on board, set up with the suction where the water is deepest. If the vessel is settling by the stern, have the suction as far aft and as close to the keel as possible. Once the pump starts and has suction, the suction should not be moved. Clear out any floating debris that may block the suction.
Pump Set Up Set up the pump on deck, to keep noise and exhaust fumes clear of the under deck area. Have a bucket or similar container on a rope to aid priming of the pump.
Pump Set Up If this is not possible, and it is necessary to operate the pump inside,ensure there is plenty of ventilation available and a watch kept on anyone down below so they don’t get over come by fumes. Communications below will be very difficult.
Tracking the Leak • It is imperative to track the leak early on, as you may well be unable to find it once the water rises. The water also rises faster with time as the hole gets deeper under water.
Plugging Discharges It should be possible to close underwater through fittings by closing the seacocks. In well fitted boats, each of these should have a tapered wooden plug attached. However in older boats, these seacocks may be seized, missing the handle or both.
Plugging Discharges Plug all visible underwater hull openings from outside that are visible and accessible, in case they turn out to be the cause of the flooding.
Plugging Discharges These may include: • Cooling water intakes (one for each engine) • Cooling water discharges (one for each engine) • Mufflers (one for each engine) • Bilge pump discharge (one for each pump) if not running • Toilet discharge (one for each toilet) • Air conditioning
Plugging Discharges These may plugged by using: • tapered soft wood bung or plug of appropriate size. If these are slightly too small, augment with a folded towel to increase the diameter • a towel or similar material folded and pushed into the opening • nerf balls squeezed into opening and allowed to expand
Plugging Holes These may be plugged by hammering in a combination of soft wood wedges, and oakum, to stop the majority of the water, and reduce the in flow. Soft wood wedges and plugs are used as they will expand when wet, and better fill the hole. With glass fibre hulls, plugs and wedges will probably make the damage worse - use collision mat instead.
Use of Collision Mat To stop a breech in the hull that is too big to plug: 1. The patch will have four lines attached, one to each corner. 2. Position the patch by dropping the patch over the bow. 3. Have someone walk down each side of the boat, two of the lines for each person, sliding the patch along the bottom of the boat.
Use of Collision Mat 4. Once the patch covers the hole, tighten and secure the four lines topside. The pressure of the water against the patch will also help to hold it in place.
Clearing the Decks • get loose fittings out of the way. • open up whatever lower compartments you can to find the deepest point in the boat, and see what is happening. • find your way around below before too much water gets in.
Clearing the Decks • move out any loose gear (sheets, towels, mattresses, clothing, bathroom accessories) that can end up floating, getting in the way or blocking pump suctions.
Batteries • Most marine batteries are lead-acid. • Lead acid batteries come in three types, flooded acid, gelled acid and advanced absorbed glass mat. • Most boat have a maximum of two banks of batteries, a house bank and starter bank.
Batteries • In general, batteries should not be submerged. • Certain types of batteries can produce chlorine gas on contact with sea water, • A short circuit can cause fire and harm to persons in the vicinity.
Other Items • Have something available to measure depth of water so that changes can be measured