Download
1 / 43
430 likes | 453 Vues
Learn how to measure blood pressure using a sphygmomanometer, understand systolic and diastolic pressure, and assess the pulse rate. Follow the steps for accurate readings and identify normal blood pressure levels.

E N D
Blood pressure • What Is Blood Pressure? • Blood pressure is the force of blood against the walls of arteries. Blood pressure is recorded as two numbers — the systolic pressure (as the heart beats) over the diastolic pressure (as the heart relaxes between beats). The measurement is written one above or before the other, with the systolic number on top and the diastolic number on the bottom. For example, a blood pressure measurement of 120/80 mmHg (millimeters of mercury) is expressed verbally as "120 over 80.„ • Normal blood pressure is less than 120 mmHg systolic and less than 80 mmHg diastolic.
Measuring blood pressure Systolic pressure: The pressure in the artery during the ventricular contraction phase of the heart cycle. The pressure in the vessel is highest at this time. Diastolic pressure:The pressure in the artery when the ventricles are relaxed. The pressure is at its lowest point, though it does not drop all the way to zero.
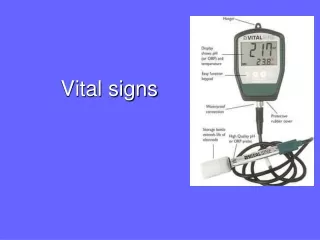
Measuring Blood Pressure • We find the blood pressure by using an instrument called a sphygmomanometer (pronounced sfig-mo-muh-NAM-eh-ter). This device consists of an inflatable cuff that is wrapped around the upper arm and a gauge that measures pressure. A stethoscope is used to listen to the different sounds that occur.
Procedure for Measuring Blood Pressure 1. You begin by inflating the cuff. Once the pressure in the cuff is above the subject's systolic pressure (140 in this example), blood cannot flow below the cuff. You will hear no sound in the brachial artery when you listen with the stethoscope. 2. As you release the pressure valve and slowly deflate the cuff, blood begins to flow through the artery. 3. When the pressure in the cuff is between the systolic and diastolic pressure, you can hear a tapping sound with each pulse. The first tapping sound you hear indicates that blood has entered the artery. Record this reading as the systolic pressure. You continue to deflate the cuff until the tapping sounds cease.
Measuring blood pressure • Wash hands and identify patient • Explain procedure • Position patient comfortably, either seated or lying. • Position patient’s arm by supporting it on the bed or arm of chair with the palm turned upward; push sleeve up to shoulder • Place cuff 2 to 3 centimetre above bend in elbow, wrap it around the arm smoothly, and secure it • Clean earpiece of the stethoscope and put earpiece in your ears; place diaphragm of stethoscope over brachial artery; hold in place with one hand • Close air valve and pump bulb to inflate the cuff; continue pumping until the gauge reads 180 or until you can no longer hear the pulse beat
Measuring blood pressure • Open air valve and allow the air to escape slowly • Listen for first sound (systolic) and read the gauge as soon as the sound occurs • Continue to release air; note muffled sound (or no sound, whichever comes firs) and take a second reading (diastolic) • Deflate cuff completely. Repeat steps 6 to 9 if you need to recheck to obtain an accurate reading • Record the blood pressure as a fraction: Systolic reading Diastolic reading • The systolic pressure is the maximum pressure in an artery at the moment when the heart is beating and pumping blood through the body. • The diastolic pressure is the lowest pressure in an artery in the moments between beats when the heart is resting.
Categories for Blood Pressure Levels in Adultslegend: < means lesst han …> means greater than or equal to
Blood pressure meassurements points (special) lower limb upper limb
Assesing the Pulse Equipment: • Watch with second hand • Pen and Pad • Stethoscope (for apical pulse only) PULSE Alternative names Heart rate; Heart beat
Assesing the Pulse 1. Place your index and middle fingers in the groove on the inside of the wrist. Just slide your fingers across the tendons until they slip into soft tissue. 2. Wait until you clearly feel beats coming with a regular rhythm. 3. Count the number of beats for 15 seconds and multiply by 4 (or for 30 seconds and multiply by 2) to get the number of beats per minute.
Assesing the Pulse Steps for radial pulse: • Assist patient to a seated or lying position to ensure relaxation and comfort; explain the procedure • Place patient’s forearm palm downward, across the chest; using the index and third fingers, locate the radial pulse • Exert firm but gentle pressure over the artery; pulsation will cease if pressure is the firm • Count pulse for 60 seconds, assess rhythm and quality • Record rate, rhythm and quality • Repeat observation if rate is under 60 or over 100, if rhythm is irregular, or if quality is abnormal
Assesing the Pulse • a. temporalis • a. radialis • a. carotis • a. poplitea • a. femoralis • a. dorsalis pedis • Apex cordis
Average Beats per Minute The Unborn Child 140 to150 Newborn Infants 130 to140 During first year 110 to130 During second year 96 to115 During third year 86 to105 7th to 14 year 76 to 90 14th to 21st year 76 to 85 21st to 60th year 70 to 75 After 60th year 67 to 80 Notes: Pulse rates rise normally during excitement, following physical exertion and during digestion. The pulse rate is generally more rapid in females. The pulse rate is also influenced by the breathing rate. Variation of one degree of temperature above 98 F. is approximately equivalent to a rise of 10 beats in pulse NORMAL PULSE RATE
Assesing respirations • Equipment • Watch with second hand • Pen and pad
Assesing respirations • Wash your hands • If patient is lying in bed, fold arm across the chest allow respirations to be felt as well as seen. If patient is in a chaire, observe respirations visually • Keep fingers on patient´s wrist, as if counting pulse. • Count respiratory rate for 30 second and multiply by 2, if respiration is irregular, count 60 seconds • Observe character of respirations • Record rate, record character is there any significant deviation from normal. • Report adult rate under 8 or over 40 to the appropriate person
Normal respirations rate • Adult (normal)- 12 to 20 breaths per minute • Children - age 1 to 8 years 15 to 30 • Infants - age 1 to 12 months 25 to 50 • Neonates - age 1 to 28 days 40 to 60
Temperature You can measure the temperature on three body locations: • Mouth - This method is not recommended for children younger than 5 years old. • Rectum - by the rectum • Armpit - axillary method, under the armpit • Ear - tympanic method,in the ear
Mouth Temperature • place the thermometer under the tongue and close the mouth using the lips to hold the thermometer tightly. The patient must breathe through the nose. Leave the thermometer in the mouth for 3 minutes. The oral temperature is usually about 1/2 to 1 degree higher axillary.
Rectal Temperature • for this method, use a rectal thermometer. This method is for infants and small children who are not able to hold a thermometer safely in their mouths. Lubricate the bulb of the thermometer with petroleum jelly. Place the small child face down on a flat surface or lap. Spread the buttocks and insert the bulb end of the thermometer about 1/2 to 1 inch into the anal canal. Remove the thermometer after 3 minutes. The rectal temperature is usually about 1/2 to 1 degree higher than the oral
Armpitt – Axillary Temperature • place the thermometer in the armpit, with the arm pressed against the body for 5 minutes before reading. This is the least accurate method for using a glass thermometer. The axillary temperature is usually about 1/2 to 1 degree below oral
Normal Values • The normal temperature varies by person, age, time of day, and where on the body the temperature was taken. The average normal body temperature is 98.6°F (37°C). • Your body temperature is usually highest in the evening. It can be raised by physical activity, strong emotion, eating, heavy clothing, medications, high room temperature, and high humidity. • Daily variations change as children get older: • In children younger than six months of age, the daily variation is small. • In children 6 months to 2 years old, the daily variation is about 1 degree. • By age six, daily variations gradually increase to 2 degrees per day . • Body temperature varies less in adults. However, a woman's menstrual cycle can elevate temperature by one degree or more.
Normal temperature range Rectum 36.6°C to 38°C (97.9°F to 100.4°F) Mouth 35.5°C to 37.5°C (95.9°F to 99.5°F) Armpit 34.7°C to 37.3°C (94.5°F to 99.1°F) Ear 35.8°C to 38°C (96.4°F to 100.4°F)
ECG • An electrocardiogram (ECG or EKG, abbreviated from the German Elektrokardiogramm) is a graphic produced by an electrocardiograph, which records the electrical voltage in the heart in the form of a continuous strip graph. It is the prime tool in cardiac electrophysiology, and has a prime function in screening and diagnosis of cardiovascular diseases.
ECG • The flow of positive electrical charges can be measured and tracked with strategically placed electrodes attached to the surface of the skin. There are at least 12 different lead pairs or positions for measurement on the body's surface: six limb leads; I, II, III, aVR, aVF and aVL, and six chest leads; V1 - V6.
Six limb leads • Lead I consists of a positive electrode attached to the left arm or shoulder and a negative one on the right arm or shoulder. A wave of depolarization on the heart that advances toward the positive lead causes a positive deflection on the ECG strip.
Six limb leads • Lead II has its positive electrode at the left leg or lower left chest and its negative electrode at the right arm or shoulder. This pair is more in line with the long axis of the heart, thus the upward deflections are greater than in Lead I.
Six limb leads • Lead III has its positive electrode at the lower left leg or lower left chest and the negative electrode at the upper left arm or shoulder.
Six chest leads LOCATION OF CHEST ELECTRODES IN 4TH AND 5TH INTERCOSTAL SPACES: • V1: right 4th intercostal space • V2: left 4th intercostal space • V3: halfway between V2 and V4 • V4: left 5th intercostal space, mid-clavicular line • V5: horizontal to V4, anterior axillary line • V6: horizontal to V5, mid-axillary line
The normal ECG • A typical ECG tracing of a normal heartbeat consists of a P wave, a QRS complex and a T wave. A small U wave is not normally visible.