A Step-by-Step Guide to Creating and Administering Tests in PowerTeacher
220 likes | 359 Vues
This guide provides detailed instructions on how to create and administer online assessments using PowerTeacher. It covers steps such as signing in to PowerTeacher, creating tests manually, aligning questions to standards, inputting test information, scheduling, and assigning tests to students. Additionally, it includes guidelines for navigating between questions, managing test settings, and administering tests to students. With easily accessible online options and detailed test review capabilities, educators can efficiently evaluate student performance.

A Step-by-Step Guide to Creating and Administering Tests in PowerTeacher
E N D
Presentation Transcript
Complete Test Information Subject which standards you are assessing.
Test Information Continued If you would like to allow your students to calculators, please select ‘Yes’.
Standard Alignment Align question with standard
Question Creation • Type Question Here Type Answer Choices Here • Be sure to mark how many points and which is correct answer.
Navigating to Questions • Click the question numbers here to move between questions. When you complete a question, it automatically saves.
After Creating Questions • Click this button here to get back to Test Detail page.
Scheduling/Assigning Test Click Ready to Schedule.
Test Settings Input the dates that you want to start and end the test. Test and scores will automatically show up in your gradebookif you click here. •
Online Test Options • Important!!! Most of these boxes should be checked. Read each one carefully and decide.
Assigning to Students • Click here to assign test to your students.
Assigning to Students Choose the sections here that you would like to assign the test to.
After Scheduling • Click View Details
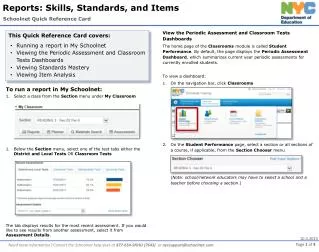
Test Review Use this page to review your test. You can also access a lot of information from this page. You can print off paper copy of test from here as well. Students’ usernames are found here.
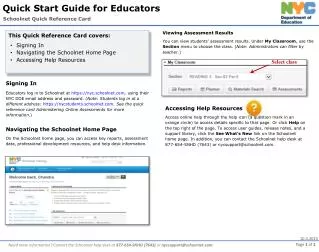
Administering Test • Select SchoolNet Login. Students will need their username and password to login.
Enter Test Code Enter test code below •
Other Information • Student’s Log-in is s_(student ID number) • Their password is the same for all classes. If you reset their password for your test, it will reset it for all on-line testing. • Tammy has a copy of initial passwords if you need them. • As of right now, the SchoolNet log-in for on-line testing is at the CCIS homepage.