Download

1 / 31
310 likes | 503 Vues
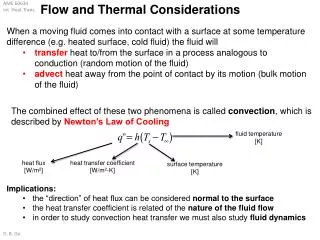
Mars Atmosphere and Volatile EvolutioN (MAVEN) Mission. Thermal Considerations for Board Electrical and Mechanical Design Christopher Smith Thermal Engineer. All RBSP electronics boards were designed without any input from the thermal engineer Same as we have done forever

E N D
Mars Atmosphere and Volatile EvolutioN (MAVEN) Mission Thermal Considerations for Board Electrical and Mechanical Design Christopher Smith Thermal Engineer
All RBSP electronics boards were designed without any input from the thermal engineer Same as we have done forever Its been working so far, or has it? PWM chip on RBSP LVPS was running 60 ºC above the box temp and was running at 90 ºC before thermal vac test was aborted RBSP LVPS issue was driven by excessive board temp NOT excessive component temp Power dissipated on the board could not get off the board Why Do We Care
Investigation revealed several issues Board mounting standoffs were G10 instead of Aluminum EMI shield was Alodined Aluminum shutting off radiation More importantly ground / thermal planes did not connect to the mounting areas RBSP LVPS Board Issues
After examining the board following the TVAC failure several features were found that were potential component thermal issues. Two resistors on board were dissipating .5 W each A diode was dissipating .5 W These were unknown to the thermal engineer even for his lame spreadsheet analysis used for part temperatures RBSP Component Issues
Use Peak Power It may be possible to ignore short duration peaks but it would need to be looked at on a case by case basis Component peaks for part stress analysis Board peaks for boards, etc … Thermal engineer will need realistic possible combinations of board peaks to produce overall box peaks in analysis Boards need to be tested to peak power Need GSE to do so If not possible extended test temperatures could substitute with some hand waving Peak Power
SWIA, STATIC, SWEA, and DPU currently qual to 50 ºC operational RBSP DCB board was running at Box + 8 ºC 1 Watt total dissipation Radiatively coupled to the LVPS board Connected to box by wedge locks LVPS board near hot components was at Box +20 ºC Use 65 ºC for an assumed board temperature to calculate component temperatures in part stress analysis? Not very conservative Margin is carried in part stress analysis assumptions Margin is carried in 10 ºC Qual to predict D We need to work to keep the board below this temperature For components that dissipate <= 100 mW, use 70 ºC ? Board Temperature Assumption
Thermal resistance given, or not, in component data sheets “Junction” refers to the max temperature inside the component Units of ºC/W or similar θJB: Thermal resistance from components junction to the board No Convection ψJB yet another resistance, different test method, close to but < θJB θJA: Thermal resistance from components junction to “Ambient” Component and board convection only, board not heat sunk θJC: Thermal resistance from components junction to outer case θCA: You may occasionally get a θCAprovided where: θJA= θCA,+ θJC You might not get any of these. You can estimate θJB using: θJB= θJC+ L/kΣAi K=thermal conductivity (copper=390 W/mC) ΣAi = sum of the cross sectional are of your leads to the board L = length of lead from component to board θJB, θJA, θJC
θJB is the only one that is correct for our purposes and even it is wrong? JEDEC standard 51-3 specifically states "It should be emphasized that values measured with these test boards cannot be used to directly predict any particular system application performance but are for the purposes of comparison between packages.” Your package connection to board, ground planes, ground plane connection to thermal ground, and nearby components effect this. How good is it for our purposes? By definition good to the 1st order only Don’t really know until we accumulate more data For now lets figure it gets us to within 5 ºC in most cases θJA, θJB, θJC, Useful with Caveats?
θJB is what we want (GREAT) L/kΣAi use if there is no θJB for non IC bits (GREAT) ψJB is close to what we want (GOOD) Includes convection effects Increase by 15% to estimate θJB θJC can be useful (OK?) θJB= θJC+ L/kΣAi θJA isn’t horrible (Who Knows) θJB was roughly 50% of θJA for a few components where they were both listed but have no idea if this is typical Depends a lot on board size, Small test boards used for θJA Using θJB, θJA, θJC
Lots about this online. Here are a couple places to start: http://www.intersil.com/data/tb/tb379.pdf http://www.coolingzone.com/library.php?read=519 http://www.coolingzone.com/library.php?read=520 http://focus.ti.com/lit/an/spra953a/spra953a.pdf Other Sources of Info
The only way to actually know your component temp is to test it on a board “thermally” equivalent to the flight board ETU boards should be built as close to flight as possible Thermal Images (if done correctly) and direct measurements will help determine the temp of your key components on your ETU Boards should be flight mounted to something equivalent to the flight box mounting If you use different components on ETU boards than flight, you won’t get this information until the flight board is built Be conservative in this case How conservative depends on weather you have θJB, θJA,or θJC in your pocket Simple TVAC tests at the ETU level can be very useful STATIC and SWIA stacked board arrangement High dissipation boards High dissipation components Real Component Temperatures
Stop doing whatever it is your doing to make it a high dissipater Stake as much area as possible with thermal potting compound Arathane 5753 with 50%, by mass, Boron Nitride k =1 W/mC Consider putting a pad underneath the component connected to the thermal plane and stake to that If filling a large gap, fill with a Beryllium Oxcide shim plus thermally conductive potting k =265 W/mC Cooling Down Hot Components
Dead bug components and stake, more surface area Place the component as close to thermal ground as possible Near wedge locks, screw posts or mounting lip Always do this with highest dissipaters Consider changes to ground plane under and near component Get the thermal ground plane underneath it If you can’t do that, use a separate ground plane as a spreader and “connect” it to thermal ground Heat sink the component Last resort? Mount component to the box Use a flexible thermal strap from the component to box Cooling Down Hot Components
If possible, the board should have 4 ounces of thermal ground plane that covers the entire board 4 oz is a best guess at this point so 2*2 oz, or 4*1oz, etc 2 might be good enough, don’t know yet One thermal ground plane needs to connect to the box well Direct connection works best so chassis ground = thermal ground If capacitive coupling is a noise issue Avoid sensitive planes / areas Get as close as possible Overlap the perimeter by as much as possible Noise and Thermal are both issues that we may not have a good handle on until the flight board is built Don’t be too conservative and make it all a thermal problem Thermal / Ground Planes
8” x 8”, 2.0 W board 0.6 W dissipated on “island” plane 1.4 W dissipated on remainder of board Isolated plane separated from thermal ground plane by 0.1” moat Perimeter of board held at 0 ºC So temps displayed are equal to D from box 2 oz copper for each 2 layers of FR4 between the copper layers Example Board
Enable radiation both side to 10 ºC sink Similar to what it would see with a board on each side Isolated Thermal Plane, Radiation
Reduce the “Moat” to 0, no overlap but no gap either Less Isolated Thermal Plane
Overlap Ground planes by 0.1” Should do this anywhere noise is not an issue Un-Isolated Thermal Plane
“Moat” back to 0 Turn Radiation Off Board Power doubled 1.2 +2.8 = 4 W Back to Less Isolated Thermal Plane
Copper layers 2 oz → 4 oz 4 oz copper
Move Island closer to edge “Island” Near Edge
Roughly 1 oz of thermal plane per Watt 2 oz minimum Thermal plane needs to go right up to noise sensitive ground planes If not possible need to work closely with thermal engineer to solve heat path issue If other ground planes are not sensitive, thermal plane should completely overlap them Minimize FR4 between thermal plane and important dissipaters, one or two layers of FR4 assumed here Isolated planes that are high dissipaters should move as close as possible to thermal ground Ground Plane Action Plan
All of the above analysis assumes that the thermal plane has good connection to the sink RBSP had lots of overlapping copper but the heat had no where to go Chassis ground was quite small and carefully avoided “keep out” zones around fasteners Standoffs were G10 by accident Ground plane not connected to all but one of the screw mounting locations When Good Thermal Planes Go Bad
The MAVEN perimeter lip on the box frames offers a lot of area to conduct heat (kA/L) To take advantage of the area you need lots of screws to the lip Lots of smaller screws better than a few bigger ones Can also take better advantage of this area by bonding with thermal epoxy Still need to get energy from the thermal plane to the box Increase Mounting Area • Create a copper pad around perimeter at mounting surface • Connect pad to thermal planes with lots of VIAs • Connect pad to box with lots of screws, epoxy, or potting compound Thermal Planes Thermal Pad Thermal Epoxy (Potting) VIAs
Need to increase area as much as practical More standoffs better Bigger standoffs .25” to .30” diameter SWIA and STATIC should try to fit in 0.3” standoffs since there are only 4 to connect all the boards Standoffs need to be thermally conductive, Aluminum No thermal breaks in standoff stacks PEMs are ok if there is good contact to thermally pad on the other side Stainless is a thermal insulator, even a washer Stainless = 16 W/mK Aluminum = 160 W/mK G10 = .25 W/mK Screws and Standoffs
Need to carefully connect standoff and screw pad to thermal plane Plated through holes Pad on both sides connected with vias No wagon wheels Beware of misinterpreted keep out zones Bigger Pads Screws, the Details Thermal Pad Vias Thermal Planes Thermal Pad Standoff Keep Out?
Identify all parts > 50 mW Hunt down the best θJB, θJA, θJC , L/kΣAi for these components Might use a value from a very similar part you have good data for Identify components that need special heat sinking Verify you are correct using a thermal imager Identify Component, and Board Peak power Plan ground planes and connection to chassis Combine thermal ground plane with chassis ground plane if possible 1 oz of thermal ground plane per watt, 2 oz minimum Generate good instructions for standoff pads, lip pads, etc Provide data to thermal engineer, probably not me to produce predicts and iterate toward solution All done before we fabricate flight PWDs Errr … that means this month Wrapup