Utilizing Microsoft Access for Building Queries and Reports with RCRAInfo
370 likes | 402 Vues
Learn how to create queries and reports in Microsoft Access for better data management and analysis with RCRAInfo. This guide covers building queries, defining relationships, using operators, functions, and wildcard characters.

Utilizing Microsoft Access for Building Queries and Reports with RCRAInfo
E N D
Presentation Transcript
USING MICROSOFT ACCESS WITH RCRAINFO QUERIES AND REPORTS RCRAInfo National Users Conference August 1 - 5, 2005
USING MICROSOFT ACCESS WITH RCRAINFO WORKING WITH QUERIES REPORT BUILDING USING REPORT WIZARD Prepared by: Buddy Jones USEPA, Region 6 (6PD-M) Dallas, TX 75202
Building a Query Select Queries New Design View and click OK:
Select the ACCESS table(s) you wish to use, and click Add. NOTE: Ensure you select the appropriate ACCESS table and not a “Link Table”. After selecting the table(s) you wish to use, and it/they appears in the “Select Query” area, click Close on the Show Table box.
To link tables, hold down the left mouse button and drag from the linkable field in one table to its related field in the other. Example: HANDLER_ID in HREPORT_UNIV3 to HANDLER_ID in CEVALUATION3. To define the relationship, double-click on the Link line:
In the Join Properties box, choose the appropriate relationship you desire and click OK. Note that the Link line changes to an arrow, pointing from one field to it’s related field based on the join property you assigned. (You should then join any other field that are necessary, such as REPORT_UNIV3.ACTIVITY_LOCATION to CEVALUATION3.EVAL_ACTIVITY_LOCATION in this case.)
After selecting any criteria and/or sort you desire, click the Run icon (!): Note: Clicking on the “Totals” symbol (3) will “Group By” your selected fields. Save your query with an appropriate name. Queries allow you be better qualify criteria, such as concatenating fields, using IF..THEN statements, etc.. Building a query first aids in generating a report.
MICROSOFT ACCESS 2000 OPERATORS, CHARACTERS AND FUNCTIONS (Commonly used with RCRAInfo) COMMONLY USED OPERATORS: OperatorDefinitionExample = Equal to = “NORFOLK” < Less than < 10 <= Less than or equal to <= 10 > Greater than > 10 >= Greater than or equal >= 10 to <> Not equal to <> “LITTLE ROCK” Like Finds values within Like “NOR*” defined ‘pattern’ (Opposite “Not Like”) Between..And Finds values between Between #10/1/99# and given parameters #9/30/00# (inclusive) In Finds values in list In (“NC”, “SC”) COMMONLY USED WILDCARD CHARACTERS: CharacterUsageExample * Matches any number of characters. wh* finds what, white, and It can be used as the first or why last character in the character string. ? Matches any single alphabetic B?ll finds Bill, bull, character.Ball, bell [ ]Matches any single character B[ae]llfinds ball within the brackets.and bell but not bill ! Matches any character not in the b[!ae]ll finds bill brackets.and bull but not bell - Matches any one of a range of b[a-c]d finds bad, bbd, characters. You must specify the bcd range in ascending order (A to Z, not Z to A). # Matches any single numeric 1#3 finds 103, 113, 123 character.
FUNCTIONS Note: This handout covers some the most common Microsoft Access functions used with RCRAInfo. A complete list of Access’s built-in Functions can be found in the Expression Builder. For more information, or information on other functions, we recommend you consult any good text reference concerning Microsoft Access or use the built-in Help function. • FUNCTIONExample • Left() Left([HREPORT_UNIV3]![LOCATION_ZIP],5) “123459876" results = “12345“ • Right() Right([HREPORT_UNIV3]![LOCATION_ZIP],4) “123459876" results = “9876“ • Mid() Mid([CEVALUATION3]![RESPONSIBLE_PERSON],3,5) “ARAAA” results = “AAA” • & (Used for concatenation - combining fields) • Left([HREPORT_UNIV3]![LOCATION_ZIP],5)& “-“ & Right([HREPORT_UNIV3]![LOCATION_ZIP],4) results = “12345-9876" • [HREPORT_UNIV3]![LOCATION_STREET_NO] & " " & [HREPORT_UNIV3]![LOCATION_STREET1] “123" & “MAIN ST” results = “123 MAIN ST” • “ “ & “STATE HWY 123" results = “ STATE HWY 123” LTrim() (Trims blank spaces from the left or right) RTrim() LTrim([HREPORT_UNIV3]![LOCATION_STREET_NO] & " " & [HREPORT_UNIV3]![LOCATION_STREET1]) “ ” & “STATE HWY 123" results = “STATE HWY 123"
FUNCTIONExample IIf() (Returns one value if the condition specified evaluates as TRUE and another value if it evaluates as FALSE) Format: IIf(logic test, then (True results), else (False results)) IIf([HREPORT_UNIV3]![LOCATION_STATE] = “LA”, “PARISH: “ & [HREPORT_UNIV3]![LOCATION_COUNTY_NAME], “COUNTY: “ & [HREPORT_UNIV3]![LOCATION_COUNTY_NAME])) IIf(Mid([HREPORT_UNIV3]![LOCATION_ZIP],6)="", [HREPORT_UNIV3]![LOCATION_ZIP] ,Left([HREPORT_UNIV3]![LOCATION_ZIP],5) & "-" & Right([HREPORT_UNIV3]![LOCATION_ZIP],4)) Max() Returns Maximum or greatest value (Opposite = Min())Max([CEVALUATION3]![EVAL_START_DATE]) Similar in function to First() and Last() Is Null Used to search for Null values (Opposite = Is Not Null) (type Is Null or Is Not Null into the Criteria cell) “” Used to search for zero-length (blank) strings (type two double quotation marks ("") into the Criteria cell to search for zero-length strings (don't type a space between the quotation marks). (Nulls are used when working with numeric or date values, or when there is NO value expected in the field. “” is used when working with alphanumeric or blank fields.)
Building a Query To select ALL fields in a table, double-click on the asterisk (*) at the top of the table’s field list. To select a specific field, double-click on the field’s name in the table list. To combine records with identical values in specified fields, and to reduce unnecessary resulting lines, it is recommended that, after you have selected the field(s) you want in the query, turn the “Totals” (3) on the action bar at the top to turn on “Group By” in the “Total:” line in the field selection grid.
Once you have selected the fields, you’re ready to begin refining your query. Simply enter the specific search criteria you desire using the appropriate Operator. (If you choose “=“, it is not necessary to type the equals sign.) You can select any sorting you desire in the drop-down box on the Sort: line
If you are designing a simple query, use of the “Criteria” line in the Query By Example (QBE) grid will be sufficient to retrieve the data you are searching for. However, many searches will require a more complex statement or a sub-query, particularly when using If..then statements, when concatenating fields, when truncating a field, when trimming blank spaces – JUST TO MENTION A FEW! For example, let’s use this scenario. I want to find the all the RCRA sites in Little Rock, AR and the date and type of their last evaluation. If I run the above query, the results would be a listing . . . Those sites with no Eval_Start_Date or Eval_Type have no Evaluations entered. Many, like Central Flying Service, only have one Evaluation. But some, like Celestica Services Inc, have more than one. Our task is to retrieve the latest one. So let’s use “ARD006341119” as a test site to further qualify our query.
Return to the design view screen and enter the HANDLER_ID, in this case “ARD006341119”. When I run the query, I find that Celestica has 25 Evaluations, and the latest seems to be a CEI of 08/04/98. Go back to the Main Menu, Click “Query” and “New”, and select “Design View”. Select the CEVALUATION3 table from the Show Table box:
Select EVAL_ACTIVITY_LOCATION, HANDLER_ID, and EVAL_START_DATE, and Group By your selections. Note: Practice and experience will tell you which fields you must choose. In this case, we’re looking for the latest Eval_Start_Date for the site. Click the Group By box under Eval_Start_Date and select “Max”.
Enter the test HANDLER_ID of “ARD006341119” and run the query. And, when we run the query we get the data for the Max of EVAL_START_DATE. Click on the “Carpenter’s Square and Pencil” in the upper left corner on the Action Bar just below “File”.
Remove the test HANDLER_ID and click the Save icon on the Action Bar. Save the Query:
Return to the Main Menu, make sure “Query” is selected, click “New”, and “Design View”. Under the “Queries” tab, select MAX EVAL_START_DATE QUERY. Under the “Tables” tab, select HREPORT_UNIV3 and CEVALUATION3.
Link HANDLER_ID and ACTIVITY_LOCATION in HEPORT_UNIV3 to HANDLER_ID and EVAL_ACTIVITY_LOCATION in MAX EVAL_START_DATE QUERY; then link HANDLER_ID, EVAL_ACTIVITY_LOCATION, MaxOfEVAL_START_DATE from MAX EVAL_START_DATE QUERY to the corresponding fields in CEVALUATION3 (HANDLER_ID, EVAL_ACTIVITY_LOCATION, and EVAL_START_DATE). Let’s first select ACTIVITY_LOCATION, HANDLER_ID, and HANDLER_NAME from HREPORT_UNIV3, MaxOfEVAL_START_DATE from the MAX EVAL_START_DATE QUERY, and EVAL_TYPE from CEVALUATION3.
Enter our test HANDLER_ID in the Criteria box. Then run the Query. WOW! It works. Now we can go back the the Select Query screen and remove the test HANDLER_ID. We can then select other fields we want in our query. Then, in the Criteria row, add “AR” under ACTIVITY_LOCATION and “LITTLE ROCK” under LOCATION_CITY.
Run your query and you check the results: Click on the Carpenter’s Square/Pencil in the upper left corner and return to your design view. Save your query. Building and using sub-queries can be very helpful in a number of applications. Experience can only be gained through experimenting.
Another way to achieve the same results can be with the use of an imbedded statement, or sub-statement, within the query. Looking back to basic data for our original query: HREPORT_UNIV3.ACTIVITY_LOCATION, HREPORT_UNIV3.HANDLER_ID, CEVALUATION3.EVAL_START_DATE, and CEVALUATION3_EVAL_TYPE. Place the cursor in the Criteria box for EVAL_START_DATE. Click the Expression Builder (Magic Wand) icon on the tool bar.
You will then get the Expression Builder box. Click the Plus Sign (+) next to Tables to open the Table list.
Double-Click on CEVALUATION3 in the Table list to get CEVALUATION3’s fields. In the Expression Builder box (the large white space), enter: Earlier, we used a Sub-Query (MAX EVAL_START_DATE QUERY) to retrieve the lastest Eval_Start_Date. We had to give that query a name. In this Sub-Statement, we are actually using 2 different CEVALUATION3 tables, one we are renaming “X” so Access can deal with the statement. Hence, the fields [X]![HANDLER_ID], [X]![EVAL_ACTIVITY_LOCATION], etc. We tell Access, IN THE FROM PORTION of our sub-statement, the name of the second (pseudo) table by entering: FROM [the current table name] [new table name]. . . . . . FROM [CEVALUATION3] [X] . . .
Since you included both HANDLER_ID and EVAL_ACTIVITY_LOCATION from CEVALUATION3 in your Sub-Statement, you MUST also include them as selected fields. If not, you will get an error message stating you did not include them. Now, let’s enter our test HANDLER_ID of “ARD006341119” and run the query. Going back to our design view, we can now remove our test HANDLER_ID and select any other fields we need.
Further use of the Expression Builder: Now, let’s do another one. This time place your cursor in the LOCATION_STREET_NO box on the QBE and click on the “Magic Wand” button. The Expression Builder box should appear with LOCATION_STREET_NO pre-filled. Let’s change the field name from LOCATION_STREET_NO to LOCATION_ADDRESS with a colon following it. This establishes a new field for the query output.
Under “Tables”, select HREPORT_UNIV3 and the table’s fields appear. With this we can “click” on fields we want to select and don’t have to type them out. Note: You can drag the sides of the box to open it up for ease in reading field names. Double-click the field you want, in this case LOCATION_STREET_NO. If you get the expression “<Expr>”, delete it.
We now add an ampersand (&) to concatenate, plus a blank space (“ “), another ampersand and LOCATION_STREET1. Note that I have added LTrim with parenthesis on each end to eliminate any blank leading spaces if no LOCATION_STREET_NO exists. Now we can run our query:
And we have our data with the newly defined field. Notice there are no leading blanks in the newly designed LOCATION_ADDRESS field. Queries can be designed for a number of purposes. Generally one query will serve the purpose. But sometimes you will have to build “subqueries” to run within another query. The power here is almost unlimited. There are, of course, numerous other Functions that can be used as either Criteria or in the Expression Builder. In the limited time provided for this presentation, we can only provide a few example. You may, and should, venture further as you develop queries for whatever purpose desire. Many good publications are available that will greatly enhance your knowledge. Additionally, you can find a lot of help on the Internet. In any good Search Engine, search for “MICROSOFT ACCESS TUTORIAL” and a number of sites should come up.
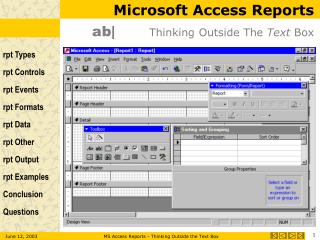
Building a report with Report Wizard Next, let’s move into Reports and use the last we just built to generate a simple report. I have named the second query “REPORT EXAMPLE QUERY” for this purpose. Click on Reports in the Objects column and select New. In the New Report box, select Report Wizard and select DEMO QUERY 2 from the drop-down list of tables and queries. Then, click OK.
Select the field(s) you want by clicking “>” an individual field or “>>” for all fields. Then click Next>. You can select fields for “grouping levels”. When finished, click Next>.
You can then select up to 4 fields for sorting. Then click on Next>. ACCESS offers six different basic layouts that you can select. Also, you can now select whether you want your report set up in Portrait or Landscape orientation. Then click on Next>.
Next, Report Wizard offers you a selection in styles. After selecting one, click on Next>. You may select from 6 prebuilt report Styles. Then click NEXT >
Next, you can enter a title for you report. Then you can opt to Preview the report or Modify the report’s design. When ready, click Finish. The report will run or the design view will display.
To go to the reports Design View, click on the View icon in the upper left corner on the tool bar. In the Design View, the report’s layout can be redesigned as desired. The report will save automatically, or you will be prompted to save it, each time you exit.
END OF PRESENTATION RCRAInfo National Users Conference August 1 – 5, 2005