Download
1 / 12
120 likes | 299 Vues
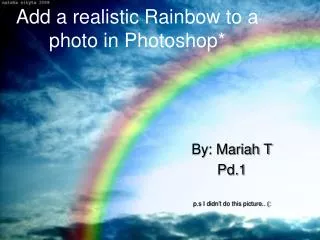
Add a realistic Rainbow to a photo in Photoshop*. By: Mariah T Pd.1 p.s I didn’t do this picture.. (:. Before*. After*. Step 1. Add a new layer and label it “Rainbow”. Step 2. Select the Gradient Tool on tool bar

E N D
Add a realistic Rainbow to a photo in Photoshop* By: Mariah T Pd.1 p.s I didn’t do this picture.. (:
Before* After*
Step 1 • Add a new layer and label it “Rainbow”
Step 2 • Select the Gradient Tool on tool bar • Click on the Gradient Picker options at the top of the screen • Then Gradient Editor pops up, then click the Right-pointing arrow on the top of the Gradient Editor • A window pops up and click Special Effects • Click Append • Find “Russell's Rainbow”
Step 3 • Click on the Radial Gradient to give the Rainbow an arc.
Step 4 • Position your mouse where you want to start your rainbow • Hold Shift and drag it across the area you want it to go • Release and the rainbow should pop up • You could rearrange the rainbow how you want it
Step 5 • Go to the layer box • Where it says NORMAL click on it and change it to SCREEN
Step 6 • Blur the colors to look more realistic • Go to FILTER then find BLUR then find GAUSSIAN BLUR • A box pops up, Drag the RADIUS SLIDER. This makes the colors softer and more natural. 30 should be fine..
Step 7 • Click on the LAYER MASK • A white thumbnail shows up
Step 8 • Go back to the GRADIENT TOOL • Click on the BLACK TO WHITE gradient • Go back to the Top and click LINEAR
Step 9 • Holding SHIFT drag the mouse from the bottom of the rainbow to the top • Now it seems like the rainbow gets brighter as it goes up
Step 10 • If you want the rainbow to be brighter make a copy of the layer • If it seems to bright now you can change the opacity of the second layer • Once you finish that just flatten the image • AND YOUR DONE!! (: