Microcontroller Basics
Microcontroller Basics. Presented by IEEE of Texas A&M. About This Workshop. Based on the MSP430G2553 microcontroller by Texas Instruments Powerpoint and code available at ieeetamu.org/mcc/ microbasics Workshop Reference available at ieeetamu.org/mcc/ wsref


Microcontroller Basics
E N D
Presentation Transcript
Microcontroller Basics Presented by IEEE of Texas A&M
About This Workshop • Based on the MSP430G2553 microcontroller by Texas Instruments • Powerpoint and code available at ieeetamu.org/mcc/microbasics • Workshop Reference available at ieeetamu.org/mcc/wsref • Footnotes refer to User Guide (UG), Datasheet, or Workshop Reference (WSRef) Example: UG §1.2.3, DS §4.5.6, WSRef §7.8.9
Import code projects into Code Composer • Follow instructions in the Workshop Reference or at ieeetamu.org/mcc/importing • Code: ieeetamu.org/mcc/microbasics • Projects to import: • Blinking LEDs 1 (Open and run “blinking_leds_1.c”) • Blinking LEDs 2 • Polling • Interrupts WSRef § 1.2
Extremely Useful Documents • User's Guide – MSP430x2xx Family • ieeetamu.org/msp430ug • All general MSP430 information • Ex: MSP430 Architecture, Instruction Set, Registers, clocks, timers, module types and functionality • MSP430G2x53 Datasheet • ieeetamu.org/msp430ds • Information specific to individual set of chips • Ex: List of included modules, pin-outs, memory size
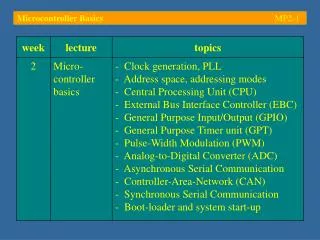
Topics Covered • Using Code Composer Studio • The MSP430 • Input and Output • Interrupts vsPolling
The Code Composer Window Projects Code Files Errors/Warnings and Console
Debugging a Program • Click Debug (bug icon) or F11 • After debug mode starts, click Resume (play button) or F8 • Pause program using Suspend • When program is paused, code can be run one line at a time • Hover over variables to see current values WSRef§1.3
Breakpoints • Right click next to a line of code and click toggle breakpoint • Code will stop executing when breakpoint is hit • Step through code or press Resume to continue WSRef§1.3
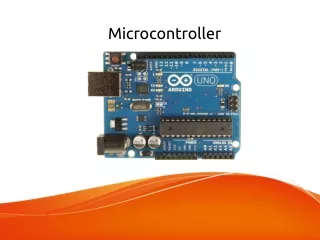
The MSP430 Family • Ultra-low power (<100μA/MHz) • Multiple Low Power Modes • 16-bit, RISC-based CPU • Hardware modules (UART, SPI, I2C) for communicating with peripherals or PC • Interrupts and timer modules • Analog to Digital Converter (ADC)
MSP430G2553 • CPU runs at up to 16 MHz • 512 Bytes RAM (for stack/heap) • 16 kB Flash Memory (for program data) • 8 channel, 10-bit ADC • Temperature Sensor
Registers - The hardware-software link • All configuration is done using registers • Controls how microcontroller behaves • In software, register names are defined in header file • #include"msp430g2553.h" • Written in all caps: P1OUT, WDTCTL, IFG2
The Header File - msp430g2553.h • Only works with one specific MSP430 model • Other MSP430s have different features • Defines register names • Defines helpful constants • Also in all caps: BIT0, WDTHOLD, UCA0RXIE • Increases readability: • Clear: WDTCTL = WDTPW + WDTHOLD; • Confusing: WDTCTL = 0x5A80;
The Watchdog Timer • Resets microcontroller in case of malfunction • Must be continually reset before elapsing • Allows a system to recover autonomously • Useful for applications in remote and/or dangerous locations such as space • Turn off when not needed • WDCTL = WDTPW + WDTHOLD; UG Ch. 10
Input and Output Open “blinking_leds_1.c” in the project “Blinking LEDs 1 - Microcontroller Basics”
Input and Output • Microcontrollers can set and read voltages on its GPIO pins depending on configuration of registers • In software, 0 = ground and 1 = Vcc (~3.3V) • The MSP430G2253 has 16 GPIOs • Port 1: P1.0 through P1.7 • Port 2: P2.0 through P2.7 • Pins are labeled on Launchpad • Each bit (0 through 7) in PxOUT, PxDIR, PxIN, etc. correspond to a GPIO pin UG Ch. 8, WSRef§2.2
P1DIR and P1OUT • These two registers are used to turn the LED on and off • P1DIR sets direction of each pin on port 1 • 0 = input, 1 = output • P1OUT sets what is being output on each port 1 pin (if set to output) • 0 = ground, 1 = Vcc WSRef §2.2
Blinking LEDs 1 • Run the code! voidmain(void) { WDTCTL = WDTPW + WDTHOLD; P1DIR = BIT0; while(1) { P1OUT ^= BIT0; __delay_cycles(250000); } }
Bitwise Operators “x” means “don’t care” (replaceable with 0 or 1) Notice that the bits in the first operand change only where there are 1s in the second operand WSRef§3.2
BITx and Shorthand Operators • P1OUT ^= BIT0; is equivalent toP1OUT = P1OUT ^ BIT0; • Same for other operators: P1OUT |= BIT0; is the same as P1OUT = P1OUT | BIT0; • Allows individual bits to be changed WSRef§2.3.1, 3.5
End of main() and __delay_cycles() • Microcontroller programs should not end • Use an infinite loop: while(1) {/*code*/} • Enter a low power mode: _BIS_SR(LPM0_bits); • __delay_cycles() delays code execution • Length of time depends on MSP430 clock rate! • Ex: 1 million cycles @ 1MHz = 1 second
Blinking LEDs 1 - Exercises to try • Make the green LED blink instead of red • Green LED is on P1.6 • Make both LEDs blink at once • Red and Green should turn on and off together • Make sure both are on or off before infinite loop • Make the LEDs alternate (one on at a time) • Exactly one LED should be on at all times • Make an LED turn on and off for different durations • “On” state should be longer/shorter than “off” • Try using |= and &= ~
Blinking the green LED #include"msp430g2553.h" voidmain(void) { WDTCTL = WDTPW + WDTHOLD; P1DIR = BIT6; // green LED is on P1.6 while (1) { P1OUT ^= BIT6; __delay_cycles(250000); } }
Blinking both LEDs at Once #include"msp430g2553.h" voidmain(void) { WDTCTL = WDTPW + WDTHOLD; P1DIR = BIT0 + BIT6; P1OUT = 0; // start both LEDs off while(1) { P1OUT ^= BIT0 + BIT6; __delay_cycles(250000); } }
Alternating Both LEDs #include"msp430g2553.h" voidmain(void) { WDTCTL = WDTPW + WDTHOLD; P1DIR = BIT0 + BIT6; P1OUT = BIT0; // start only red on while(1) { P1OUT ^= BIT0 + BIT6; __delay_cycles(250000); } }
Separate duration for on and off #include"msp430g2553.h" voidmain(void) { WDTCTL = WDTPW + WDTHOLD; P1DIR = BIT0; while(1) { P1OUT |= BIT0; // red LED on __delay_cycles(250000); P1OUT &= ~BIT0; // red LED off __delay_cycles(500000); } }
Blinking LEDs 2 Open “blinking_leds_2.c” in the project “Blinking LEDs 2 – Microcontroller Basics”
Launchpad Setup • Download code to MSP • Disconnect MSP! • LED leg to P1.1 • Resistor leg to P1.2 • Reconnect MSP and verify LED is blinking
Pins Output Real Voltages! • P1.2 is always set to ground • P1.1 toggles between ground and Vcc, which turns the LED on and off • All normal voltage and current rules apply to circuit connected between P1.1 and P1.2 • Current flows out of P1.1 and into P1.2 P1DIR = BIT1 + BIT2; P1OUT = 0; while (1) { P1OUT ^= BIT1; __delay_cycles(250000); }
Exercise to try • Without changing the circuit, make the LED blink by toggling P1.2
Make LED blink by toggling P1.2 void main(void) { WDTCTL = WDTPW + WDTHOLD; P1DIR = BIT1 + BIT2; P1OUT = BIT1; while(1) P1OUT ^= BIT2; __delay_cycles(250000); } }
Polling Open “polling.c” in the project “Polling – Microcontroller Basics”
Launchpad setup • Disconnect the MSP! • Vcc to P1.4 • Gnd to P1.5 • Connecting P1.4, red LED will blink • Connecting P1.5, green LED will turn on • Having both connected causes red LED to blink slowly
Pullup/pulldown Resistors • Default voltage for unconnected input pin • Prevents voltage from floating between states • Pullup resistor pulls voltage up to Vcc • Pulldown resistor pulls voltage down to ground • Takes input voltage when pin is connected • Useful for switches and buttons Input pin Input pin WSRef §4.2
Configuring pullup/down resistors • PxREN enables pullup/down resistors on pins • When enabled, PxOUT decides direction • 0 = down, 1 = up voidmain(void) { WDTCTL = WDTPW + WDTHOLD; P1DIR = BIT0 + BIT6; P1OUT = 0; P1REN |= BIT4 + BIT5; P1OUT |= BIT5;
P1IN • Use P1IN to read inputs on port 1 pins • 0 = ground, 1 = Vcc WSRef §2.2
The Polling Loop • Constantly loops, checking conditions over and over again • Very inefficient while (1) { if (P1IN & BIT4) { // checks if P1.4 is Vcc. P1IN & BIT4 P1OUT ^= BIT0; // results in either 010000 or 000000 } // which evaluates to true and false if (!(P1IN & BIT5)) { // checks if P1.5 is ground P1OUT |= BIT6; __delay_cycles(250000); } else { P1OUT &= ~BIT6; } __delay_cycles(250000); }
Interrupts Open “interrupts.c” in the project “Interrupts – Microcontroller Basics”
Launchpad Setup • Same as polling example • Vcc to P1.4 • Gnd to P1.5 • Connecting P1.4, red LED will toggle • Connecting P1.5, green LED will blink 4 times
Interrupts • Interrupts are handled by the microcontroller • Only runs code when interrupt is triggered • Interrupts pause currently running code to run their own code • Interrupts have different priorities • More important interrupts run before others UG §2.2
Interrupt Configuration void main(void) { WDTCTL = WDTPW + WDTHOLD; P1DIR = BIT0 + BIT6; P1OUT = 0; P1REN |= BIT4 + BIT5; P1OUT |= BIT5; P1IE |= BIT4 + BIT5; P1IES = BIT5; P1IFG &= ~(BIT4 + BIT5); _BIS_SR(LPM4_bits + GIE); }
Interrupt Handler #pragmavector=PORT1_VECTOR // handles interrupts on port 1 __interruptvoid Port_1(void) { if(P1IFG & BIT4) { // handles P1.4 interrupt P1OUT ^= BIT0; _delay_cycles(100000); P1IFG &= ~BIT4; } elseif(P1IFG & BIT5) { // handles P1.5 interrupt inti; for(i = 0; i < 4; i++) { P1OUT |= BIT6; _delay_cycles(100000); P1OUT &= ~BIT6; _delay_cycles(100000); } P1IFG &= ~BIT5; } }