Intro to MicroControllers : Stellaris Launchpad
Intro to MicroControllers : Stellaris Launchpad. Class 4 : PCB Schematic Design & Board Layout. Topics for Today. Symbol + Package = Device Create Device / Libraries Net Names Pin Names Design Rule Check Board Layout (signal routing) PCB Fabrication Services. Device = Symbol + Package.

Intro to MicroControllers : Stellaris Launchpad
E N D
Presentation Transcript
Intro to MicroControllers : Stellaris Launchpad Class 4: PCB Schematic Design & Board Layout
Topics for Today • Symbol + Package = Device • Create Device / Libraries • Net Names • Pin Names • Design Rule Check • Board Layout (signal routing) • PCB Fabrication Services
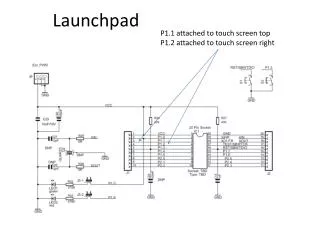
Device = Symbol + Package • Library = collection of Devices • Device = pairing of Symbol with Package • Symbol = Electrical Signal Property routing • Package = Physical copper contacts Package Symbol
Board Layout = Packages wired up Top Layer Bottom Layer Via
Custom Part Creation • Create / Open Library • Create Symbol • CreatePackage • Create Device • Link Pinstogether on Schematic -> Package Note: make sure you have the library window in focus. For more detailed instructions see the instructable below. http://www.instructables.com/id/How-to-make-a-custom-library-part-in-Eagle-CAD-too/?ALLSTEPS
Schematic • Focus on Library->Library->Symbol • Draw package, add pins, name pins and nets
Package • Set grid to half smallest size • Use datasheet • Name pins • Name package, give value • NOTE: Show names / values, VERY IMPORTANT for later
Device • Library in focus -> Library -> Device • Select Symbol, select Package (prev created) • Connect pins • Save
Device creation the Easy Way • Copy Existing Parts • Open their libraries, cut, then open your library and paste.
Board Layout • Do Schematic first • Generate board from Schematic • Route wires • Run DRC, fix errors
Produce Board • Upload .board file to OSH Park • Review masks • Wait 2 weeks, • Vuala!
Extras • Generate 3D image of board