5th Grade One Point Perspective shapes
5th Grade One Point Perspective shapes. Materials White paper (12x18 cut down to 12x12) newsprint paper 18” ruler triangle (in drawer w/rulers) No. 2 pencil (sharpened) eraser (white plastic) colored pencils Class Periods - 2

5th Grade One Point Perspective shapes
E N D
Presentation Transcript
5th GradeOne Point Perspectiveshapes • Materials • White paper (12x18 cut down to 12x12) • newsprint paper • 18” ruler • triangle (in drawer w/rulers) • No. 2 pencil (sharpened) • eraser (white plastic) • colored pencils • Class Periods - 2 • for a good understanding of perspective drawing before the class, refer to http://www.olejarz.com/arted/perspective/index.html Drawing in One-Point Perspective by Harold Olejarz • how to video http://www.youtube.com/watch?v=E8fG6unqwyo&feature=related • http://www.youtube.com/watch?v=7ZYBWA-ifEs&feature=related • Set Up • Before class enters, give each place 2 pieces of newsprint paper, 18” ruler, angle, no. 2 pencil, eraser • Make sure the students put their name and date on every project!
Draw a horizon line Draw a vanishing point
no orthogonal from these corners you would not see the sides of this shape
parallel lines parallel lines
no orthogonal from these corners you would not see the sides of this shape
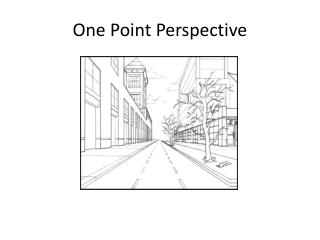
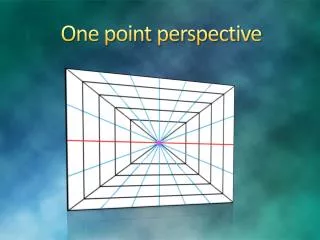
Procedure (print this page to teach from) DISCUSSION (show slides of photos of perspective)If you look along a straight road, the parallel sides of the road appear meet at a point in the distance. As lines head into the distance, they converge on a vanishing point. A classic example of this is the image of a road that heads straight off to the horizon. The lines on the road converge to a single point.You’ll notice that all the lines: the horizon lines, the rows of grass, the flowers, even the shades on the road converge to that same vanishing point.SHAPES EXERCISEPractice this exercise on the newsprint paper. Have students put their name and date on the paper.The second piece of paper is for unhappy mistakes or more practice.1. Turn paper to horizontal format2. Draw a horizon line3. Make a vanishing point (just a small point of reference)4. Draw a square or rectangle5. Draw orthogonal lines from shape corners to (or thru) vanishing point6. Draw a horizontal and vertical line to create a form (cube)7. Erase the orthogonals8.
Step 5: Create a background. Keep it simple (see examples.) Remember you only have two class periods for both the practice exercise and the final piece. Step 6: Color. Use colored pencils to fill the shapes and background with color. Use one color for the face of the object and a different color, or shade of the same color, for the sides (see examples.) Use value to create shading - as you did in an earlier project. Step 1: Using LIGHT pencil lines, draw the horizon line. High or low - your choice The horizon line is where the sky meets together with the earth. Step 2: Choose a vanishing point. Centered or off-centered Pick a point on the horizon line. You can pick a point anywhere on this line. If you pick a point away from the middle the results you get will look different than the practice drawing, but the principles of one point perspective will be the same. Step 3: Draw 4 - 7 shapes. No more - too crowded. No less - not enough. Square, triangle, circle or anything you choose. Draw simple shapes (see examples) using light lines. You can make whatever you want. Step 4: Draw in perspective. Follow the same steps as the practice exercise. Draw orthogonals from shape corners to (or thru) vanishing pointDraw a horizontal line to end you formDraw parallel lines for unusual shapes without horizontal or vertical like circles, pentagon, etc. Draw a vertical line to make the form’s side Erase the orthogonals Erase horizon line and vanishing point
vocabulary • horizon line - the viewer's eye level (where the ground and the sky seem to meet). You can see the top of an object if it is below eye level, below the Horizon Line. If an object is above eye level, above the Horizon Line, you can not see its top. • vanishing point - is always on the Horizon Line. As things get closer to the Vanishing Point they get smaller and smaller until they appear to vanish. • orthogonal lines - lines that meet at the vanishing point • horizontal lines - lines that go from left to right • vertical lines - lines that go from the top to bottom of the page • parallel lines - Two or more straightlines or edges on the same plane that do not intersect. Parallel lines have the same direction.